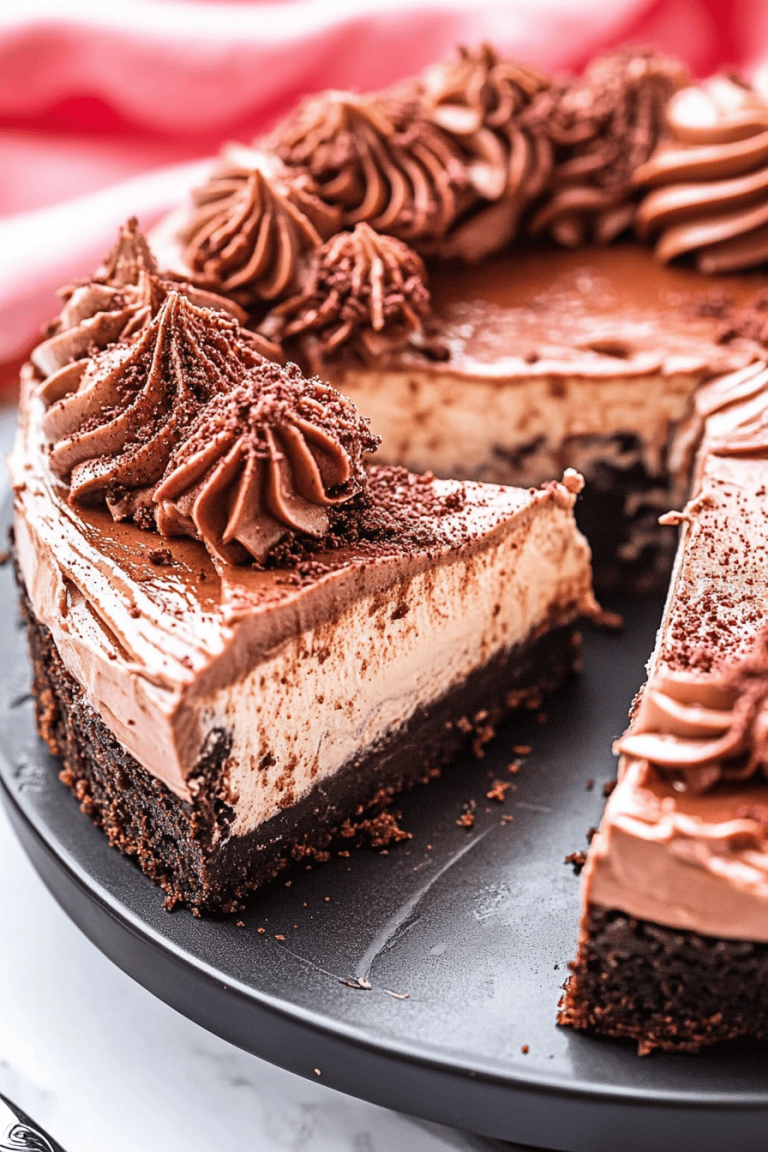
Do you ever find yourself daydreaming about that perfect dessert that hits all your favorite notes—rich, creamy, a touch of caramel, and a little chocolate crunch? That’s exactly what Samoa Cheesecake does for me. I still remember the first time I made it for my family; the house smelled like a bakery, and it disappeared faster than I could say “seconds, please!” It’s like if your favorite Samoa cookie and cheesecake had a delicious baby—creamy, indulgent, and absolutely unforgettable. Whenever someone asks me for my go-to dessert that feels fancy but isn’t a headache to make, this is the one I proudly share. If you love the idea of a classic cheesecake but crave that salty-sweet, coconut-chocolate twist, stick around—I’m about to share my all-time favorite Samoa Cheesecake recipe with you.
What is a Samoa cheesecake?
So, what exactly is Samoa Cheesecake? Think of it as a luscious cheesecake infused with the spirit of those iconic Samoa Girl Scout cookies—layers of caramel, toasted coconut, and gooey chocolate swirled into a creamy, dreamy base. It’s essentially a classic cheesecake but with a tropical, indulgent flair that transports you right to your childhood cookie jar. The name “Samoa” comes from those famous cookies that blend crispy coconut with caramel and chocolate, and this cheesecake captures that flavor combo in every bite. If you’re familiar with a plain cheesecake, this just takes it one step beyond with those playful, nostalgic flavors tucked inside, so it feels both familiar and like a sweet surprise. It’s the kind of dessert you want to dive into with your eyes closed, knowing every mouthful is a perfect mix of creamy, chewy, crunchy, and sweet.
Why you’ll love this recipe?
Here’s the deal—I don’t hand out recipes lightly. This Samoa Cheesecake quickly became a staple at holidays, weekend get-togethers, and honestly, random Tuesday nights when my sweet tooth demands attention. What I love most about this recipe is how it strikes the perfect balance between flavor and ease. The caramel and toasted coconut combo delivers a richness that feels special, but without making you feel like you need a PhD in baking to pull it off. It’s super straightforward with ingredients that most people already keep on hand or can easily find at your local grocery store without hunting for specialty items.
And about that flavor? It’s a snack, a dessert, and a conversation starter all in one. The cheesecake stays nice and creamy—never rubbery—with that golden crust complementing the smooth filling. The caramel gooeyness and chocolate drizzle bring extra layers of deliciousness that turn every forkful into a tiny celebration. If you’re a fan of other cheesecake variations, give my classic New York cheesecake or cookie crust raspberry swirl a try—they all have their charms, but this Samoa Cheesecake feels like a warm hug with a bit of sass.
What’s more, this recipe is budget-friendly! You don’t need any fancy gadgets, and even the caramel sauce can be homemade with just a few pantry staples. Plus, it’s perfect for sharing, but I won’t judge if you keep most of it for yourself—it’s that irresistible. Trust me, my kids actually ask for seconds before dinner sometimes (though I try to save them for dessert, of course). If you want something that feels luxe without breaking the bank, this one fits the bill perfectly.
How do I make Samoa cheesecake?
Quick Overview
At its core, this Samoa Cheesecake recipe is about layering flavors and textures carefully but without fuss. You start by creating a rich cream cheese base, fold in or swirl caramel and toasted coconut, then bake it gently until just set. The magic happens during the layering and glazing, where chocolate and caramel mingle, creating that signature Samoa look and taste. I love how simple it is to prep everything ahead of time—it’s truly one of those recipes where you can enjoy the process and still have time for a coffee break.
Ingredients
For the Main Batter:
- 16 oz cream cheese, softened (the fresher, the better for creaminess)
- 2/3 cup granulated sugar (adjust depending on your sweetness preference)
- 3 large eggs, room temperature (helps keep the texture smooth)
- 1 tsp vanilla extract, pure is best for depth
- 1/4 cup sour cream or Greek yogurt (adds that slight tang and softness)
For the Filling:
- 1 cup caramel sauce (store-bought or homemade—I’ll link my fave caramel recipe below)
- 3/4 cup toasted shredded coconut (watch it closely while toasting to avoid burning!)
- 1/2 cup chopped chocolate or chocolate chips (dark or milk, your call)
For the Glaze:
- 1/2 cup semi-sweet chocolate chips
- 2 tbsp heavy cream (or half-and-half if you want it lighter)
- Extra caramel sauce for drizzling
Step-by-Step Instructions
Step 1: Preheat & Prep Pan
Start by preheating your oven to 325°F (160°C). I always line my 9-inch springform pan with parchment paper at the bottom—makes cleanup sooo much easier! And spritz the sides with cooking spray or butter to ensure your cheesecake releases smoothly after baking. Setting up the pan right is half the battle, trust me.
Step 2: Mix Dry Ingredients
This recipe doesn’t call for much in the way of dry ingredients beyond sugar. I carefully blend the sugar with cream cheese at this stage. It’s crucial to beat them together until smooth, scraping the bowl often—I’ve learned this trick after too many lumps sneaked in before. The mixture should be silky, with no visible sugar grains.
Step 3: Mix Wet Ingredients
Beat in the eggs one at a time, mixing slowly after each addition to avoid air bubbles that can cause cracks later. Then stir in vanilla and sour cream or yogurt. I use yogurt sometimes to get a slight tartness that cuts through the sweetness—makes it glow. The batter will be creamy and dense but easy to spread.
Step 4: Combine
Bring everything together by gently folding in the toasted coconut and chopped chocolate, or save some for swirling and sprinkle on top later. The key here is NOT to overmix; otherwise, the cheesecake can get dense and dry. I usually stop as soon as I don’t see any dry bits, keeping everything light and fluffy.
Step 5: Prepare Filling
Warm your caramel sauce slightly if it’s thick—this makes it easier to swirl through the batter. If you like, fold some caramel into the batter or reserve it for layering. Toasting the shredded coconut until just golden (about 5 minutes in a dry pan) brings an amazing nutty aroma that screams “Samoa!” I always keep a close eye on the coconut; just a touch too dark can throw off the flavor.
Step 6: Layer & Swirl
Pour half the batter into the pan, then dollop half the caramel sauce across it. Use a knife or skewer to swirl the caramel gently through the batter without mixing it completely. Add a sprinkle of coconut and chocolate, then top with the rest of the batter. Repeat the swirling and sprinkle some coconut and chocolate over the top for that gorgeous, homemade look you’re aiming for.
Step 7: Bake
Bake the cheesecake in the middle rack for about 50-60 minutes. Don’t fret if the middle is a bit jiggly—that’s a sign it will set beautifully once cooled. I learned the hard way that opening the oven too often causes cracks, so resist that urge! After baking, turn off the oven, crack the door, and let the cheesecake rest in there for about an hour. This little trick saves it from sinking or cracking.
Step 8: Cool & Glaze
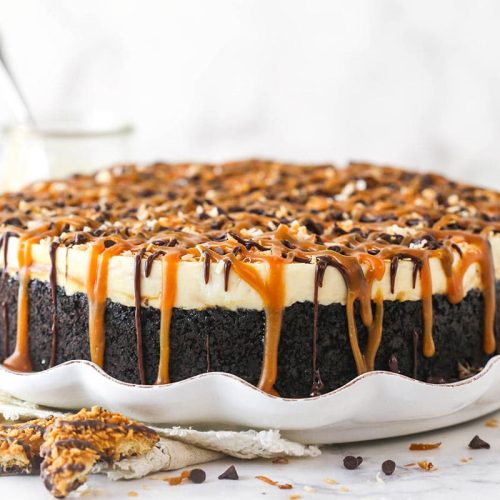
Once it reaches room temperature, apply your glaze. Melt the chocolate chips and cream together using a double boiler or microwave in 30-second bursts, stirring until smooth. Drizzle this over the cooled cheesecake, followed by a generous swirl of warm caramel sauce. The shine and rich chocolatey contrast make it look like you bought it at a fancy bakery, but shhh—it’s our secret.
Step 9: Slice & Serve
For clean slices, I dip my knife in hot water between cuts, wiping it dry—this keeps the edges sharp and pretty. I serve it chilled, but not ice-cold; let it sit out 10 minutes so the flavors can bloom. A little whipped cream or extra toasted coconut on the side really ups the experience at our house.
What to Serve It With
For Breakfast: I know, cheesecake for breakfast sounds decadent, but hey, sometimes you need a treat. Pair a small slice with a strong cup of black coffee or a creamy latte. The bitterness cuts through the caramel sweetness perfectly, and it feels like a cozy indulgence first thing in the morning.
For Brunch: When hosting friends, this cheesecake alongside a fresh fruit salad and sparkling mimosas instantly elevates the vibe. I’ll sometimes plate slices with a dollop of whipped cream and sprinkle on some toasted coconut for a fancy brunch feel without breaking a sweat.
As Dessert: It’s a natural champion here. After dinner, serve with a scoop of vanilla bean ice cream or just a drizzle of homemade caramel. If you want a sophisticated touch, a glass of dessert wine or rich coffee pairs beautifully—one of my signature dinner party moves.
For Cozy Snacks: Honestly, this cheesecake is a lifesaver on quiet evenings when my family just wants something sweet and comforting. Straight from the fridge, a small wedge and a mug of chai tea make for our version of a calm night in. It’s become such a ritual in our house.
Top Tips for Perfecting Your Samoa Cheesecake
Cheesecake Batter: Always bring your cream cheese and eggs to room temperature before mixing. I learned the hard way that cold ingredients clump and make lumps almost impossible to smooth out.
Mixing Advice: Be gentle after adding eggs—overmixing incorporates too much air, causing cracks. Use a spatula for folding in the coconut and chocolate; you want a nice swirl, not full mixing.
Swirl Customization: For a more dramatic marbling effect, try swirling the caramel in three or four layers rather than one big batch in the middle. Use a skewer to drag through each layer carefully, alternating directions.
Ingredient Swaps: If you’re avoiding dairy, I tested this with cream cheese made from almond milk—it surprisingly made the cheesecake even creamier! Also, feel free to swap out sweetened shredded coconut for unsweetened for less sugar, just add a touch of maple syrup to your caramel to balance it out.
Baking Tips: I always bake mine in a water bath for extra moisture and to prevent cracking, although it’s not mandatory. Make sure your water doesn’t seep into the pan—use foil to tightly wrap the bottom. And remember, a little jiggle in the center is perfect.
Glaze Variations: Sometimes I swap out the chocolate for white chocolate and add a sprinkle of toasted pecans for crunch. The glaze should be pourable but not runny—if it’s too thin, add more chocolate; if too thick, stir in a little more cream.
Storing and Reheating Tips
Room Temperature: If you’re eating it the same day, leaving it covered with a cake dome or cling film on the counter for up to 6 hours is fine, but keep it away from heat. The flavors meld nicely without the chill muting anything.
Refrigerator Storage: Store leftover cheesecake in an airtight container or tightly wrap it with plastic wrap and aluminum foil to lock in moisture. It keeps well for up to 4 days. I learned this when feeding a crowd—never had to toss a slice yet!
Freezer Instructions: For longer storage, wrap cheesecake slices individually in plastic wrap and place in a freezer-safe container or zip bag. It freezes beautifully for up to 3 months. Thaw overnight in the fridge to maintain texture. Avoid refreezing.
Glaze Timing Advice: If freezing, apply the chocolate glaze after thawing to avoid cracking or dulling. For fridge storage, glaze immediately after cooling—it stays shiny and adds the perfect finishing touch.
Frequently Asked Questions
Final Thoughts
Making this Samoa Cheesecake feels like sharing a piece of happiness—and it truly delivers. Every time I cut into it, the layers of caramel, coconut, and chocolate remind me why I love baking: it’s about creating moments that bring smiles and memories around the table. Whether you’re baking for your family, impressing friends, or just treating yourself after a long day, this cheesecake makes the whole process feel special without the stress. Give it a try, take your time swirling in those caramel ribbons, and savor how those classic Samoa cookie flavors turn into something uniquely cozy and unforgettable.
If you enjoy this, be sure to check out my other cheesecake favorites and cookie-inspired desserts—I love seeing how you make them your own! Don’t be shy: leave a comment, share your tweaks, or just tell me how many times you’ve gone back for seconds. Happy baking, and can’t wait to hear how your Samoa Cheesecake turns out!
Samoa Cheesecake
Ingredients
Main Ingredients
- 2.5 cups Oreo crumbs from about 25 Oreos, leave filling in the Oreos
- 5 tbsp unsalted butter melted
- 24 oz cream cheese room temperature
- 0.5 cup sugar
- 0.25 cup light brown sugar packed
- 1 tsp vanilla extract
- 0.5 tsp coconut extract
- 1 cup caramel sauce divided
- 1 cup vanilla wafer cookies broken in half
- 0.75 cup sweetened coconut flakes toasted
- 1.25 cups heavy whipping cream cold
- 0.5 cup powdered sugar
- 0.25 cup mini chocolate chips
- 0.25 cup sweetened coconut flakes toasted
- 3 oz semi-sweet chocolate chips
- 0.25 cup heavy whipping cream cold
- caramel sauce for drizzling
Instructions
Preparation Steps
- Line a 9-inch springform pan with parchment paper in the bottom and grease the sides.
- Combine Oreo crumbs and melted butter in a bowl. Press mixture into the bottom and up the sides of the springform pan. Chill in the fridge.
- Toast the sweetened coconut flakes in the oven at 350°F for 5-10 minutes, stirring every 2-3 minutes until lightly browned. Let cool.
- In a large bowl, beat cream cheese, sugar, and brown sugar until smooth. Mix in vanilla extract, coconut extract, and ½ cup caramel sauce.
- Fold in broken vanilla wafer cookies and toasted coconut flakes.
- In another bowl, whip heavy cream and powdered sugar until stiff peaks form. Gently fold whipped cream into cream cheese mixture in two parts.
- Spread one third of cheesecake filling over crust. Drizzle with ¼ cup caramel sauce and swirl with a knife carefully.
- Repeat layers with another third of filling and caramel sauce. Top with remaining cheesecake filling evenly spread. Chill 4-5 hours until firm.
- Remove cheesecake from pan. Garnish with mini chocolate chips and toasted coconut flakes.
- Make chocolate ganache: Microwave semi-sweet chocolate chips with ¼ cup heavy cream until smooth. Drizzle ganache and remaining caramel sauce on top.
- Store cheesecake covered in fridge; best eaten within 4-5 days.