I still remember the very first time I baked red velvet cupcakes — it was for a little birthday party, and honestly, I was a bit intimidated by all the fuss about their “perfect” red color and that velvety texture everyone’s always raving about. But when they came out of the oven, warm and glowing, the smell filled the kitchen with this rich blend of chocolate and buttermilk tang, and after that first bite, my family was hooked. These red velvet cupcakes aren’t just a pretty face; they bring a sort of nostalgic comfort that feels like a hug in cupcake form. I swear, they’re the kind of treat that disappears in minutes around here. They have this perfect balance between sweet and slightly tangy, and the cream cheese frosting is just the cherry on top. If you’ve ever loved classic chocolate cupcakes, wait till you try these — they’re softer, richer, and just a little bit more special. Honestly, I keep this recipe in heavy rotation because it’s quick enough for busy days but fancy enough for celebrations.
What is red velvet cupcake?
Think of red velvet cupcakes as chocolate cupcakes with a charming twist — they’re essentially a tender, moist cake with just enough cocoa to give a subtle chocolate hint, but what really sets them apart is their signature vivid red color and that distinct, slightly tangy richness from buttermilk and vinegar. The “velvet” part comes from their incredibly soft crumb that almost melts in your mouth. The story behind the name has a little mystery and a lot of Southern charm, but it basically means these cupcakes are smoother and silkier than your typical chocolate cake. They’re usually topped with a luscious cream cheese frosting — it’s creamy, a bit tangy, and perfectly sweetened to complement the cake’s flavor. If you’ve never made them at home, don’t worry — it’s easier than you think, and once you’ve tasted that first bite, you’ll know why they’ve become a classic.
Why you’ll love this recipe?
What I love most about these red velvet cupcakes is how they manage to feel both indulgent and approachable at the same time. The flavor hits just right — a subtle chocolate undertone with that magical cream cheese frosting that nearly steals the show. It’s not too sweet, but it’s definitely comforting, which is why my kids actually ask for seconds (and sometimes thirds!). The simplicity of this recipe is another huge win — I’m talking straightforward ingredients, no fancy stuff, and a quick process that doesn’t demand hours in the kitchen. You can whip these up for a last-minute celebration or a cozy weekend bake without breaking a sweat. Plus, they’re so budget-friendly; a handful of pantry staples and a small cream cheese block go a long way. You can jazz them up with simple tweaks too — like swapping out classic cream cheese frosting for a lighter whipped version or adding a little citrus zest for a subtle brightness. I’ve also tested almond milk as a replacement for buttermilk here, and it made the cupcakes even creamier! Whether you want to surprise your friends or just treat yourself on a quiet afternoon, these cupcakes deliver that perfect dose of homemade love. If you’re into classic chocolate or vanilla cupcakes, give this one a try—you might find your new favorite.
How do I make Red Velvet Cupcakes?
Quick Overview
This recipe is about mixing two simple batters — the cocoa-spiked red velvet base and the dreamy, tangy cream cheese frosting — and assembling a batch of cupcakes that bake up light, fluffy, and irresistibly moist. It’s straightforward, with just a few special touches like vinegar and buttermilk that add that signature lift and subtle tang. Don’t worry if you haven’t worked with vinegar in cakes before; trust me, you won’t taste it, but it makes all the difference to texture. With just one bowl for the wet and another for the dry ingredients, it’s a breeze to bring together, and I’m betting you’ll be amazed at how the color and flavor develop during baking.
Ingredients
For the Main Batter:
- 1 1/4 cups all-purpose flour — I prefer sifting it for lighter cupcakes
- 1 tablespoon unsweetened cocoa powder — this gives just a subtle chocolate hint without overpowering
- 1/2 teaspoon baking soda — key for that airy crumb
- 1/4 teaspoon salt — balances flavor
- 1/2 cup unsalted butter, softened — room temp butter works wonders here for creaminess
- 1 cup granulated sugar — not too much, so your cupcakes aren’t cloyingly sweet
- 2 large eggs — make sure they’re at room temp for the best blend
- 1 cup buttermilk — classic tang and moisture; if you’re out, mix 1 cup milk + 1 tablespoon vinegar, let sit 5 minutes
- 1 tablespoon vanilla extract — pure vanilla always
- 1 tablespoon white vinegar — trust me, it keeps things tender and bright
- 2 tablespoons red food coloring — the star of the show! I use gel food coloring for vibrant color without extra liquid
For the Filling:
- 8 ounces cream cheese, softened — it’s the velvety heart of the cupcake
- 1/3 cup granulated sugar — dissolve well for smooth texture
- 1 teaspoon vanilla extract — to deepen flavor
For the Frosting:
- 8 ounces cream cheese, softened
- 1/2 cup unsalted butter, softened
- 3–4 cups powdered sugar — adjust for desired sweetness and thickness
- 1 teaspoon vanilla extract
- 1-2 tablespoons heavy cream or milk — for spreadable glaze consistency
Step-by-Step Instructions
Step 1: Preheat & Prep Pan
Preheat your oven to 350°F (175°C). Line a standard 12-cup muffin tin with cupcake liners — I like sturdy paper liners to hold the shape well. If you need a little extra insurance against sticking or sogginess, a quick spritz of non-stick spray before placing liners does the trick.
Step 2: Mix Dry Ingredients
In a medium bowl, sift together the flour, cocoa powder, baking soda, and salt. This step helps distribute the cocoa evenly and keeps your cupcakes tender and light. I always give these a quick whisk together to avoid any clumps or uneven baking spots.
Step 3: Mix Wet Ingredients
In a large bowl, cream the softened butter and sugar together until light and fluffy — this usually takes about 3-4 minutes with an electric mixer. Then, add eggs one at a time, beating well after each addition. Next, stir in the vanilla, buttermilk, vinegar, and food coloring. The batter will look rich and glossy, with a deep red color starting to blossom—it’s so satisfying to see.
Step 4: Combine
Gradually add the dry ingredients to the wet, mixing gently on low just until combined. Don’t over-mix here — you want a smooth, velvety batter, but overdoing it can cause dense cupcakes. The batter should fall off your spoon in thick ribbons and look silky.
Step 5: Prepare Filling
While the batter rests briefly, whip together the filling ingredients — cream cheese, sugar, and vanilla — until smooth. This creamy center will surprise your guests and add that extra rich touch.
Step 6: Layer & Swirl
Fill each cupcake liner halfway with red velvet batter, then add about a teaspoon of cream cheese filling in the center, and top with more batter until the cupcake liner is two-thirds full. Don’t worry if some filling peeks out — that swirl of white against the red batter is part of the charm.
Step 7: Bake
Bake for about 18–22 minutes, rotating the pan halfway through to ensure even baking. You’ll know they’re ready when a toothpick inserted in the cake part (not the filling) comes out clean or with just a few moist crumbs. Letting them overbake just a touch can dry out the cupcake, so keep a close eye.
Step 8: Cool & Glaze
Remove from the oven and let cupcakes cool in their pan for 10 minutes, then transfer to a wire rack. The smell at this point is pure magic. Once fully cooled, whip up your frosting until fluffy, adding cream a tablespoon at a time to get that perfect spreadable consistency. Dollop or pipe generous swirls on top of each cupcake. If you want, sprinkle with a few red velvet crumbs or festive sprinkles for visual delight.
Step 9: Slice & Serve
This is the fun part — slice one open to reveal the creamy center or just bite right in! Serve these at room temperature to get the best flavors and textures. I find they’re delightful paired with a cold glass of milk or a steaming cup of coffee, depending on your craving.
What to Serve It With
For Breakfast: Nothing beats starting the day with a little sweetness, right? Pair your red velvet cupcakes with a rich, dark roast coffee or a vanilla latte — the bitterness cuts through the frosting’s sweetness beautifully. Serve them alongside fresh berries or a dollop of Greek yogurt for balance. It’s indulgent but feels a little like a treat for grown-ups.
For Brunch: These cupcakes can be the centerpiece of a bright and cheerful brunch spread. I like to arrange them on a pretty cake stand with colorful garnishes like edible flowers or a dusting of powdered sugar. Serve with sparkling water infused with lemon or mimosas if you’re feeling festive — they bring out the cake’s tartness and creaminess.
As Dessert: For after-dinner elegance, these cupcakes shine with a drizzle of dark chocolate sauce or a few fresh raspberries on the side. Coffee or black tea works perfectly here, providing a warm counterpoint to the rich frosting. My family often grabs these right after dinner, and they’ve become our little celebration staple.
For Cozy Snacks: When I want something sweet but easy, I’ll pop one of these next to my afternoon cup of tea or hot chocolate. Sometimes, I warm them gently in the microwave for just 10 seconds—the frosting softens just right, making the whole cupcake meltier and way harder to resist.
Honestly, these cupcakes have a way of fitting into every moment — from casual weekday treats to special family gatherings. It’s become a little tradition in my house to make a batch whenever someone needs a pick-me-up.
Top Tips for Perfecting Your Red Velvet Cupcakes
Food Coloring Choice: I recommend gel or paste food coloring because it’s more concentrated and you don’t risk thinning your batter — liquid food coloring can sometimes mess with the texture. Plus, a good gel gives that iconic, vibrant red every time.
Mixing Technique: When combining wet and dry ingredients, mix just until you don’t see dry flour anymore. Overmixing can make the cupcakes tough instead of tender. I’ve learned that the batter should look satiny but not glossy — this visual cue helps me stop at the right moment.
Filling Swirls: To get that pretty cream cheese swirl, try layering: cupcake batter, then filling, then more batter. It’s tempting to fully mix the filling in, but leaving it distinct keeps the texture interest and the delightful surprise bite at the center.
Butter and Cream Cheese Temperature: Both for filling and frosting, make sure they’re soft but not melted. Too cold, and mixing will be lumpy; too warm, and they get runny and lose structure. Room temperature is your best friend here.
Oven Calibration: Every oven is a little different. I keep tabs on my cupcakes starting at 18 minutes and poke with a toothpick every couple of minutes after that. If you have a convection oven, reduce temperature slightly and keep a close eye so the tops don’t brown too fast.
Ingredient Swaps: You can swap buttermilk for plain yogurt thinned with milk in equal parts — I’ve done this when I forgot to buy buttermilk, and the texture was still spot on. For dairy-free options, almond or oat milk with 1 tablespoon vinegar makes a decent substitute, though the flavor won’t be quite as tangy but still delicious.
Glaze Variations: Want a twist? Try mixing in a little lemon zest or a teaspoon of espresso powder to your cream cheese frosting — these subtle shifts add extra depth and keep things interesting. Don’t be shy to experiment a little; sometimes the simplest changes make these cupcakes feel brand new.
Storing and Reheating Tips
Room Temperature: These cupcakes do beautifully at room temp — I usually leave them out covered with a cake dome or in an airtight container for up to two days. This keeps the cake soft and the frosting creamy without drying out.
Refrigerator Storage: If you’re storing longer than two days, pop them in the fridge in an airtight container. The cream cheese frosting benefits from chilling, but take the cupcakes out about 20 minutes before serving so they soften up and the flavors come alive again.
Freezing Instructions: These freeze well too, which is a lifesaver for busy days. Wrap each cupcake tightly in plastic wrap, then place them in a freezer-safe bag or container. Freeze for up to 3 months. Thaw overnight in the fridge, then bring to room temp before eating. I usually frost them after thawing to keep the frosting texture perfect.
Glaze Timing Advice: If you need to freeze unfrosted cupcakes, do so before glazing. For refrigerated or room temp storage, frost right before serving – that way, your frosting looks fresh and silky, not dried out or cracked.
Frequently Asked Questions
Final Thoughts
There’s something truly comforting about red velvet cupcakes — they feel like a little celebration wrapped in every bite, with a perfect sprinkle of sweetness and just enough creaminess from the frosting to keep everyone coming back for more. I’ve made these countless times, and honestly, the best part is how easy they come together without fuss, yet always impress. Whether it’s a weeknight treat or a fancy party dessert, these cupcakes deliver warmth, nostalgia, and that unmistakable “wow” factor without complicated steps. I’d love for you to give them a try — maybe tweak them a little, add your own twist, or just enjoy them as they are with someone special. Don’t hesitate to come back and share how your batch turns out — I bet it’ll make your kitchen smell just as amazing as mine! Happy baking, and here’s to sweet moments everyone can share.
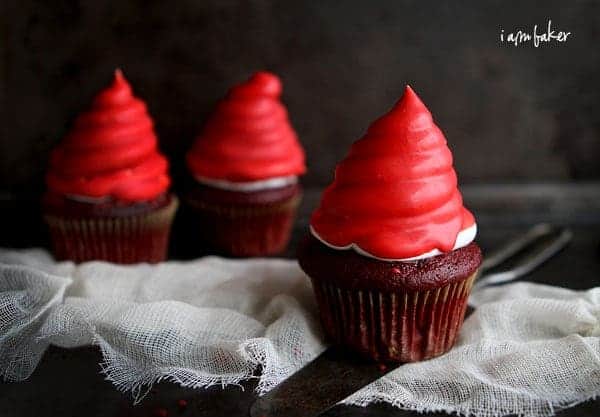
red velvet cupcakes
Ingredients
Main Ingredients
- 3.5 cups cake flour
- 0.75 cup unsalted butter (softened)
- 2.5 cups granulated sugar
- 3 large eggs room temperature
- 5 tablespoons red food coloring
- 3 tablespoons unsweetened cocoa powder
- 2 teaspoons vanilla extract
- 1 teaspoon salt
- 1.5 cups buttermilk room temperature
- 2 teaspoons cider vinegar
- 1.5 teaspoons baking soda
Seven Minute Frosting
- 2.5 cups granulated sugar
- 6 large egg whites room temperature
- 0.5 cup water
- 0.5 teaspoon cream of tartar
- 2 teaspoons pure vanilla extract
Instructions
Preparation Steps
- Preheat oven to 350°F. Line 2 cupcake pans with cupcake liners.
- In a small bowl, sift the cake flour and salt; set aside.
- In a large bowl, cream the softened butter and granulated sugar with an electric mixer until very light and fluffy, about 5 minutes.
- Add eggs one at a time, beating well after each addition.
- In a small bowl, whisk together the red food coloring, cocoa powder, and vanilla extract. Add to the batter and beat well.
- Add the buttermilk to the batter in three parts alternating with the flour mixture, beating on medium-low speed until ingredients are incorporated.
- In a small bowl, stir together cider vinegar and baking soda. Add to batter and mix well. Scrape down the bowl to make sure ingredients are well blended and smooth.
- Divide the batter evenly among the prepared cupcake pans, using an ice cream scoop if desired.
- Bake cupcakes for 17 to 20 minutes. Cupcakes are done when gently pressed and spring back or when a toothpick inserted comes out with a few crumbs.
- Cool cupcakes in pan for 10 minutes, then remove and cool completely before adding frosting.
- For frosting: Place a saucepan with a couple inches of water on the stove and bring to a slow boil.
- In a heat-safe bowl, whisk together room temperature egg whites, sugar, water, and cream of tartar until frothy.
- Set the bowl over the simmering water and whisk continuously until sugar dissolves, about 5 minutes.
- Transfer mixture to an electric mixer and beat on high speed for about 10 minutes, add vanilla extract and continue beating for another 5 minutes.
- Use frosting immediately. If piping, place frosting into a pastry bag and pipe onto the cooled cupcakes.