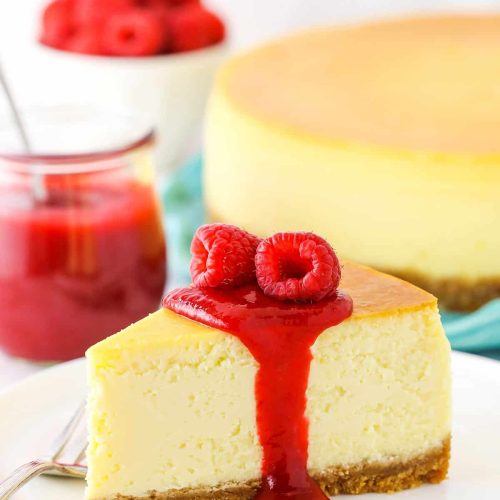
There’s something about the smell of a New York Cheesecake baking in the oven that instantly takes me back to cozy Sunday afternoons at my grandmother’s house. The rich, tangy aroma swirling with that buttery crust feels like a warm hug you didn’t know you needed. I remember my kids’ eyes lighting up the second I pulled it out of the oven, already plotting who’d snag the biggest slice. Unlike your average dessert, this New York Cheesecake has this creamy, dense charm that makes it feel like a special occasion—even if I whipped it up on a regular Tuesday. If you’re used to lighter mousses or fluffy cakes, think of this as the grown-up, seriously luxurious cousin: all about indulgence without fuss. Trust me, once you try this, you’ll see why it’s not just a dessert but a bona fide celebration on a plate.
What is New York cheesecake?
Alright, here’s the lowdown in the simplest terms: New York Cheesecake is essentially the kingpin of cheesecakes. It’s thick, creamy, and famously rich thanks to that signature use of cream cheese, heavy cream, and eggs. The name traces back to, of course, New York City, where many credit the original recipe to cafes that perfected this velvety treat in the early 20th century. Think of it as a dense, smooth block of sweet heaven that’s neither too fluffy nor too dry—but right in that magical middle ground where every bite just melts away. It’s closer to a custard than your traditional sponge cake. And that golden-brown top? That’s pure caramelized goodness that gives it a slight, irresistible tang. The crust usually comes from graham crackers, which brings a rustic crunch to all that silky decadence.
Why you’ll love this recipe?
What I find so endearing about this New York Cheesecake is how it hits that perfect trifecta: wow-worthy flavor, crazy simplicity, and wallet-friendly ingredients. The flavor? Oh, it’s like a smooth, creamy dance of tangy cream cheese paired with subtle vanilla and just enough sugar to keep it decadently sweet without going overboard. When I serve this, the first comment I usually get is about how it tastes like it took all day to make, but here’s the secret—it doesn’t. Seriously, it’s straightforward: simple pantry staples you likely already have, and no fancy equipment necessary. Actually, I tested this with various brands of cream cheese, and a good quality one makes a noticeable difference—so don’t skimp there! The best part? This cheesecake doubles as everything—from an elegant dinner party showstopper to a casual family treat after school. You can throw berries on top, drizzle caramel, or keep it classic with a dusting of powdered sugar. One time, I even swapped in almond milk with great success, making it a little more luscious and perfectly creamy.
How do I make New York cheesecake?
Quick Overview
Making this cheesecake is all about layering with love and patience, but don’t let that scare you. You start by prepping your crust, then whip the batter until it’s silky, finally baking low and slow for that iconic dense yet tender texture. The best part? Once you get your oven temp right and the batter mixed just so, the rest practically takes care of itself. This recipe needs no fancy water baths or super long cooling times to get that perfect slice, which has saved me more than once on busy weeknights.
Ingredients
For the Crust:
- 1 12 cups graham cracker crumbs (I love the honey-flavored ones—they add a subtle depth)
- 5 tablespoons unsalted butter, melted (use real butter for that true richness)
- 2 tablespoons granulated sugar
For the Filling:
- 4 (8-ounce) packages cream cheese, softened (room temp is key for smooth mixing)
- 1 ¼ cups granulated sugar
- 1 teaspoon pure vanilla extract
- 4 large eggs
- 2/3 cup heavy cream (for that extra silkiness, I sometimes sub with half-and-half for a lighter version)
- 1 tablespoon all-purpose flour (just a touch for that extra structure)
For the Glaze (optional):
- 1 cup sour cream
- 2 tablespoons powdered sugar
- 1 teaspoon vanilla extract
Step-by-Step Instructions
Step 1: Preheat & Prep Pan
Preheat your oven to 325°F (160°C). I always line the bottom of my 9-inch springform pan with parchment paper to avoid any sticky disasters, then grease the sides lightly with butter or non-stick spray. If you have one, a springform pan is hugely helpful here—it just makes unmolding the cheesecake so much easier and looks spotless.
Step 2: Mix Dry Ingredients
Grab a bowl and toss in your graham cracker crumbs and sugar, then pour in the melted butter. Stir everything together till it looks like damp sand. This crust’s texture should be loose but clumpy enough to hold shape—if it’s too dry, add a bit more butter, but be careful not to overdo it.
Step 3: Mix Wet Ingredients
In a large bowl, beat your softened cream cheese with an electric mixer on medium speed until smooth and creamy—no lumps! Slowly add sugar and vanilla, mixing well after each addition. Then add the eggs one by one, beating just enough to combine but not overmix (overbeating can cause cracks). Finish by pouring in the heavy cream and whisk lightly. Your batter should be velvety and thick, almost like a custard.
Step 4: Combine
Give the batter one last gentle whisk to make sure everything is incorporated, then stop. This part trips up a lot of people—the trick is avoiding overmixing, which introduces too much air and leads to cracking. Less is more here, trust me.
Step 5: Prepare Filling
Pour your graham cracker crust mix into the prepared pan, spreading it evenly and pressing firmly along the bottom and slightly up the sides. Then pour your cream cheese batter on top, smoothing carefully with a spatula. If you want to get fancy, you can gently tap the pan on the counter to release any hidden air bubbles.
Step 6: Layer & Swirl
If you’re going with the glaze, whisk thoroughly then dollop it over the batter. Use a knife or toothpick to swirl the sour cream topping in gentle circles, giving a pretty marbled effect on top that just adds to the homemade charm. This swirl not only looks incredible but adds a subtle tang that balances the sweetness beautifully.
Step 7: Bake
Place your pan on the middle rack and bake for about 60 – 70 minutes. You want the edges to be set but the center should still jiggle slightly when you shake the pan lightly. It’s that perfect “just done” consistency that sets as it cools. If your oven has hot spots, rotate the pan halfway through baking to avoid browning unevenly.
Step 8: Cool & Glaze
Once out of the oven, let the cheesecake cool completely on a wire rack before chilling in the fridge for at least 4 hours, ideally overnight. This chilling is the real secret to cutting clean, perfect slices. If you skipped the earlier glaze step, this is when you can spread a simple sour cream or fruit topping just before serving.
Step 9: Slice & Serve
For the cleanest slices, dip your knife in hot water and wipe dry between each cut—this little trick keeps edges smooth without sticking. Serve chilled or at room temperature with fresh berries, a drizzle of honey, or even a dollop of whipped cream. My kids swear by adding a handful of raspberry coulis on the side—it’s their favorite way to jazz it up.
What to Serve It With
For Breakfast: A cup of strong black coffee or a frothy cappuccino pairs beautifully, making those weekend lazy mornings just a bit more special. Try adding a few slices of fresh fruit to the plate for a morning boost.
For Brunch: Plate slices alongside light egg dishes like a veggie frittata or smoked salmon to balance the richness. A glass of sparkling rosé or a mimosa gives it a celebratory vibe without overpowering the cheesecake’s delicate flavor.
As Dessert: This is where the cheesecake really shines—top with macerated strawberries or a drizzle of warm caramel sauce. A dollop of homemade whipped cream with a sprinkle of cinnamon really elevates the experience, making guests think you went the extra mile.
For Cozy Snacks: When the afternoon slump hits, a thick slice with a cup of chai tea or hot cocoa is pure comfort. I keep frozen blueberries on hand to sprinkle on top; the contrast of cold berries and creamy cheesecake is one of my favorite spontaneous indulgences.
This recipe has been a staple in my family for years—not only because it’s consistently delicious but because it brings people together. Whether it’s a casual Tuesday or a holiday feast, it always earns the “Wow, you made this?” response, which is exactly why I keep making it.
Top Tips for Perfecting Your New York Cheesecake
Cream Cheese Prep: Make sure your cream cheese is at room temperature. Cold cream cheese leads to lumpy batter, and no one wants that texture. I’ve learned to let it sit out at least an hour before mixing.
Mixing Advice: Beat your cream cheese and sugar until completely smooth before adding eggs. Add eggs one at a time and mix just until combined—overmixing introduces air that leads to cracks. This was a game-changer for me after many failed cheesecakes!
Swirl Customization: If you’re feeling artistic, go slow when swirling the glaze to create beautiful marble patterns. Quickly scribbling or dragging the tip leads to messy puddles rather than pretty designs.
Ingredient Swaps: You can substitute sour cream for heavy cream for a slightly tangier flavor. I once swapped part of the sugar for honey for a floral note, but reduce liquids slightly to keep texture balanced.
Baking Tips: Avoid opening the oven door too often during baking—it disturbs the temperature and can cause cracking. Plus, positioning your rack in the middle ensures even heat distribution. If the edges brown too quickly, tent with foil.
Glaze Variations: Feel free to skip the sour cream topping or replace it with berry jam or Nutella for different flavors. When I’m in a hurry, just a dusting of powdered sugar and fresh fruit works wonders.
This recipe looks intimidating but after dozens of bakes, I promise it gets easier—and every batch feels like a little achievement. The few extra steps are totally worth that first silky bite.
Storing and Reheating Tips
Room Temperature: If you plan to eat it within a day, you can leave the cheesecake out covered loosely with foil. It stays fresh for about 8 hours, but don’t leave it out longer; cream cheese can spoil quickly.
Refrigerator Storage: Always store your cheesecake in an airtight container or tightly wrapped in plastic wrap to keep it moist and prevent it from absorbing fridge odors. It keeps beautifully for up to 5 days—though I’d be surprised if it lasts that long!
Freezer Instructions: Cheesecake freezes wonderfully. Wrap tightly in plastic wrap and then foil, or place in a freezer-safe container. It can be frozen for up to 2 months. Thaw overnight in the fridge before serving and avoid microwaving, which can ruin the texture.
Glaze Timing Advice: If freezing, skip the glaze—add it fresh after thawing for the best texture and flavor. If storing in fridge for a few days, add glaze before storing or just before serving depending on your preference.
Frequently Asked Questions
Final Thoughts
If there’s one dessert I’ve found that never gets old, it’s this New York Cheesecake. It’s got that perfect balance of creamy and dense, tangy and sweet—a real crowd-pleaser that feels like a cozy family hug on a plate. I can’t count how many times this recipe has rescued me for celebrations, last-minute guests, or just a quiet night craving something sweet yet comforting. Plus, it’s forgiving enough for nearly any home cook to tackle, with a few little tricks that make it shine every time. If you’re a cheesecake fan, I’d encourage you to also try a chocolate swirl or pumpkin cheesecake for a twist on the classic—once you’ve nailed this base, the possibilities are endless. I hope you have as much fun making it as I’ve had sharing it. Happy baking, and can’t wait to hear how yours turns out!
New York Cheesecake
Ingredients
Main Ingredients
- 1.75 cups graham cracker crumbs
- 6 tbsp salted butter, melted
- 2 tbsp sugar
- 40 oz cream cheese, room temperature five 8 oz packages
- 1.75 cups sugar
- 3 tbsp all purpose flour
- 1 tsp lemon zest
- 4 tsp vanilla extract
- 0.5 cup heavy cream
- 5 large eggs room temperature
- 2 large egg yolks room temperature
Instructions
Preparation Steps
- Preheat oven to 325°F. Line a 9-inch springform pan with parchment paper on the bottom and grease the sides.
- Combine graham cracker crumbs, melted butter and sugar. Press firmly onto the bottom of the springform pan to form crust.
- Bake crust for 8 to 10 minutes, then remove from oven and let cool.
- Wrap outside of springform pan with aluminum foil to protect from water bath. Set aside.
- Reduce oven temperature to 300°F (148°C).
- In a large bowl, beat cream cheese, sugar, and flour on low speed until smooth and combined. Scrape down bowl sides as needed.
- Add lemon zest and vanilla extract and mix on low speed until incorporated.
- Add the heavy cream and mix on low speed until well combined.
- Add eggs and egg yolks one at a time, mixing slowly to combine after each addition. Scrape bowl sides to ensure even mixing.
- Pour batter into prepared crust, filling the pan fully.
- Place springform pan inside a larger pan and add warm water halfway up the sides of the springform pan, ensuring water does not overflow the foil.
- Bake for about 2 hours until edges are set and center is slightly jiggly.
- Turn off oven and keep door closed for 30 minutes to slowly cool the cheesecake.
- Crack oven door open and let cheesecake cool for another 30 minutes to prevent cracking.
- Remove cheesecake from oven and water bath. Refrigerate for 5-6 hours or overnight until firm.
- Remove cheesecake from springform pan and transfer to serving plate. Keep refrigerated until serving.
- Serve with your favorite toppings. Best eaten within 5 days when properly covered.