Oh, cornbread. Just the word itself brings back a flood of memories for me. It’s that warm, golden hug in a pan that just makes everything feel a little bit better. I remember my Grandma Elsie making it every Sunday after church. The smell would waft through the house, a sweet, toasty aroma that meant good food and even better company was coming. It wasn’t fancy, not by any stretch of the imagination, but it was *perfect*. I’ve tinkered with tons of cornbread recipes over the years, searching for that perfect balance of sweet and savory, that tender crumb that isn’t dry or crumbly. This cornbread recipe, my friends, is the one. It’s the one I whip up when friends are coming over last minute, the one that soothes a chilly evening, and honestly, the one my kids request even when they’re being picky eaters. It’s like the reliable friend in your recipe box – always there, always delicious, and never lets you down. Forget those boxed mixes; this homemade cornbread recipe is so surprisingly simple and tastes leagues better. It’s truly my favorite cornbread recipe, and I can’t wait to share it with you.
What is your favorite comforting cornbread recipe?
So, what exactly *is* this beloved cornbread recipe? At its heart, it’s a classic American quick bread, meaning it uses a leavening agent like baking powder or baking soda to rise, rather than yeast. Think of it as a golden, tender cake that’s made with cornmeal, giving it that unmistakable texture and slightly sweet, earthy flavor. It’s not your super-sweet, cake-like dessert cornbread, nor is it the ultra-savory, almost biscuit-like kind. It sits somewhere beautifully in the middle, a perfect balance that makes it incredibly versatile. The name “cornbread” itself tells you exactly what you’re getting: bread made with corn. But the magic really happens in the ratios and the little touches I’ve picked up over the years. It’s essentially a simple batter that bakes up into a golden, delightful loaf that smells like pure comfort.
Why you’ll love this recipe?
What are some of my favorite cornbread recipes?flavorIs this a good, subtle sweetness from cornmeal and a touch of sugar,simplicity. Seriously, if you can stir things together in a couple of bowls, you can make this! It’s a lifesaver on busy weeknights when you need a quick side dish or even a snack. No complicated steps, no fancy equipment. Just pure, delicious results with minimal effort. And let’s talk about cost-efficiency. The ingredients are pantry staples: flour, cornmeal, eggs, milk, butter, sugar, baking powder. You probably have most of them already! It’s a fraction of the cost of store-bought, and the taste is exponentially better. Plus, the versatility is off the charts. I’ll get to more serving ideas later, but this cornbread is amazing with chili, BBQ, fried chicken, or even slathered with butter and honey all on its own. What I love most about this recipe is that it always turns out. I’ve made it countless times, and it never fails to impress. It’s the kind of recipe that makes you feel like a baking rockstar, even if you’re just starting out. It’s a reliable go-to that delivers pure deliciousness every single time.
How to Make My Go-To Comforting Cornbread
Quick Overview
This cornbread recipe is all about gentle mixing and getting that perfect golden crust. We’ll start by preheating our oven and greasing our pan, then whisk together the dry ingredients, followed by the wet. Combine them just until they come together, pour into the prepared pan, and bake until golden brown and a toothpick comes out clean. That’s it! The key is not to overmix, which ensures a tender crumb, and using a well-heated pan for that lovely crispy edge. It’s incredibly straightforward and yields a consistently delicious result.
Ingredients
For the Main Batter:
You’ll need all-purpose flour – about 1 ½ cups. It gives the cornbread structure. And of course, the star: yellow cornmeal. I like to use medium-grind cornmeal for a nice texture; about 1 cup. Make sure it’s fresh – old cornmeal can taste a bit dusty! For leavening, we’re using baking powder, 2 teaspoons, to make sure it’s nice and fluffy. A half teaspoon of salt is crucial for balancing the flavors. Now for the wet ingredients: 2 large eggs, lightly beaten. They bind everything together and add richness. About 1 cup of milk; whole milk gives the best richness, but I’ve tested this with 2% and even a non-dairy alternative like almond milk, and it still turns out wonderfully creamy! And a half cup of melted unsalted butter. Don’t skimp here; butter is flavor! Lastly, about ¼ cup of granulated sugar. This adds just a touch of sweetness to complement the cornmeal, but feel free to adjust it a bit based on your preference.
For the Filling:
This is optional, but oh-so-good! I love to add about ½ cup of something extra. My favorite is shredded sharp cheddar cheese for a cheesy bite. You could also do a handful of fresh or frozen corn kernels, or even some chopped pickled jalapeños if you like a little heat! Just make sure whatever you choose is prepped and ready to go.
For the Glaze:
This is my little secret for an extra touch of decadence! It’s optional but highly recommended. You’ll need about ¼ cup of honey or maple syrup, warmed slightly. And a tablespoon or two of melted butter. That’s it! It creates a beautiful sheen and adds a wonderful layer of flavor.
Step-by-Step Instructions
Step 1: Preheat & Prep Pan
First things first, let’s get that oven heated up to 400°F (200°C). While it’s preheating, grab your baking pan. A 9-inch cast iron skillet is my absolute favorite for cornbread because it gets super hot and gives you the most incredible crispy edges. If you don’t have cast iron, a regular 9-inch round or square baking pan will work just fine. Grease it really well with butter or cooking spray, or even better, add a tablespoon of butter to your cast iron skillet and pop it in the preheating oven for a few minutes until it’s hot. This makes sure the cornbread doesn’t stick and gets that amazing crust.
Step 2: Mix Dry Ingredients
In a large mixing bowl, whisk together your flour, cornmeal, baking powder, and salt. Make sure everything is well combined. You want to distribute the leavening agent evenly so you don’t get pockets of it in your finished cornbread. I like to give it a good whisk for about 30 seconds to aerate it a bit, which also helps with a lighter texture.
Step 3: Mix Wet Ingredients
In a separate medium bowl, whisk together your eggs until they’re lightly beaten. Then, stir in your milk and melted butter. If you’re adding sugar to the wet ingredients (some people prefer to do this, though I usually add it with the dry), stir it in now until it’s mostly dissolved. You want everything to be well combined and smooth.
Step 4: Combine
Now, pour the wet ingredients into the bowl with the dry ingredients. Using a spatula or a wooden spoon, mix everything together *just* until it’s combined. This is super important! You’ll still see a few lumps, and that’s perfectly okay. Overmixing the batter will develop the gluten in the flour, leading to a tough, rubbery cornbread, and nobody wants that. We’re going for tender and crumbly, not chewy. If you’re adding any optional fillings like cheese or corn kernels, gently fold them in now.
Step 5: Prepare Filling
If you’re adding any optional mix-ins like shredded cheese, corn kernels, or diced jalapeños, have them ready. Just make sure they’re drained well if they’re wet (like jalapeños). You’ll gently fold these into the batter right before pouring it into the pan.
Step 6: Layer & Swirl
Carefully remove your hot skillet (or baking pan) from the oven. If you’ve preheated butter in the skillet, it should be sizzling slightly. If not, add a tablespoon of butter and let it melt. Pour the batter evenly into the hot pan. It should sizzle slightly as it hits the hot pan, which is a good sign! If you’re using any kind of swirl for visual appeal, now is the time to do it with a toothpick or skewer, but for this classic recipe, just get it into the pan.
Step 7: Bake
Place the pan into your preheated oven. Bake for about 20-25 minutes. You’ll know it’s ready when the top is golden brown and a toothpick inserted into the center comes out clean. The edges should be slightly pulled away from the sides of the pan. Keep an eye on it; ovens can vary!
Step 8: Cool & Glaze
Once it’s baked to perfection, carefully remove the cornbread from the oven. Let it cool in the pan for about 10 minutes. This allows it to set up properly. While it’s cooling, gently warm your honey or maple syrup and stir in the melted butter for the glaze. Once the cornbread has cooled slightly, drizzle this luscious glaze all over the top. It soaks in and adds an incredible sheen and flavor boost.
Step 9: Slice & Serve
After the glaze has had a moment to soak in, carefully invert the cornbread onto a wire rack or a serving plate if you used a non-stick pan. If you baked it in a cast iron skillet, you can also serve it right from the skillet, which is always a crowd-pleaser! Slice into wedges using a serrated knife for clean cuts. Serve it warm and enjoy the incredible aroma and taste!
What to Serve It With
This cornbread recipe is honestly a chameleon when it comes to pairings. For Breakfast, I love a warm slice with a smear of butter and a drizzle of honey. It’s hearty enough to keep you going but sweet enough to feel like a treat. It also makes a fantastic accompaniment to scrambled eggs or bacon. When it comes to Brunch, it feels a little more elegant. I often serve it alongside a frittata or some smoked salmon. A small dollop of sour cream or Greek Yogurt on top can be lovely. For a simple yet satisfying Dessert, especially when you’re craving something sweet at 10pm but don’t want to bake a whole cake, a warm slice with a scoop of vanilla ice cream is pure bliss. The contrast of the warm, slightly savory cornbread with cold, creamy ice cream is divine. And for those really Cozy Snacks, there’s nothing better than a thick slice with a glass of cold milk. My family also loves it crumbled over a bowl of hearty soup, especially on a chilly evening. It’s the perfect textural contrast and adds such a comforting element to a simple meal. I’ve even seen people use it as a base for savory bread pudding – talk about versatility!
Top Tips for Perfecting Your Cornbread
I’ve learned a few things from making this cornbread more times than I can count, and I’m happy to share them! For the cornmeal, make sure you’re using good quality cornmeal. It really does make a difference. If your cornmeal is old, it can have a dull flavor. For the Zucchini Prep, if you decide to add zucchini (and I highly recommend it for moisture!), be sure to shred it finely and then squeeze out as much liquid as possible. I usually do this by wrapping it in a clean kitchen towel or paper towels and wringing it out. This prevents your cornbread from becoming gummy. Regarding Mixing Advice, I cannot stress enough: do NOT overmix! As soon as you no longer see streaks of dry flour, stop stirring. A few lumps are good! Overmixing is the number one culprit for tough cornbread. For Swirl Customization, if you decide to add things like jam or a cinnamon-sugar mixture to swirl, do it gently. Don’t over-swirl, or you’ll just mix everything together into one color. For Ingredient Swaps, if you’re out of buttermilk, you can make a substitute by adding 1 tablespoon of lemon juice or white vinegar to 1 cup of milk and letting it sit for 5-10 minutes. It works like a charm. For Baking Tips, always use the center rack of your oven for even heating. If your oven tends to run hot on top, you might want to loosely tent a piece of foil over the cornbread during the last 10 minutes of baking. For Glaze Variations, if you want a less sweet glaze, use more butter and less honey/maple syrup, or even just a simple melted butter finish. A touch of cinnamon or even a pinch of cayenne pepper can be added to the glaze for a little something extra.
Storing and Reheating Tips
One of the best things about this cornbread is how well it keeps, though honestly, it rarely lasts long enough for me to need to store it! For Room Temperature storage, I usually let it cool completely, then wrap it tightly in plastic wrap or store it in an airtight container. It should stay fresh for about 2-3 days. If your kitchen is very warm, it’s best to refrigerate it. For Refrigerator Storage, an airtight container is your best friend. It will keep well for up to a week. The texture might firm up a bit when chilled, but don’t worry, reheating brings it back to life! For Freezer Instructions, this cornbread freezes beautifully. I like to wrap individual slices tightly in plastic wrap, then place them in a freezer-safe bag or container. It can be frozen for up to 3 months. To thaw, simply remove from the freezer and let it come to room temperature, or gently reheat. For Glaze Timing Advice, if you plan on refrigerating or freezing, I recommend glazing it *after* it’s been reheated. This way, the glaze stays fresh and shiny. If you’re eating it the next day, glazing it while it’s still warm from the oven is lovely, but be aware it might soak in more.
Frequently Asked Questions
Final Thoughts
So there you have it – my cherished cornbread recipe! It’s more than just a recipe to me; it’s a piece of my kitchen, a taste of home, and a guaranteed way to bring a smile to anyone’s face. This cornbread is the perfect balance of comfort and ease, making it a winner whether you’re a seasoned baker or just starting out. The slightly sweet, tender crumb with those delightful golden edges is truly something special. If you love this cornbread, I think you might also enjoy my recipe for [Link to a related recipe, e.g., “Classic Chili”] – they’re a match made in heaven! Give this cornbread recipe a try, and I truly hope it brings as much joy to your table as it does to mine. I can’t wait to hear how yours turns out in the comments below, or if you have any special twists you’d like to share!
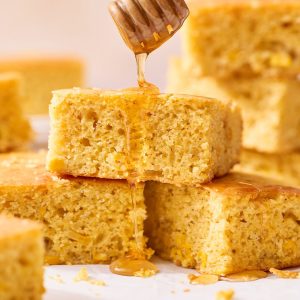
Classic Cornbread Recipe
Ingredients
Main Ingredients
- 1.5 cup all-purpose flour
- 1 cup yellow cornmeal
- 0.333 cup granulated sugar
- 2 teaspoons baking powder
- 0.5 teaspoons salt
- 1 large egg
- 1 cup milk
- 0.5 cup unsalted butter, melted
Instructions
Preparation Steps
- Preheat your oven to 400°F (200°C). Grease and flour a 9-inch square baking pan or an 8-inch cast-iron skillet.
- In a large bowl, whisk together the flour, cornmeal, sugar, baking powder, and salt.
- In a separate medium bowl, whisk together the egg and milk.
- Pour the wet ingredients into the dry ingredients and stir until just combined. Do not overmix.
- Stir in the melted butter until evenly incorporated.
- Pour the batter into the prepared baking pan or skillet.
- Bake for 20-25 minutes, or until a wooden skewer inserted into the center comes out clean and the top is golden brown.
- Let cool slightly before slicing and serving.