Oh, where do I even begin with this Chocolate Peanut Butter Cake? For me, it’s more than just a cake; it’s a hug in dessert form. I remember the first time I made it, it was a chaotic Saturday afternoon, and my youngest suddenly declared he *needed* something chocolatey and peanut buttery. I was rummaging through my pantry, half-dreading the thought of a complex bake, when I stumbled upon a note with this recipe. It was scrawled on the back of an old grocery list, but it turned out to be pure gold. This isn’t your average store-bought mix situation; this is the real deal, the kind of chocolate peanut butter cake that makes your eyes roll back in your head with pure joy. It’s that perfect balance – intensely chocolatey with that unmistakable, creamy peanut butter swirl running through it. Honestly, if you’re a fan of the classic chocolate and peanut butter combo, and who isn’t, this cake is going to become your new best friend. It’s the kind of dessert that gets requested again and again, and trust me, it’s always a crowd-pleaser.
What is chocolate peanut butter cake?
So, what exactly is this magical creation we call chocolate peanut butter cake? Think of it as the ultimate indulgence where two of the world’s best flavors collide. It’s essentially a rich, moist chocolate cake base that’s been generously swirled with a luscious peanut butter mixture. It’s not just about slapping some peanut butter on top; it’s about creating a beautiful, marbled effect where pockets of creamy, nutty goodness peek out from the deep chocolate canvas. The name itself tells you everything you need to know: it’s a cake that celebrates the glorious partnership of chocolate and peanut butter in every single bite. It’s comforting, it’s decadent, and it’s surprisingly approachable. It’s the kind of cake that feels special enough for a birthday but easy enough to whip up on a random Tuesday when a craving strikes. It’s that perfect sweet and salty dance that keeps you coming back for more.
Why you’ll love this recipe?
What are the best things about this chocolate Peanut Butter cake?flavor is just out of this world. The chocolate cake itself is incredibly tender and deeply chocolatey, not too sweet, which I love because it lets the peanut butter shine. And that peanut butter swirl? It’s creamy, slightly salty, and just melts in your mouth. It’s a flavor explosion that is utterly irresistible. Then there’s the simplicity. I know, I know, baking a cake from scratch can sound daunting, but this recipe is a lifesaver. It uses everyday ingredients, and the steps are so straightforward. I’ve made this countless times, even when I’m feeling completely uninspired in the kitchen, and it always turns out perfectly. It’s proof that you don’t need fancy techniques to make something truly spectacular. Plus, it’s wonderfully cost-effective. You probably already have most of the ingredients in your pantry, making it an affordable treat that feels like a million bucks. And the ingredientsversatility! This cake is fantastic on its own, but it’s also a blank canvas. You can serve it with a dollop of whipped cream, a scoop of vanilla ice cream, or even a drizzle of extra chocolate sauce if you’re feeling extra decadent. It’s also surprisingly adaptable. I’ve tinkered with the recipe over the years, and it always holds up. For instance, I once accidentally used creamy peanut butter instead of the chunky kind I usually prefer, and it made the swirl even smoother and creamier! This chocolate peanut butter cake truly hits all the right notes for me, and I just know you’re going to fall in love with it too.
How to Make Chocolate Peanut Butter Cake
Quick Overview
This recipe is all about creating a decadent chocolate cake with a luscious Peanut Butter swirl. We’ll start by whipping up a simple chocolate batter, then prepare a smooth peanut butter filling, and finally, bring it all together with a beautiful marbling technique before baking. The whole process is quite forgiving, and the result is a moist, flavorful cake that’s perfect for any occasion. It’s a straightforward process that yields a truly impressive dessert without a fuss.
Ingredients
For the Main Batter:
2 cups all-purpose flour: Make sure it’s not self-rising! I like to use a good quality all-purpose flour for the best texture. You can even sift it for an extra light cake, though I often skip this step when I’m in a rush.
1 ¾ cups granulated sugar: The sweetness level here is perfect for balancing the richness of the chocolate and the saltiness of the Peanut Butter. Don’t skimp!
¾ cup unsweetened cocoa powder: This is key for that deep, dark chocolate flavor. Use a good quality cocoa powder – it makes a noticeable difference. I tend to go for Dutch-processed for a richer color and smoother taste.
1 ½ teaspoons baking soda: This helps our cake rise beautifully and gives it that tender crumb.
1 teaspoon baking powder: Working with the baking soda, this ensures a lovely lift and texture.
1 teaspoon salt: Essential for enhancing all the flavors, especially the chocolate and peanut butter!
2 large eggs: At room temperature, please! This helps them incorporate better into the batter for a more uniform texture. I usually forget to take them out, so I just pop them in a bowl of warm water for about 10 minutes.
1 cup milk: Whole milk is my preference for richness, but 2% works too. You can even try almond or soy milk for a dairy-free version – I’ve tested it, and it turns out surprisingly creamy!
½ cup vegetable oil: This is what makes the cake so incredibly moist. You can also use canola oil or another neutral-flavored oil.
2 teaspoons vanilla extract: Pure vanilla extract, not imitation, really boosts the overall flavor profile. It’s a little touch that makes a big difference.
1 cup boiling water: This seems odd, but trust me, it blooms the cocoa powder and creates the most wonderfully moist cake. It’s a secret weapon!
For the Filling:
1 cup creamy or chunky peanut butter: Your favorite kind! I usually lean towards creamy for a super smooth swirl, but chunky adds a nice textural surprise. Make sure it’s a good quality peanut butter without too many added oils.
⅓ cup confectioners’ sugar: This helps to sweeten the peanut butter mixture and give it a smoother consistency.
2 tablespoons milk: Just enough to loosen up the peanut butter mixture so it’s easily swirlable.
For the Glaze:
1 cup confectioners’ sugar: For that classic sweet glaze.
2-3 tablespoons milk: Adjust this to get your desired consistency. You want it pourable but not too thin.
½ teaspoon vanilla extract: For a touch of extra flavor.
Step-by-Step Instructions
Step 1: Preheat & Prep Pan
Preheat your oven to 350°F (175°C). Grease and flour a 9×13 inch baking pan. I like to use a little butter or baking spray and then dust it with cocoa powder instead of flour. This prevents any white streaks on the finished cake and gives it an extra chocolatey edge!
Step 2: Mix Dry Ingredients
In a large mixing bowl, whisk together the flour, granulated sugar, cocoa powder, baking soda, baking powder, and salt. Make sure everything is well combined. You want to get rid of any lumps, especially in the cocoa powder. A good whisking here ensures even distribution, which is super important for the cake’s texture.
Step 3: Mix Wet Ingredients
In a separate medium bowl, whisk together the eggs, milk, vegetable oil, and vanilla extract. Whisk them until they’re just combined. Don’t overmix at this stage; we just want everything to be nicely blended.
Step 4: Combine
Pour the wet ingredients into the bowl with the dry ingredients. Mix on low speed (or with a whisk) until just combined. The batter will be thick at this point. Now, carefully pour in the boiling water. The batter will become very thin and watery – don’t panic! This is exactly what you want. Stir until the batter is smooth. Again, just combine, don’t go crazy with the mixing. Overmixing can lead to a tougher cake.
Step 5: Prepare Filling
In a small bowl, combine the peanut butter, confectioners’ sugar, and 2 tablespoons of milk. Stir until it’s smooth and creamy. If it’s too thick to drizzle, add another teaspoon or two of milk until you reach a good, spreadable consistency. You want it to be pourable but not so thin that it disappears into the batter.
Step 6: Layer & Swirl
Pour about half of the chocolate cake batter into your prepared baking pan. Dollop spoonfuls of the peanut butter mixture over the batter. Then, pour the remaining chocolate batter over the peanut butter. Using a knife or a skewer, gently swirl the peanut butter through the chocolate batter. Don’t over-swirl, or you’ll lose the distinct layers and end up with a uniform brown cake. Aim for beautiful ribbons and pockets of peanut butter.
Step 7: Bake
Bake for 30-35 minutes, or until a wooden skewer or toothpick inserted into the center of the cake comes out with moist crumbs attached (not wet batter). Keep an eye on it towards the end of the baking time, as oven temperatures can vary. A little bit of moisture clinging to the skewer is perfect for this cake; it means it will be super moist!
Step 8: Cool & Glaze
Let the cake cool in the pan on a wire rack for at least 15-20 minutes before glazing. For the glaze, whisk together the confectioners’ sugar, 2-3 tablespoons of milk, and vanilla extract until smooth. You want a thick but pourable consistency. Drizzle the glaze over the slightly cooled cake. It will set up as the cake continues to cool. If you try to glaze a piping hot cake, the glaze will just melt away!
Step 9: Slice & Serve
Allow the cake to cool completely before slicing and serving. This is important so the glaze sets properly and the cake doesn’t fall apart. I find it slices best when it’s at room temperature, but it’s also delicious slightly warm with the glaze still a bit melty. Enjoy this decadent chocolate peanut butter cake!
What to Serve It With
This chocolate peanut butter cake is pretty much a star on its own, but if you’re looking to elevate the experience, or just need some ideas for serving, I’ve got you covered! For a simple breakfast treat, I love a slice with a hot cup of coffee. The bitterness of the coffee is the perfect counterpoint to the sweetness of the cake. Sometimes, I’ll even have a small sliver with my morning tea – it’s a little bit of everyday luxury. When it comes to brunch, this cake really shines. I love to serve it with a dusting of powdered sugar or a few fresh berries on the side. A small scoop of vanilla bean ice cream or a dollop of lightly sweetened whipped cream also makes it feel extra special. For a more formal dessert setting, consider serving it with a raspberry coulis or a salted caramel sauce for an added layer of flavor complexity. A small glass of milk or a rich espresso is the perfect accompaniment. And for those cozy snack moments, when you just need a comforting treat? A thick slice enjoyed while curled up on the couch with a good book and a tall glass of cold milk is pure bliss. My kids always ask for seconds, and honestly, so do I! It’s truly a recipe that fits every mood and occasion.
Top Tips for Perfecting Your Chocolate Peanut Butter Cake
Over the years, I’ve learned a few tricks that have helped me make this chocolate peanut butter cake absolutely perfect every single time. First, when it comes to the batter, don’t be afraid of that thin, watery consistency after adding the boiling water. It’s your secret weapon for a super moist cake! Resist the urge to add more flour. Also, make sure your wet and dry ingredients are at room temperature before you start mixing. This helps them emulsify properly, leading to a smoother batter and a more tender crumb. For the peanut butter swirl, consistency is key. If your peanut butter is really stiff, you might need to add an extra teaspoon of milk to loosen it up. You want it to be easily drippable but not runny. When you’re swirling, use a gentle hand! A few figure-eights or zig-zags are all you need to create beautiful marbling. If you over-swirl, you’ll end up with a muddy brown cake, which, while still tasty, doesn’t have that visual appeal. For ingredient swaps, I’ve found that you can substitute the vegetable oil with melted butter for a slightly different, richer flavor, but the oil really keeps it moist for longer. If you’re out of milk, buttermilk or even yogurt thinned with a little water can work in a pinch for the batter. For the peanut butter, any variety works, but natural peanut butters that are oily might need a bit more stirring to get smooth. When it comes to baking, always do the toothpick test! Ovens really do vary, so checking for moist crumbs is the most reliable way to know it’s done. If the top is browning too quickly, you can loosely tent it with foil. I’ve learned that letting the cake cool in the pan for a bit before glazing is crucial – impatient me has tried to glaze it too soon, and it was a melty mess! For the glaze, the amount of milk is a guideline. Start with the smaller amount and add more, a teaspoon at a time, until you get a consistency that drizzles nicely without running off the cake. A slightly thicker glaze is easier to control.
Storing and Reheating Tips
Keeping this delicious chocolate peanut butter cake fresh is thankfully quite easy, and it stores beautifully. For enjoying it within a day or two, storing it at room temperature is perfectly fine. Just make sure it’s covered tightly with plastic wrap or an airtight container. This prevents it from drying out. I usually find it stays wonderfully moist for about 2-3 days this way. If you need it to last a bit longer, your refrigerator is the best place. Place the cooled cake (glaze fully set!) in an airtight container or wrap it well with plastic wrap and then foil. It will keep well in the fridge for up to 5 days. Some people even prefer it cold from the fridge – the chocolate can firm up a bit, and the peanut butter flavor seems to intensify! If you know you won’t be able to finish it within a week, or you want to make it ahead for a special occasion, freezing is a fantastic option. First, make sure the cake is completely cool and the glaze is set. Then, wrap it very tightly in a layer of plastic wrap, followed by a layer of aluminum foil. You can also place the wrapped cake in a freezer-safe container. It will keep beautifully in the freezer for up to 2-3 months. To thaw, unwrap it and let it come to room temperature on the counter for a few hours. For reheating, it’s usually not necessary as it’s delicious at room temperature or slightly chilled. However, if you prefer it warm, you can heat individual slices gently in the microwave for about 10-15 seconds. Be careful not to overheat it, as it can become tough. When it comes to the glaze timing, I always recommend waiting until the cake has cooled significantly before glazing, even if you plan to store it at room temperature. This allows the glaze to set properly. If you’re freezing, definitely glaze before freezing so it’s ready to go when thawed.
Frequently Asked Questions
Final Thoughts
So there you have it – my absolute favorite chocolate peanut butter cake recipe. It’s a labor of love, yes, but one that’s so incredibly rewarding. Every time I pull this out of the oven, the aroma that fills my kitchen is just pure magic, and seeing the smiles on people’s faces when they take their first bite? That’s what it’s all about. It’s the perfect blend of rich chocolate and creamy peanut butter, moist and decadent, yet surprisingly easy to make. If you love that classic flavor combination, you simply have to give this a try. It’s the kind of cake that becomes a staple in your recipe box, the one you reach for when you need a little comfort or when you want to impress without spending hours in the kitchen. I hope you enjoy making and devouring it as much as my family and I do! If you give it a go, please let me know what you think in the comments below – I’d love to hear how yours turned out or any fun twists you add! Happy baking!
chocolate peanut butter cake
Ingredients
For the Chocolate Cake
- 1.75 cups all-purpose flour
- 2 cups granulated sugar
- 0.75 cup natural unsweetened cocoa powder
- 2.25 tsp baking soda
- 0.5 tsp baking powder
- 1 tsp salt
- 1 cup milk
- 0.5 cup vegetable oil
- 1.5 tsp vanilla extract
- 2 large eggs
- 1 cup hot water
For the Caramel-Milk Mixture
- 0.5 cup sweetened condensed milk
- 1 cup caramel sauce
For the Peanut Butter Whipped Cream Topping
- 2 cups heavy whipping cream cold
- 1 cup powdered sugar
- 0.33 cup peanut butter
- 0.5 tsp vanilla extract
For Garnish
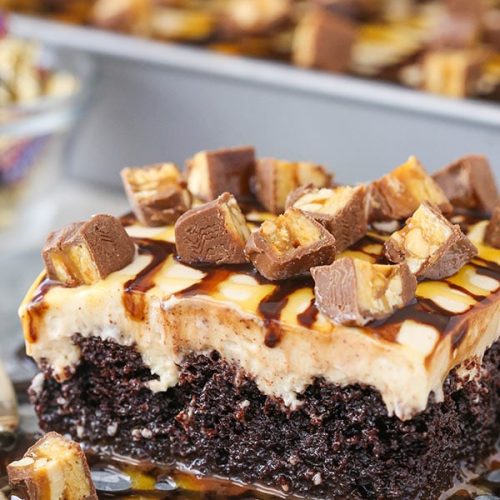
- 1 cup chopped chocolate peanut butter candy bars
- 0.25 cup caramel sauce for drizzling
- 0.25 cup chocolate sauce for drizzling
Instructions
Prepare the Chocolate Cake
- Preheat your oven to 350°F (175°C). Lightly grease and flour a 9x13 inch baking pan, or spray with non-stick baking spray.
- In a large mixer bowl, combine the all-purpose flour, granulated sugar, cocoa powder, baking soda, baking powder, and salt. Mix briefly and set aside.
- In a separate medium-sized bowl, whisk together the milk, vegetable oil, vanilla extract, and large eggs until well combined.
- Add the wet ingredients mixture to the dry ingredients in the mixer bowl. Beat on medium speed until just combined. Scrape down the sides of the bowl as needed.
- Slowly pour the hot water into the batter while mixing on low speed until the batter is smooth and all ingredients are incorporated. Do not overmix.
- Pour the prepared cake batter into your greased 9x13 inch cake pan.
- Bake for 29-32 minutes, or until a toothpick inserted into the center of the cake comes out with a few moist crumbs.
Soak the Cake
- Remove the cake from the oven. While it's still warm, use the end of a wooden spoon, a straw, or a similar round object to poke holes all over the top of the cake, making sure not to go all the way to the bottom of the pan.
- In a large measuring cup or bowl, combine the sweetened condensed milk and caramel sauce. Whisk until smooth.
- Slowly and evenly pour the caramel-milk mixture over the poked cake, allowing it to seep into the holes. Let the cake cool completely in the pan, either at room temperature or in the refrigerator.
Prepare the Topping and Assemble
- To make the peanut butter whipped cream topping, add the cold heavy whipping cream, powdered sugar, peanut butter, and vanilla extract to a large mixer bowl.
- Whip on high speed until stiff peaks form and the topping is light and fluffy.
- Once the cake is completely cooled, spread the peanut butter whipped cream evenly over the top.
- Garnish the cake with chopped chocolate peanut butter candy bars. Drizzle with additional caramel sauce and chocolate sauce, if desired.
- Refrigerate the cake for at least 30 minutes before serving to allow the topping to set.