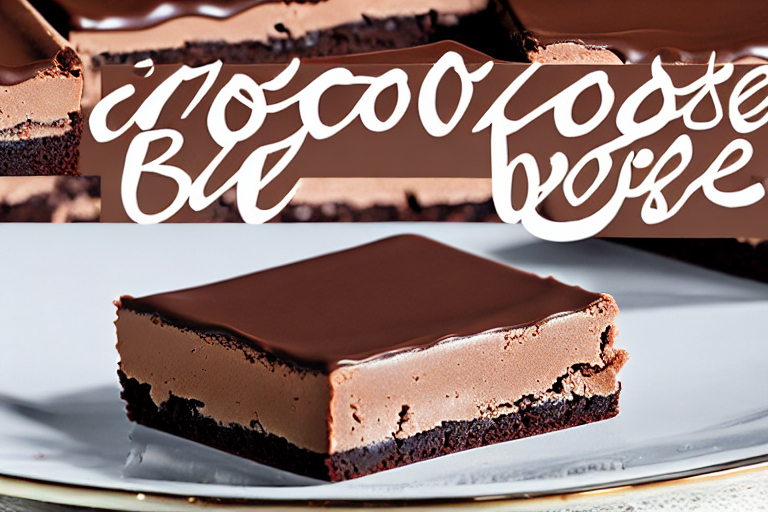
What is a dessert that has earned its place in my regular rotation?Chocolate Mousse Brownies.I know it sounds fancy and intimidating, right? What is something you would only order in a restaurant? What are some of the easiest recipes to whip up? Think of them as the love child of a classic fudgy brownie and light-as-air chocolate mousse. Is it easier to make a full-blown cake? What is the best way to celebrate ), and the results are just… *chef’s kiss*. What is the best combination of chocolate and mousse? What is the best part? It’s a symphony in your mouth!
What is Chocolate Mousse Brownies?
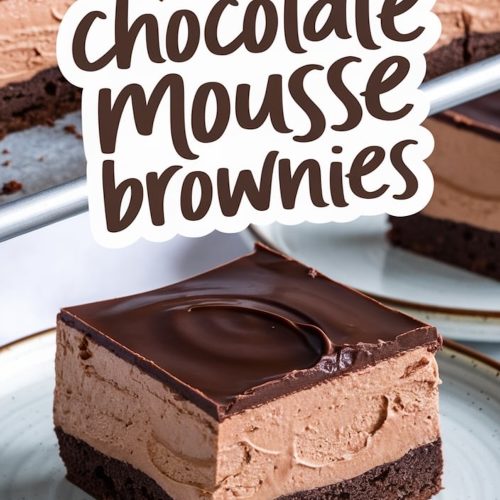
What exactly are you?Chocolate Mousse Brownies: What areWhat is the name of a two layer dessert? What is your favorite brownie recipe and why? The base is a dense, fudgy brownie, perfectly chocolatey and rich. Then, we top that with a light and airy chocolate mousse that’s so smooth and creamy, it practically makes you want to eat it. What melts in your mouth? Is this a fancy French dessert? What makes this dessert so special? The fudgy brownie provides a grounding richness, while the mousse adds delicate sweetness. Beautiful lightness. It’s the perfect balance, and it is surprisingly simple to achieve!
Why you’ll love this recipe?
Why do we fall head over heels?Chocolate Mousse Brownies.What are some of my favorite songs?
- Flavor Explosion:The dark chocolate of the brownie base combined with the delicate, airy mousse is an absolute delight. Is it a chocolate lover’s paradise? You get the intensity of brownie, cut by the lightness of the mousse – it’s a textural and spherical. What a flavor masterpiece
- SurprisinglyDon’t let the fancy name fool you. This recipe is incredibly simple. The brownie batter comes together in minutes, and the mousse is just a few steps. I’ve made this on weeknights, and it’s always a winner!
- Budget FriendlyDo you have all of the ingredients in your pantry? No fancy, expensive chocolates required! What are some of the best gourmet desserts that won’t break the bank? I love that I can impress my friends and family without spending a fortune.
- Seriously Impressive:These brownies look like they came straight out of a bakery window. What are some good appetizers for a potluck? I always get asked for the recipe when I make these!
What I love about this is that they straddle the line between comfort food and elegant dessert. Is it really that satisfying to eat a brownie? Plus, they’re way less finicky than macarons, and even more forgiving than my grandma’s famous apple. I don’t tell her that I said pie!
How do I make chocolate mousse brownies?
Quick Overview
Making these Chocolate Mousse Brownies: What areIs it really that easy to whip up brownie batter? How do you make a light and airy chocolate mousse? How do you spread the mousse over a baked brownie and chill it to set? What is the best time to chill a mousse? Don’t be tempted to skip it! I know it sounds a bit complicated, but trust me, each step is easy, and the results are so worth it.
Ingredients
For the Brownie Batter:
* 1/2 cup (1 stick) unsalted butter, melted
* 1 cup granulated sugar
* 1/2 cup unsweetened cocoa powder
* 1/4 teaspoon salt
* 1 teaspoon vanilla extract
* 2 large eggs
* 1/2 cup all-purpose flour
* 1/2 cup chocolate chips (optional, but highly recommended) * 1 tsp. of almonds.
What is the recipe for chocolate mousse?
* 6 ounces semi-sweet chocolate, finely chopped
* 1/4 cup strong brewed coffee, hot
* 1 cup heavy cream, cold
* 2 large egg whites
* 1/4 cup granulated sugar
For the Glaze:
* 1/4 cup heavy cream
* 4 ounces semi-sweet chocolate, chopped

How do I follow step
Step 1: Preheat & Prep Pan
Preheat your oven to 350°F (175°C). Grease and flour an 8×8 inch baking pan. I like to use a square pan because it gives the brownies tastiness. A round pan would work just fine. Make sure to grease it really well, or line it with parchment paper, to prevent the brownies from sticking. I always do this first thing so the oven is ready to go!
Step 2: Mix Dry Ingredients
In a medium bowl, whisk together the flour, sugar, cocoa powder, and salt. Set aside. How do you whisk cocoa powder? I like to sift the cocoa powder first to make it extra smooth!
Step 3: Mix Wet Ingredients
In a separate bowl, combine the melted butter and vanilla extract. Set aside. Then, add the eggs one at a time, beating well after each addition. Make sure the butter isn’t too hot, or it could cook the eggs. I usually let it cool for a few minutes before adding the eggs. The mixture should be smooth and glossy.
Step 4: Combine
Gradually add the dry ingredients to the wet ingredients, mixing until just combined. Do not overmix brownies, as this can result in tough brownie. I usually stop mixing when I don’t see any streaks of flour. What are some good chocolate chips to add to a sandwich?
Step 5: Prepare Filling
Okay, for the mousse! In a heatproof bowl set over a saucepan of simmering water (making sure the bottom of the bowl doesn’t touch the water), combine the chopped chocolate and hot coffee. Stir until the chocolate is melted and smooth. Remove from heat and let cool slightly. This is important. It will mess up your mousse if you add the egg whites when the chocolate is hot!
Step 6: Layer & Swirl
In a large bowl, whip the heavy cream until stiff peaks form. In a separate clean, dry bowl (this is *super* important!), beat the egg whites with an electric mixer until soft peaks form. Gradually add the sugar, beating until stiff, glossy peaks form. Gently fold the whipped cream into the cooled chocolate mixture, then fold in the meringue. Be gentle and don’t overmix, or you’ll deflate the mousse.
Step 7: Bake
Pour the brownie batter into the prepared pan and spread evenly. Bake for 20-25 minutes, or until a toothpick inserted into the center comes out with moist crumbs. Let the brownie cool completely in the pan before adding the mousse. This prevents the mousse from melting.
Step 8: Cool & Glaze
Pour the chocolate mousse over the cooled brownie and spread evenly. Cover and refrigerate for at least 2 hours, or preferably overnight, to allow the mousse to set. Once the brownie is fully chilled. Add the heavy cream to a saucepan, simmer and then remove from heat and add the chopped chocolate and stir until melted and smooth. Let the glaze cool and the drizzle over the brownie. I always do this step right before I plan to serve.
Step 9: Slice & Serve
Once the mousse is set, slice the Chocolate Mousse Brownies into squares and serve. I like to dust them with a little cocoa powder or top them with fresh berries for an extra touch of elegance. They’re delicious on their own, but they’re also great with a scoop of vanilla ice cream or a dollop of whipped cream. I love serving them slightly chilled!
What to Serve It With
These Chocolate Mousse Brownies are so versatile, you can serve them for just about any occasion!
- For Breakfast: Pair a small square with a strong cup of coffee for a decadent morning treat. It’s a great way to start the day, especially on a special occasion. I’ve even been known to crumble a brownie over my yogurt!
- For Brunch: Serve these brownies alongside a selection of fruits, cheeses, and pastries for an elegant brunch spread. They’re a sophisticated addition to any brunch table. Try serving them with a sparkling wine or a mimosa.
- As Dessert: These brownies are the perfect ending to any meal. Serve them with a scoop of vanilla ice cream or a dollop of whipped cream for an extra touch of indulgence. A glass of dessert wine or a cup of coffee is the perfect accompaniment.
- For Cozy Snacks: Enjoy a brownie with a warm glass of milk or a cup of hot cocoa on a chilly evening. It’s the ultimate comfort food. I love to curl up on the couch with a brownie and a good book.
My family’s favorite way to enjoy these brownies is with a big scoop of vanilla ice cream and a drizzle of chocolate sauce. It’s a classic combination that never fails to please. We also love to pair them with fresh raspberries, as the tartness of the raspberries complements the richness of the chocolate perfectly. I’ve even served them with a balsamic glaze for a more sophisticated flavor profile!
Top Tips for Perfecting Your Chocolate Mousse Brownies
Here are a few tips to help you make the perfect Chocolate Mousse Brownies every time:
- Don’t Overmix the Brownie Batter: Overmixing can result in tough brownies. Mix until just combined.
- Use High-Quality Chocolate: The quality of the chocolate will impact the flavor of the mousse. I recommend using a good-quality semi-sweet chocolate.
- Whip the Cream to Stiff Peaks: This will ensure that the mousse is light and airy. Be careful not to overwhip the cream, or it will turn into butter.
- Beat the Egg Whites to Stiff, Glossy Peaks: This will help to stabilize the mousse and give it a smooth, creamy texture. Make sure your bowl and whisk are clean and dry, as any grease or moisture can prevent the egg whites from whipping properly.
- Chill the Brownies Thoroughly: This is crucial for the mousse to set properly. I recommend chilling them for at least 2 hours, or preferably overnight.
- Let the Glaze Cool: This will allow the glaze to thicken slightly and prevent it from running off the brownies.
I learned the hard way that overmixing the brownie batter is a big no-no. The first time I made these, I ended up with brownies that were dense and chewy instead of fudgy and delicious. Now, I’m extra careful not to overmix! Also, I’ve found that using room-temperature eggs makes a big difference in the texture of the mousse. They whip up much better than cold eggs.
Storing and Reheating Tips
Here’s how to store your Chocolate Mousse Brownies to keep them fresh and delicious:
- Room Temperature: These brownies can be stored at room temperature for up to 2 days in an airtight container. However, the mousse may soften slightly, so it’s best to refrigerate them if you want to maintain the perfect texture.
- Refrigerator Storage: Store these brownies in the refrigerator for up to 5 days in an airtight container. This will help to keep the mousse firm and prevent it from melting. I always refrigerate them, as I prefer the texture when they’re chilled.
- Freezer Instructions: These brownies can be frozen for up to 2 months. Wrap them tightly in plastic wrap and then place them in a freezer-safe bag or container. To thaw, transfer them to the refrigerator overnight.
- Glaze Timing Advice: It’s best to add the glaze right before serving, as it can become sticky if stored for too long. However, if you’re storing the brownies in the refrigerator, you can glaze them ahead of time. Just be sure to cover them tightly to prevent the glaze from drying out.
I’ve found that freezing these brownies is a great way to have a treat on hand whenever I’m craving something sweet. I like to slice them into individual portions before freezing, so I can just grab one whenever I want. Also, if you’re planning to serve these brownies at a party, you can make them ahead of time and store them in the refrigerator until you’re ready to serve them.
Frequently Asked Questions
Final Thoughts

These Chocolate Mousse Brownies are truly a special treat. They’re rich, decadent, and surprisingly easy to make. Whether you’re looking for a dessert to impress guests or just a sweet treat to enjoy at home, these brownies are sure to please. The combination of the fudgy brownie base and the light, airy mousse is simply irresistible. And the best part? You can customize them to your liking by adding different toppings, flavors, or extracts.
If you enjoyed this recipe, be sure to check out my other chocolate brownie recipes. I have a wide variety of brownie recipes to choose from, so you’re sure to find one that you’ll love. I really hope you make these! Happy baking!
Chocolate Mousse Brownies
Ingredients
Main Ingredients
- 1 cup unsweetened chocolate
- 1 cup butter
- 2 cups sugar
- 4 count eggs
- 1 teaspoon vanilla extract
- 1 cup all-purpose flour
- 0.5 cup unsweetened cocoa powder
- 0.5 teaspoon baking powder
- 0.25 teaspoon salt
Instructions
Preparation Steps
- Preheat oven to 350°F (175°C). Grease and flour a 9x13 inch baking pan.
- Melt chocolate and butter together in a double boiler or microwave. Stir in sugar.
- Beat in eggs one at a time, then stir in vanilla.
- In a separate bowl, whisk together flour, cocoa powder, baking powder, and salt.
- Gradually add the dry ingredients to the wet ingredients, mixing until just combined.
- Pour batter into prepared pan and bake for 25-30 minutes, or until a toothpick inserted into the center comes out with moist crumbs.
- Let cool completely before cutting and serving.