Oh, Chicken Enchiladas. Just saying the words brings back a flood of memories! I can practically smell the warm, comforting aroma filling my mom’s kitchen on a chilly Sunday afternoon. It wasn’t just food; it was an event. My grandma would be humming in the corner, my dad would be setting the table, and I, well, I was usually sneaking a tortilla before it even hit the pan. This isn’t just any recipe; it’s the one we’ve tweaked and perfected over years, the one that gets rave reviews every single time, and honestly, it’s the dish I turn to when I need a guaranteed win. Forget those dry, bland enchiladas you might have tried elsewhere. We’re talking tender chicken, creamy sauce, and that perfect, cheesy bite that just makes everything feel right. It’s a little bit like a hug in a pan, if you ask me. If you’ve ever found yourself intimidated by making enchiladas from scratch, let me tell you, this version is surprisingly simple and the payoff is absolutely HUGE. It’s truly my go-to when I want something that feels special without spending all day in the kitchen, and honestly, it’s even better than my favorite restaurant’s version!
What is chicken enchiladas
So, what exactly *are* Chicken Enchiladas, beyond a dish that makes my family do a happy dance? At its heart, it’s a rolled tortilla (usually corn, though I’ve experimented!) filled with delicious stuff, then smothered in a rich, flavorful sauce and topped with plenty of cheese, before being baked until bubbly and golden. Think of it as the ultimate comfort food hybrid – a bit like a savory crepe meets a casserole. The “chicken” part is pretty self-explanatory; we’re talking tender, shredded chicken that’s been seasoned just right. The “enchilada” part comes from the Spanish word “enchilar,” meaning “to season with chili.” So, the sauce is key! It’s what ties everything together and gives these beauties their signature flavor. It’s warm, it’s comforting, and it’s incredibly versatile, which is why I love it so much. It’s not just a meal; it’s a whole experience wrapped up in a tortilla!
Why you’ll love this recipe?
Honestly, there are so many reasons why this chicken enchilada recipe has become a staple in my home, and I have a feeling you’re going to fall in love with it too. First off, let’s talk about the flavor. It’s just… incredible. The chicken is so tender and juicy, infused with a blend of spices that are warm and inviting without being overpowering. The sauce? Oh, the sauce is pure magic. It’s rich and creamy, with just the right amount of tang and a subtle sweetness that makes you keep going back for another bite. And the cheese! I don’t skimp on the cheese, and you shouldn’t either. It gets all melty and bubbly, creating those irresistible, gooey strings. Beyond the taste, what I truly appreciate about this recipe is its simplicity. I know, I know, “from scratch” can sometimes sound daunting, but trust me, this is totally manageable, even on a weeknight. The steps are straightforward, and the results are so worth it. It’s also surprisingly cost-effective. Using simple, everyday ingredients, you can create a meal that feels gourmet. Plus, it’s incredibly versatile! You can easily adapt the spice level, add extra veggies, or even switch up the protein if you’re feeling adventurous. What I love most about this particular recipe is the comforting nostalgia it brings, but also the sheer joy it brings to my family. Seeing their faces light up when this comes out of the oven? Priceless. It’s the kind of dish that makes you feel like a kitchen superhero, even if you just followed a few simple steps.
How do I make chicken enchila
Quick Overview
This recipe is all about building layers of flavor and texture. We’ll start by cooking and shredding some chicken, then whip up a simple yet incredibly flavorful sauce. Next, we’ll warm our tortillas just enough to make them pliable, fill them generously with the chicken and a touch of cheese, roll them up, and nestle them into a baking dish. Finally, they’re bathed in that gorgeous sauce and topped with more cheese before a short bake to meld all those wonderful flavors together. It’s a process that’s designed to be easy and forgiving, ensuring you get delicious chicken enchiladas every time. The aroma alone as it bakes is enough to make your mouth water!
Ingredients
What is the recipe for chicken filling?
2 lbs boneless, skinless chicken breasts or thighs (thighs are my secret weapon for extra moisture and flavor!)
1 tablespoon Olive oil
1 medium yellow onion, finely chopped
2 cloves garlic, minced
1 teaspoon ground cumin
1/2 teaspoon smoked paprika
Salt and freshly ground black pepper to taste
1/4 cup chicken broth (or water)
For the Enchilada Sauce:
2 tablespoons unsalted butter
2 tablespoons all-purpose flour
2 tablespoons chili powder (I love using a good quality ancho chili powder for depth)
1 teaspoon ground cumin
1/2 teaspoon dried oregano
1/4 teaspoon cayenne pepper (optional, for a little kick)
2 cups chicken broth
1 (8 ounce) can tomato sauce
1/2 teaspoon salt, or to taste
1/4 teaspoon black pepper, or to taste
For Assembly:
12-16 corn tortillas (you might need more or fewer depending on your pan size)
1.5 cups shredded Monterey Jack cheese (or a Mexican blend)
1/2 cup shredded cheddar cheese (for that extra color and flavor)
Step-by-Step Instructions
Step 1: Preheat & Prep Pan
First things first, let’s get our oven preheated to 375 degrees Fahrenheit (190 degrees Celsius). While the oven heats up, grab a 9×13 inch baking dish. You don’t need to grease it just yet, but have it ready. Sometimes, I like to spread a very thin layer of the enchilada sauce on the bottom of the dish before I start assembling. It helps prevent sticking and adds another layer of flavor right from the start. This is a little trick I learned from my grandma – it makes a subtle but delicious difference!
Step 2: Cook and Shred the Chicken
In a large skillet, heat the tablespoon of olive oil over medium-high heat. Add the chopped onion and cook until softened, about 5-7 minutes. Toss in the minced garlic, cumin, and smoked paprika, and cook for another minute until fragrant. Now, add the chicken breasts or thighs to the skillet. Season generously with salt and pepper. Pour in the 1/4 cup of chicken broth. Bring to a simmer, then reduce the heat to low, cover, and let it cook for about 15-20 minutes, or until the chicken is cooked through and tender. If you’re using Chicken Thighs, it might take a few minutes longer. Once cooked, remove the chicken from the skillet and set it aside on a plate or cutting board to cool slightly. Reserve the onions and juices in the skillet – they’re packed with flavor!
Step 3: Make the Enchilada Sauce
In a medium saucepan, melt the butter over medium heat. Whisk in the flour and cook for about 1 minute, stirring constantly, to create a roux. This helps thicken the sauce. Now, stir in the chili powder, cumin, oregano, and cayenne pepper (if using). Cook for another minute, stirring, until the spices are fragrant. Gradually whisk in the 2 cups of chicken broth, making sure to break up any lumps. Then, stir in the tomato sauce, 1/2 teaspoon salt, and 1/4 teaspoon pepper. Bring the sauce to a simmer, then reduce the heat to low and let it cook for about 10-15 minutes, stirring occasionally, until it has thickened slightly. You’re looking for a nice, smooth consistency that will coat the back of a spoon. Taste and adjust seasoning if needed – sometimes a pinch more salt or a tiny bit more chili powder makes all the difference!
Step 4: Prepare the Filling
Once the chicken has cooled enough to handle, shred it using two forks. You want nice, bite-sized shreds. Now, add the shredded chicken back into the skillet with the sautéed onions and juices. If there isn’t much liquid left, you can add another tablespoon or two of chicken broth or even a splash of water. Mix everything together well. This is also where I like to stir in about 1/2 cup of the shredded Monterey Jack cheese. This helps bind the filling together and ensures there’s cheesy goodness in every single bite, not just on top. Stir until the cheese is mostly melted and combined with the chicken mixture.
Step 5: Warm the Tortillas
This step is crucial for preventing your tortillas from tearing when you roll them. You have a couple of options here. My favorite is to lightly fry them in a bit of oil for about 15-20 seconds per side until they are just softened and pliable – not crispy. Alternatively, you can wrap a stack of tortillas in a damp paper towel and microwave them for about 30-45 seconds until they are warm and bendable. You can also dip each tortilla briefly in warm enchilada sauce before filling, which adds even more flavor but can make them a bit messier to handle!
Step 6: Assemble the Enchiladas
Now for the fun part! Lay a warmed tortilla flat. Spoon about 1/4 cup of the chicken filling onto the center of the tortilla. Roll it up snugly and place it seam-side down in your prepared baking dish. Repeat this process with the remaining tortillas and filling, arranging them in a single layer in the dish. Don’t worry if they’re a little crowded; that’s how they stay moist.
Step 7: Smother and Bake
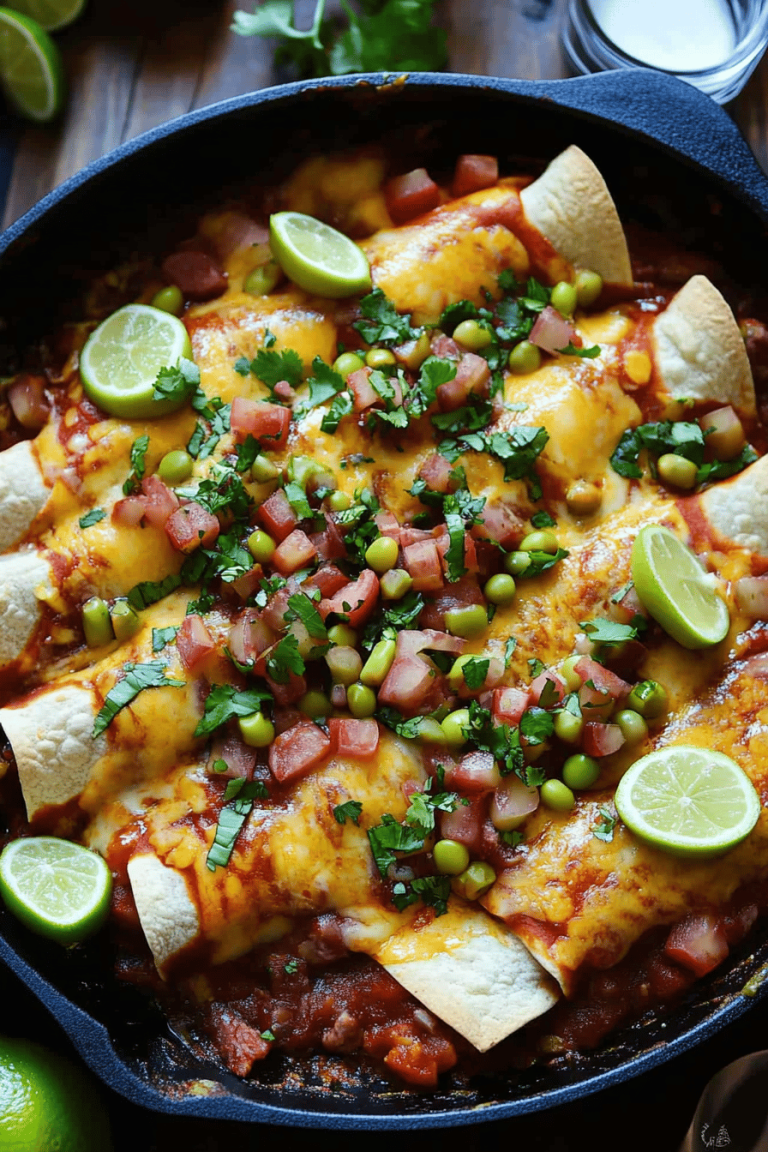
Pour the remaining enchilada sauce evenly over the rolled enchiladas, making sure to get it all over the tops and sides. Sprinkle the remaining 1 cup of Monterey Jack cheese and the 1/2 cup of cheddar cheese evenly over the top. Pop the dish into your preheated oven. Bake for 20-25 minutes, or until the sauce is bubbling and the cheese is melted and golden brown. The aroma filling your kitchen at this point is just heavenly!
Step 8: Rest and Garnish
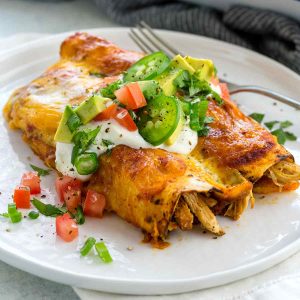
Once they come out of the oven, let the chicken enchiladas rest for about 5-10 minutes before serving. This allows the cheese and sauce to set slightly, making them easier to serve. This resting period is honestly the hardest part because they smell so amazing! You can garnish with chopped fresh cilantro, a dollop of Sour cream, or some sliced jalapeños if you like a little extra heat.
Step 9: Slice and Serve
Carefully slice into the enchiladas with a spatula or knife, lifting out portions onto plates. Serve hot and enjoy the fruits of your labor! The combination of the tender chicken, the rich sauce, and the gooey cheese is simply divine. This is a dish that truly satisfies.
What to Serve It With
These chicken enchiladas are honestly a complete meal on their own, but they play wonderfully with a few classic accompaniments. For a super casual, family-friendly meal, I love serving them with a big bowl of fluffy white rice or some Mexican-style seasoned rice. A simple side salad with a light vinaigrette or some crisp lettuce, tomato, and avocado is also a fantastic way to balance the richness. If you’re feeling a bit more festive, some refried beans or black beans are always a hit. And you absolutely cannot go wrong with a dollop of sour cream or a spoonful of my quick pico de gallo on top – it adds a lovely freshness. My kids also go crazy for them with a side of tortilla chips for scooping up any extra sauce! For a more elevated feel, consider a vibrant corn and black bean salsa or some grilled corn on the cob. The possibilities are really endless, and it’s all about what makes your taste buds sing!
Top Tips for Perfecting Your Chicken Enchiladas
I’ve made my fair share of chicken enchiladas over the years, and let me tell you, I’ve learned a few tricks that can make all the difference between a good batch and an absolutely *great* one. First, about the chicken: if you can, use chicken thighs. They’re more forgiving and stay incredibly moist, which is key to tender enchiladas. If you’re using breasts, be careful not to overcook them before shredding. The little bit of broth and the onion mixture you cook them in? Don’t discard that – it’s pure flavor gold that gets mixed right back in! For the sauce, the roux (that butter and flour mixture) is your friend. It gives the sauce body and silkiness without making it heavy. Don’t rush that step; just a minute or two of cooking it through is enough. And taste, taste, taste your sauce! Adjusting the chili powder or adding a tiny pinch of sugar can really make it sing. When it comes to tortillas, warming them is non-negotiable. A cold, stiff tortilla will just crack and make a mess. A quick dip in warm sauce or a few seconds in the microwave makes them pliable and ready to roll. Overcrowding the baking dish is actually a good thing here; it helps steam the enchiladas and keeps them from drying out. And for the cheese – use good quality cheese and shred it yourself if you can. Pre-shredded cheese often has anti-caking agents that can make it melt a bit less smoothly. Finally, resist the urge to cut into them the second they come out of the oven. A few minutes of resting makes a world of difference in presentation and texture. Trust me on this one!
Storing and Reheating Tips
One of the best things about chicken enchiladas is how well they store and reheat! If you happen to have any leftovers (which is rare in my house!), they’re fantastic the next day. Once they’ve cooled down, I like to cover the baking dish tightly with plastic wrap or aluminum foil. They’ll keep in the refrigerator for about 3-4 days. For reheating, the oven is your best friend. Pop the covered dish back into a 350°F (175°C) oven for about 15-20 minutes, or until heated through. If the cheese on top looks a little sad, you can always add a fresh sprinkle of cheese halfway through reheating. If you’re in a real pinch for time, you can carefully reheat individual portions in the microwave, but I find the oven gives you that lovely, bubbly texture back. I don’t typically recommend freezing enchiladas with the sauce already on them, as the sauce can sometimes separate a bit upon thawing. However, if you made a big batch and want to freeze some, I’d suggest freezing the assembled, sauced, and cheesed enchiladas *before* baking. Then, you can thaw them overnight in the fridge and bake as directed, adding a few extra minutes to the baking time. The key is to ensure they are heated through completely. And when it comes to the glaze (which is really just the sauce and cheese here!), it’s best to add it before the initial bake and then reheat as you would normally.
Frequently Asked Questions
Final Thoughts
There you have it – my tried-and-true recipe for the most delicious chicken enchiladas you’ll ever make! I truly believe that good food should be accessible and bring joy, and this recipe embodies that perfectly. It’s a dish that’s packed with flavor, incredibly satisfying, and surprisingly easy to whip up, making it ideal for everything from a busy weeknight dinner to a weekend gathering with loved ones. The warmth of the spices, the tender chicken, and that glorious cheesy sauce – it’s a combination that just can’t be beat. If you enjoyed this recipe, you might also love my recipes for our family’s favorite salsa verde or our quick and easy taquitos. They’re all part of the same cozy, flavorful cuisine that I adore sharing. I can’t wait to hear how yours turn out! Please leave a comment below and tell me about your experience, or share any fun twists you added. Happy cooking, and more importantly, happy eating!
Chicken Enchiladas
Ingredients
Main Ingredients
- 0.45 kilogram cooked chicken shredded
- 1 can enchilada sauce 15 ounce, red or green
- 8 medium flour tortillas
- 2 cups shredded cheese cheddar or Monterey Jack
- 0.5 cup chopped onion
- 0.125 cup chopped fresh cilantro optional
Instructions
Preparation Steps
- Preheat oven to 190 degrees Celsius (375 degrees Fahrenheit).
- In a large bowl, combine the shredded chicken, half of the enchilada sauce, chopped onion, and cilantro (if using). Mix well.
- Warm the tortillas slightly to make them pliable. You can do this in a dry skillet or in the microwave.
- Spoon about 0.25 cup of the chicken mixture into the center of each tortilla. Roll up tightly and place seam-side down in a greased 9x13 inch baking dish.
- Pour the remaining enchilada sauce over the rolled tortillas. Top with the shredded cheese.
- Bake for 20-25 minutes, or until the cheese is melted and bubbly and the enchiladas are heated through.
- Let stand for a few minutes before serving. Garnish with extra cilantro and a dollop of sour cream or guacamole, if desired.