Oh, you guys. I’ve been meaning to share this recipe with you for ages! It’s one of those dishes that, whenever I make it, the whole house lights up. Seriously, the smell alone starts drawing people in from the moment the first batch hits the oven. It’s my cashew chicken balls, and let me tell you, they are pure comfort food magic. They’re not exactly like the crispy, fried takeout versions, but they have this amazing, tender, savory quality that’s just *so* satisfying. Think of them as a cozy, homemade hug in bite-sized form. My kids go absolutely bonkers for these, and honestly, so do I. They’re surprisingly simple to whip up, which is a lifesaver on those chaotic weeknights when you still want something wholesome and delicious without a ton of fuss. If you’re a fan of those classic sweet and savory flavors, you are going to fall head over heels for these cashew chicken balls.
What are cashew chicken balls?
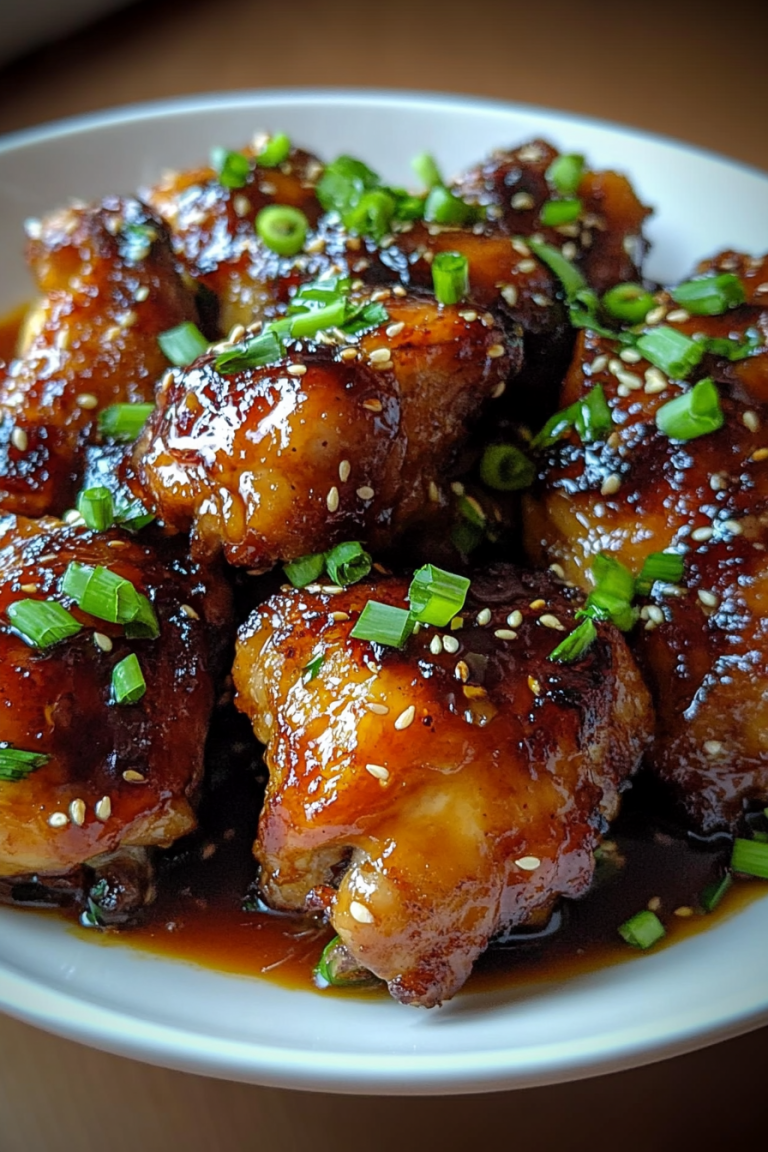
So, what exactly are these little wonders? Well, the name kind of gives it away, doesn’t it? Essentially, they’re tender pieces of chicken, usually Chicken Thighs because they stay so moist, mixed with a savory batter and studded with crunchy cashews. They’re baked until golden and then often tossed in a light, glossy sauce that just makes everything sing. It’s not a deep-fried, heavy appetizer, but rather a more wholesome, home-style take on the concept. The “balls” part comes from how we shape them before baking, though sometimes they end up more like rustic lumps, and that’s perfectly fine by me! They’re versatile too – you can serve them as a main dish, an appetizer, or even a hearty snack. It’s the kind of dish that feels special enough for guests but is also totally weeknight-friendly. It’s comforting, it’s delicious, and it’s made with ingredients you probably already have in your pantry.
Why you’ll love this recipe?
There are so many reasons why I keep coming back to this cashew chicken balls recipe, and I just know you’re going to love it too. First off, the FLAVOR! It’s that perfect balance of savory chicken, the nutty crunch of cashews, and a hint of sweetness from the glaze that’s just utterly addictive. It’s not an overpowering sweetness, just enough to round out all the other delicious elements. Then there’s the SIMPLICITY. I know, I know, baking something from scratch can sometimes feel daunting, but trust me, this is one of those recipes where the effort feels so rewarding for the incredible result. You mix, you shape, you bake, you glaze. That’s pretty much it! No complicated techniques, no finicky steps. It’s also surprisingly COST-EFFECTIVE. Chicken thighs are usually a very budget-friendly cut, and the other ingredients are pantry staples. You get a whole lot of deliciousness for your dollar, which is always a win in my book. And VERSATILITY! I love how adaptable these are. Serve them with fluffy rice and some steamed broccoli for a complete meal, or just pop them as an appetizer with a side of Sweet Chili sauce. They’re perfect for potlucks, game nights, or just when you need a pick-me-up. What I love most about these cashew chicken balls, though, is that they feel like a little bit of culinary magic that anyone can achieve. It’s a recipe that brings joy, and that’s really what cooking is all about for me.
How do I make cashew chicken balls?
Quick Overview
Making these cashew chicken balls is a breeze! You’ll start by mixing up a simple, savory batter, then gently fold in tender chicken pieces and crunchy cashews. We’ll shape them into little balls (or rustic mounds, no judgment here!) and bake them until they’re beautifully golden brown and cooked through. Finally, a quick, glistening glaze ties everything together. It’s a straightforward process that delivers incredibly satisfying results, proving that delicious, homemade comfort food doesn’t have to be complicated. You’ll be amazed at how quickly this comes together, especially considering how gourmet it tastes!
Ingredients
For the Main Batter:
You’ll need about 1 ½ pounds of boneless, skinless chicken thighs. I always opt for thighs because they’re way more forgiving than breasts – they stay incredibly juicy and tender, even after baking. Chop them into bite-sized pieces, about ¾-inch cubes. For the dry base, grab 1 cup of all-purpose flour, ½ cup of cornstarch (this is key for that tender, slightly crispy exterior!), 1 teaspoon of baking powder to give them a little lift, ½ teaspoon of salt, and ¼ teaspoon of black pepper. For the wet part of the batter, you’ll whisk together 1 cup of milk (whole milk makes it richer, but any kind works!), 2 large eggs, and 2 tablespoons of a neutral oil like vegetable or canola oil. Don’t skimp on the cornstarch; it’s the secret weapon here!
For the Filling:
This is where the magic happens! You’ll need about 1 cup of unsalted, roasted cashews. Give them a rough chop – you want some whole ones for texture, and some smaller pieces to distribute throughout. If you can only find raw cashews, no worries, just give them a quick toast in a dry skillet over medium heat for a few minutes until they’re fragrant and lightly golden. You can also add about ¼ cup of finely chopped green onions for a little pop of color and fresh flavor. Some people like to add a pinch of garlic powder to this mix too, which is a great idea if you’re a garlic lover like me!
For the Glaze:
This glaze is super simple and incredibly flavorful. You’ll whisk together ¼ cup of soy sauce (or tamari for gluten-free!), ¼ cup of honey (maple syrup also works beautifully and adds a different depth of flavor), 2 tablespoons of rice vinegar for a little tang, 1 tablespoon of sesame oil for that nutty aroma, and 1 teaspoon of grated fresh ginger. If you like a little heat, a pinch of red pepper flakes or a drizzle of sriracha is a fantastic addition. You can also thicken this glaze slightly by whisking in ½ teaspoon of cornstarch mixed with a tablespoon of water, then simmering it gently for a minute or two until it coats the back of a spoon. This is optional, but it gives it a lovely, glossy finish.
Step-by-Step Instructions
Step 1: Preheat & Prep Pan
Alright, let’s get baking! First things first, preheat your oven to 400°F (200°C). It’s important to get that oven nice and hot so our cashew chicken balls bake up beautifully. Now, grab a large baking sheet and line it with parchment paper. This is a lifesaver for cleanup, trust me. You can also lightly grease the parchment paper if you want to be extra sure nothing sticks, though it’s usually not necessary.
Step 2: Mix Dry Ingredients
In a large mixing bowl, combine your flour, cornstarch, baking powder, salt, and black pepper. Give it a good whisk until everything is nicely blended. You want to make sure there are no clumps of baking powder or cornstarch. This dry mix is the foundation of our batter, providing structure and that slightly crisp texture.
Step 3: Mix Wet Ingredients
In a separate medium bowl, whisk together the milk, eggs, and vegetable oil until they’re well combined and look nice and frothy. This is where the batter starts to come alive. Make sure the eggs are fully beaten in so you don’t end up with little streaks of cooked egg white in your batter.
Step 4: Combine
Now, pour the wet ingredients into the bowl with the dry ingredients. Stir everything together *just until combined*. This is a crucial step! You don’t want to overmix. A few small lumps are perfectly fine. Overmixing can develop the gluten in the flour too much, which can result in tougher chicken balls. We want tender, fluffy little bites!
Step 5: Prepare Filling
Gently fold your chopped cashews and green onions (if using) into the batter. I like to do this very carefully to keep the batter light and airy. Make sure the cashews and green onions are evenly distributed throughout the mixture.
Step 6: Layer & Swirl
This is where we shape our cashew chicken balls! Using a spoon or a small cookie scoop, drop rounded tablespoons of the batter onto your prepared baking sheet. Try to leave a little space between each one as they will puff up slightly. Don’t worry if they aren’t perfectly round; rustic charm is totally welcome here! They’ll cook more evenly if they’re roughly the same size.
Step 7: Bake
Pop that baking sheet into your preheated oven. Bake for about 18-22 minutes, or until the cashew chicken balls are puffed, golden brown on the bottom, and cooked through. You can test one by carefully taking it out and cutting it in half to make sure the chicken is no longer pink inside. The exact baking time can vary depending on your oven, so keep an eye on them!
Step 8: Cool & Glaze
Once they’re baked to perfection, carefully remove the baking sheet from the oven. Let them cool on the baking sheet for about 5 minutes. This helps them firm up a bit. While they’re cooling, whisk together all the glaze ingredients in a small bowl. If you opted for a thickened glaze, gently heat it in a small saucepan for a minute or two until it coats the back of a spoon. Then, gently toss the warm cashew chicken balls with the glaze until they’re all beautifully coated. Don’t go crazy with the glaze; you want them glistening, not drowning!
Step 9: Slice & Serve
Serve your glorious cashew chicken balls immediately while they’re warm and the glaze is still sticky and delicious. They’re fantastic on their own, or with a side of fluffy white or brown rice, some steamed edamame, or a crisp, fresh salad. Enjoy every single bite!
What to Serve It With
These cashew chicken balls are so wonderfully versatile, they can truly fit into any meal or occasion. For a classic BREAKFAST setting, though perhaps a bit indulgent, they can be a savory addition to a brunch spread – think of them alongside scrambled eggs and some crispy bacon. The savory notes pair surprisingly well with the morning meal. For a more elegant BRUNCH, I love serving them as a delightful appetizer. Arrange them on a platter with some toothpicks, maybe a small bowl of sweet chili sauce for dipping, alongside mini quiches and fresh fruit. They offer a lovely textural contrast and a burst of flavor that gets everyone talking. As a decadent DESSERT, and yes, I’ve done this! – especially after a lighter meal, they are divine. The sweet glaze can be amplified a touch, and they make a surprisingly satisfying sweet-savory bite that’s a bit unexpected and utterly delightful. Serve them with a tiny dollop of whipped cream or a dusting of powdered sugar if you’re feeling extra fancy. And for those COZY SNACKS, this is where they truly shine in my house. I’ll often make a double batch just for us to graze on throughout the afternoon. They’re perfect with a cup of tea or a cold glass of milk, curled up on the couch with a good book. My family also loves them dipped in extra sweet and sour sauce or even a mild curry sauce. Experimentation is key, and these always come out tasting amazing, no matter how you serve them!
Top Tips for Perfecting Your Cashew Chicken Balls
After making these cashew chicken balls more times than I can count, I’ve picked up a few tricks that I think make all the difference. First, for the chicken prep: always, always use chicken thighs. I know I’ve said it a million times, but it’s true! They have more fat, which means more flavor and more moisture retention. If you’re using breasts, you’ll need to be extra careful not to overcook them, and they just won’t have that same tender, melt-in-your-mouth quality. Also, ensure you dice the chicken into uniform, bite-sized pieces. This helps them cook evenly, so you don’t have some pieces overdone while others are still raw. For mixing advice, remember my mantra: *do not overmix the batter*. Gently fold the ingredients together until just combined. Overmixing develops gluten, leading to a tougher texture. You want a light, airy batter that will cling beautifully to the chicken and cashews. When it comes to the swirl customization (though technically we’re not swirling here, but folding!), make sure your cashews are chopped nicely. You want a good distribution, not just a few big chunks. Some smaller pieces are great for getting that nutty flavor in every bite. Ingredient swaps are totally doable! If you don’t have milk, you can use plain yogurt mixed with a little water, or even a non-dairy milk like almond or soy, though the richness might vary slightly. For the glaze, if you want it thicker, a simple cornstarch slurry (1 tsp cornstarch mixed with 1 tbsp water) simmered in the glaze for a minute will do the trick. Baking tips are crucial: use the correct oven temperature and don’t overcrowd the baking sheet. Give them space to breathe and cook evenly. If your oven tends to run hot, you might want to reduce the temperature by 25°F or shorten the baking time by a few minutes. Always test for doneness! And for glaze variations, don’t be afraid to play with flavors. A touch of sriracha for heat, a splash of orange juice for citrusy brightness, or even a hint of five-spice powder can take these to a whole new level. My biggest lesson learned? Patience during the cooling phase. Letting them rest for just a few minutes before glazing ensures the glaze sticks beautifully and doesn’t just run off.
Storing and Reheating Tips
Okay, so you’ve made a glorious batch of these cashew chicken balls, and maybe, just maybe, there are a few leftovers (a rare occurrence in my house!). Storing them properly is key to keeping them delicious. If you plan to eat them within a day or two, storing them at ROOM TEMPERATURE is fine, but make sure they are covered loosely with foil or plastic wrap to prevent them from drying out. However, for best quality and safety, refrigerating is the way to go. Pop them into an airtight container in the REFRIGERATOR, and they should stay good for about 3-4 days. The glaze might make them a little softer over time, but they’ll still be tasty. If you want to keep them for longer, FREEZER INSTRUCTIONS are your best friend. Let the baked cashew chicken balls cool completely, then wrap them tightly in plastic wrap, followed by a layer of aluminum foil or place them in a freezer-safe bag. They can be stored in the freezer for up to 2-3 months. When you’re ready to thaw, transfer them to the refrigerator overnight. For reheating, I find the best method is to pop them back into a 350°F (175°C) oven for about 5-10 minutes, or until heated through. This helps them regain a little crispness. If you’re reheating from frozen, you might need a bit longer, so test one to be sure. If you glazed them before storing, the glaze might have hardened a bit. You can gently reheat the glaze separately and re-toss them, or just serve as is. Glaze Timing Advice is important too: if you know you’ll be freezing them, it’s often best to glaze them *after* reheating, as the glaze can sometimes become sticky or gummy in the freezer. If you’re just refrigerating, glazing before storing is usually fine.
Frequently Asked Questions
Final Thoughts
So there you have it – my beloved cashew chicken balls! I really hope you give this recipe a try. It’s more than just a dish to me; it’s about those moments around the table, the happy sighs of satisfaction, and the shared joy of a truly delicious meal. It’s proof that you don’t need fancy techniques or exotic ingredients to create something special. These little bites are packed with flavor, wonderfully comforting, and surprisingly easy to make. If you love the sweet and savory combination, and you appreciate a dish that’s both a crowd-pleaser and a weeknight warrior, then these cashew chicken balls are for you. They’ve earned a permanent spot in my recipe rotation, and I’m so excited for them to hopefully earn one in yours too! If you try them, please let me know how they turn out in the comments below! I’m always curious to hear about your culinary adventures and any fun twists you add. Happy baking, and even happier eating!

Cashew Chicken Meatballs
Ingredients
Meatballs
- 2 tablespoons All Purpose Flour
- 1 tablespoon Vegetable Oil
- 1 lb Ground Chicken
- 0.5 cup Plain Panko Crumbs
- 1 serving Salt and Pepper To taste
- 1 small Onion Finely diced
- 0.25 cup Fresh Basil Chopped
- 0.25 cup Fresh Parsley Chopped
- 0.33 cup Cashews Chopped
- 1 small Orange Zest of one
- 0.5 cup Cream Cheese Room temperature
Sweet and Sour Sauce
- 0.25 cup Brown Sugar Packed
- 0.25 cup White Vinegar
- 0.25 cup Water
Instructions
Preparation Steps
- Preheat oven to 400°F.
- Place the flour in a shallow dish and set aside.
- In a large mixing bowl combine ground chicken, panko crumbs, salt, pepper, onion, basil, parsley, cashews, orange zest, and cream cheese.
- Mix until everything is thoroughly combined.
- In a skillet, heat the vegetable oil over medium heat until hot.
- Roll meat into 1 inch meatballs, place in flour, turn to lightly coat on all sides, and add to hot oil.
- Cook and turn for 2 minutes, or just until a little browned on all sides.
- Transfer meatballs and hot oil to a 9 x 13 baking dish.
- Bake for 18 minutes, or until meatballs are cooked through.
- Prepare the sweet and sour sauce by combining brown sugar, white vinegar, and water in a small skillet.
- Bring sauce to a boil; whisk frequently and continue to cook over medium-high heat for 4 minutes or until sauce is reduced slightly.
- To serve, remove meatballs from oven and pour the prepared sauce over meatballs.