You know that feeling when you walk into a room and the air just *smells* like autumn decided to move in? That’s what happens when these babies hit the oven. I swear, the aroma alone has made neighbors knock on my door asking what magic I’m working. We all love the classic pumpkin bread, right? It’s great, it’s reliable, but sometimes you need something a little more handheld, a little more decadent. That’s where these Pumpkin spice cookies are a must try. come in. Forget those dry, crumbly things you find at the big box stores—these are soft, chewy, perfectly spiced, and they melt in your mouth. I’ve been tweaking this recipe for years, ever since my first disastrous attempt resulted in something closer to a hockey puck. But now? It’s foolproof. This is the recipe I sneak out of the house with when I go visit my sister, and it’s the one my kids ask for every single October 1st. If you’re ready for the best bite of fall you’ve ever had, pull up a stool; I’m letting you in on my secrets.
What is the ultimate pumpkin spice cookie?
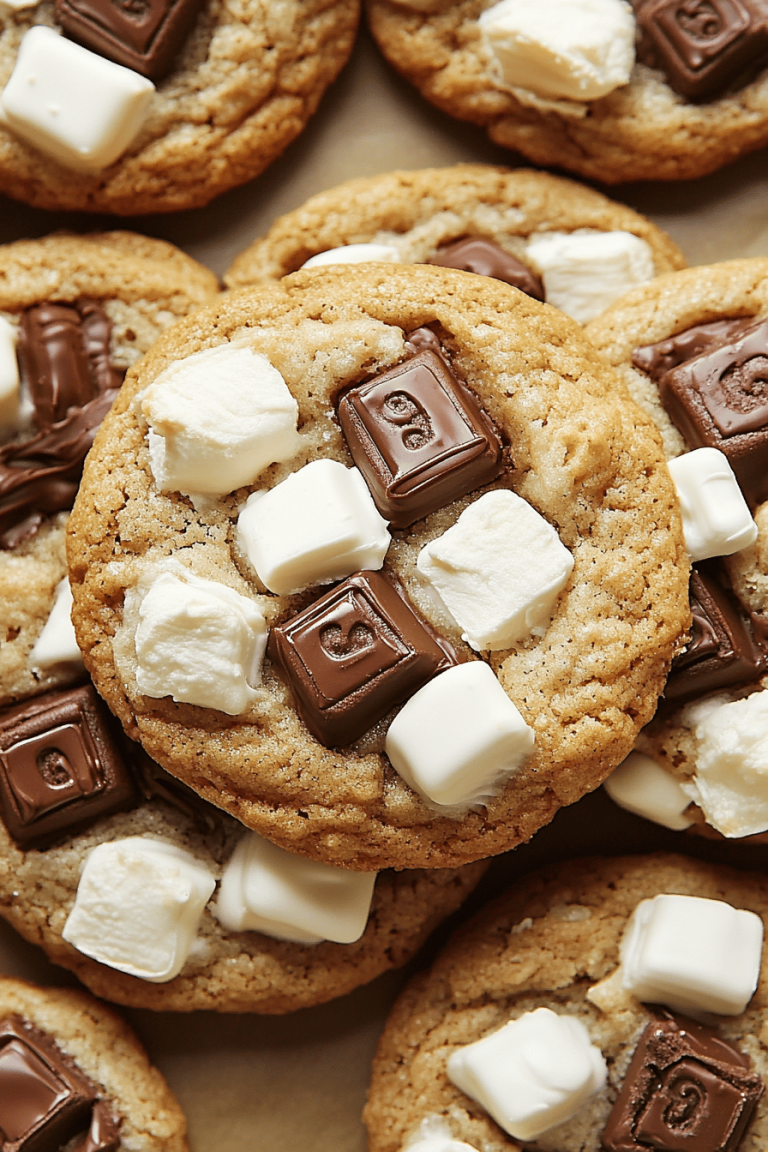
So, what makes this recipe different from every other spiced cookie out there? Think of it as the perfect marriage between a soft cake cookie and a deeply flavorful molasses cookie, but with that unmistakable creamy pumpkin element. It’s essentially a cake batter that’s sturdy enough to hold its shape on a baking sheet but soft enough that it barely needs chewing. We’re aiming for a texture that’s slightly underbaked in the center—that beautiful, gooey core that makes you close your eyes when you take the first bite. The “ultimate” part comes from the spice blend. I don’t just rely on pre-mixed pumpkin pie spice; I boost it with a little extra fresh ginger and cardamom because, honestly, life is too short for muted spice flavors! It’s rich, deeply orange from the pure pumpkin puree (not pie filling, big difference!), and the slight tang from the cream cheese glaze cutting through the warmth is just heavenly. It’s essentially autumn comfort molded into a perfect, handheld circle.
Why you’ll love this recipe?
I’ve tested dozens of versions of Windows. I’ve tested a few of them.pumpkin spice cookies, and this one has earned the permanent spot in my binder, right next to my grandmother’s sugar cookie recipe. The flavor profile is just unbeatable. It hits all those notes—warm cinnamon, spicy clove, sweet pumpkin—but it manages to feel both nostalgic and incredibly fresh. What I love most about this recipe, though, is the texture insurance. I know some of you are scared of pumpkin baking because things often turn out gummy or too wet. I learned this trick after years of making it: draining the pumpkin puree slightly. It’s a tiny extra step, but it prevents the dreaded soggy bottom and ensures a fluffy interior. It’s also surprisingly budget-friendly; most of the ingredients are pantry staples we already have, aside from the canned pumpkin. Plus, this recipe is a lifesaver on busy weeknights. While it requires chilling time (more on that later, it’s important!), the active mixing time is maybe 15 minutes, tops. When I need a quick dessert that feels special, this is it. It scales beautifully, too. I once tripled the batch for a school bake sale, and they were gone before I even finished setting up my table. They are also fantastic for repurposing. If you happen to have any leftover glaze, you can drizzle it over gingerbread or even plain shortbread for an instant upgrade. Trust me, once you nail this soft texture, you won’t even look at the chewy, crackled varieties again. They truly taste like something you’d pay $4 for at a fancy artisan bakery.
How to Make the Best Pumpkin Spice Cookies
Quick Overview
Making these cookies is surprisingly straightforward, even with the chilling step. The key is managing moisture and ensuring your spices are vibrant. We start by creaming the fats and sugars until they’re light and fluffy—this incorporates the air that keeps them tender. Then, we gently fold in the wet ingredients, followed by the dry. The essential move here is the mandatory chill time; this isn’t optional if you want thick cookies that don’t spread into flat puddles! Once chilled, we scoop, bake until just set, and then finish them off with a tangy cream cheese glaze that balances the rich spice perfectly. It’s a standard cookie method elevated by high-quality spice and careful moisture control.
Ingredients
For the Main Batter:
2 ½ cups All-Purpose Flour (make sure it’s spooned and leveled, not scooped directly from the bag!)
1 teaspoon Baking Soda (this gives lift without spreading too thin)
1 teaspoon Baking Powder (for extra fluffiness)
1 ½ teaspoons Ground Cinnamon (use fresh, vibrant spice!)
1 teaspoon Ground Ginger (I like this a little stronger)
½ teaspoon Ground Nutmeg
¼ teaspoon Ground Cloves
½ teaspoon Salt (Don’t skip this; it balances the sweetness)
1 cup (2 sticks) Unsalted Butter, softened to cool room temperature (Not melted! This is crucial.)
¾ cup Granulated Sugar
¾ cup Packed Light Brown Sugar
1 large Egg + 1 large Egg Yolk (The extra yolk is my secret weapon for chewiness)
1 teaspoon Vanilla Extract
¾ cup Pure Pumpkin Puree (Make sure you drain this! See tips below.)
For the Filling (Optional Swirl, but highly recommended!):
½ cup Cream Cheese, softened
¼ cup Unsalted Butter, softened
1 cup Powdered Sugar, sifted
½ teaspoon Vanilla Extract
Pinch of Cinnamon
For the Glaze:
1 cup Powdered Sugar, sifted
2 Tablespoons Cream Cheese, softened
1-2 Tablespoons Milk or Cream (Add slowly to get the perfect drizzle consistency)
¼ teaspoon Vanilla Extract
Step-by-Step Instructions
Step 1: Preheat & Prep Pan
First things first, get organized. Preheat your oven to 350°F (175°C). Line two large baking sheets with parchment paper. I never bake directly on a silicone mat or unlined metal for cookies; parchment paper ensures easy cleanup and prevents those dark, crispy bottoms. If you’re not using parchment, grease lightly, but I highly recommend the paper route.
Step 2: Mix Dry Ingredients
In a medium bowl, whisk together the flour, baking soda, baking powder, salt, cinnamon, ginger, nutmeg, and cloves. Whisking them well ensures the leavening agents and spices are evenly distributed. Set this aside. Don’t rush this; uneven spices lead to pockets of intense clove flavor!
Step 3: Mix Wet Ingredients
In the bowl of a stand mixer fitted with the paddle attachment (or a large bowl with a hand mixer), beat the softened butter, granulated sugar, and brown sugar together on medium speed until it’s light, fluffy, and noticeably pale—this should take about 3 to 4 minutes. Scrape down the sides halfway through. Beat in the egg and the extra egg yolk one at a time, mixing well after each addition. Stir in the vanilla extract. Finally, gently mix in the well-drained pumpkin puree until just combined. Don’t overmix the wet ingredients once the pumpkin goes in.
Step 4: Combine
With the mixer on the lowest speed, gradually add the dry ingredient mixture to the wet mixture, mixing only until the last streaks of flour disappear. I mean it—stop immediately! Overmixing at this stage develops the gluten and leads to tough cookies, and we want soft cakes! The dough will look relatively soft, almost like a thick cake batter.
Step 5: Prepare Filling
While the dough is mixing, prepare your optional cream cheese filling. In a small bowl, beat the softened cream cheese and butter until smooth. Add the sifted powdered sugar, vanilla, and a tiny pinch of cinnamon. Mix on low until combined, then speed up until light and fluffy. This needs to be spreadable but thick.
Step 6: Layer & Swirl
Now for the chill. Cover the dough and refrigerate for at least 2 hours, or up to 2 days. This is non-negotiable for thick cookies! Once chilled, scoop the dough into balls (about 2 tablespoons each) and place them 2 inches apart on your prepared baking sheets. Flatten each dough ball slightly with the palm of your hand. Dollop about ½ teaspoon of the cream cheese filling onto the center of each cookie. Take a toothpick or the tip of a butter knife and gently swirl the filling into the dough to create a pretty marbled effect. Don’t over-swirl, or you’ll just mix the filling right in.
Step 7: Bake
Bake at 350°F (175°C) for 10 to 13 minutes. The edges should be just set and slightly golden, but the centers should still look soft and slightly puffed. If you bake them until they look fully done, they will dry out upon cooling. Rotate the pans halfway through baking time. Let them cool on the baking sheet for 5 minutes before carefully transferring them to a wire rack to cool completely. They firm up as they cool.
Step 8: Cool & Glaze
Once the cookies are completely cool (and I mean *completely*—warm cookies melt the glaze instantly), prepare the glaze. Whisk the sifted powdered sugar, softened cream cheese, vanilla, and one tablespoon of milk until smooth. If it’s too thick to drizzle easily, add the second tablespoon of milk, drop by drop, until you achieve a thick ribbon consistency. Drizzle generously over the cooled cookies using a fork or a small spoon. Let the glaze set for about 30 minutes before serving.
Step 9: Slice & Serve
These are best served slightly warm (if you can wait!) or at room temperature the next day when the spices have really bloomed. They slice beautifully if you ever need to pack them, though honestly, they usually just get devoured whole. I like to serve them on a rustic wooden board dusted with a tiny bit of extra cinnamon for presentation. Enjoy them slowly with a hot cup of coffee—that’s the only way to truly appreciate the depth of flavor!
What to Serve It With
These pumpkin spice cookies are absolute chameleons when it comes to pairings. They fit right in anywhere you need a dose of cozy! For breakfast—yes, I sneak them sometimes—they are phenomenal dipped into a mug of strong, black coffee. The bitterness of the coffee cuts through the sweetness of the glaze beautifully, and they become soft and cake-like when dipped. For a proper brunch spread, I plate them up alongside fresh fruit and maybe a savory quiche. The spice provides a warm counterpoint to the creamy eggs. I often use a sparkling cider or a tart cranberry spritzer alongside them for an elegant touch. As a dessert, they shine brightest when paired with something cold. My kids insist on a scoop of vanilla bean ice cream nestled right beside one, and I won’t argue. The contrast between the cold, creamy ice cream and the spicy cookie is just perfect. For those cozy, quiet evenings when you’re curled up on the couch reading, I always have a batch alongside a mug of hot apple cider—maybe with a cinnamon stick stirring it. That combination is pure, unadulterated autumn bliss, and it’s my favorite family tradition.
Top Tips for Perfecting Your Pumpkin Spice Cookies
I’ve made enough batches of these to wallpaper my pantry, and over the years, I’ve picked up a few non-negotiable rules for achieving that perfect soft texture and intense flavor. Listen closely to these because they are the difference between “good” and “amazing.”
Zucchini Prep: Wait, I mean Pumpkin Prep! The single most common mistake people make is using wet pumpkin. If you buy the canned stuff, open it up and spoon it into a fine-mesh sieve lined with a paper towel or cheesecloth. Let it sit over a bowl for at least an hour, or even overnight in the fridge, to let excess moisture drip out. This prevents the cookies from spreading like crazy and keeps the interior cakey instead of dense.
Mixing Advice: When combining the dry and wet ingredients, use a rubber spatula, not the mixer, for the final fold. Mix only until you see no more white flour patches. If you mix until perfectly smooth, you’ve gone too far. You want to see a few little streaks—that slight unevenness is what keeps them tender. I learned this the hard way when I tried to speed up the process with the stand mixer and ended up with dense hockey pucks.
Swirl Customization: If you skip the cream cheese filling swirl (and I hope you don’t!), you can still add texture by rolling the dough balls in a mixture of turbinado sugar and cinnamon before baking. This gives you a lovely sugary crunch on the outside. If you want more color in the swirl, add a tiny drop of orange food coloring to your filling mixture—it makes them look extra festive without affecting the taste.
Ingredient Swaps: If you’re out of brown sugar, you can use all granulated, but reduce it slightly, maybe to 1 cup total sugar instead of 1 ½ cups, or the cookies will be too sweet. For the fats, I tested this with half melted coconut oil instead of butter once, and while the flavor was nice, the spread was terrible, so stick to butter here! For vegan options, I haven’t perfected a full swap yet, but using half plant-based butter sticks often yields decent results.
Baking Tips: Use the middle rack. Always. Also, don’t trust the timer completely. Start checking visually at 10 minutes. If you gently press the edge of one cookie, it should feel set, but the very center should still give slightly under pressure. They continue baking on the hot tray after removal, so pulling them slightly early is the secret to that soft center.
Glaze Variations: If you prefer a tangier glaze, use lemon juice instead of milk. It brightens everything up! For a deeper fall flavor, dissolve a tiny pinch of instant espresso powder into the milk before mixing it into the glaze. It doesn’t make them taste like coffee, just deepens the spice notes wonderfully.
Storing and Reheating Tips
The way you store these cookies determines how long that beautiful, soft texture lasts. Luckily, they are quite forgiving, but you need to be strategic, especially concerning the glaze.
Room Temperature: This is my preferred method for immediate enjoyment. Store them in a single layer (if possible, or separated by parchment paper) in an airtight container for up to 3 days. If you stack them, the glaze can stick, making a mess, and the bottom cookies can compress. They are perfectly fresh tasting for about 48 hours this way.
Refrigerator Storage: If you know you won’t get to them within three days, the fridge is your friend. Store them in a tightly sealed container for up to a week. Just note that chilling can sometimes slightly firm up the cookie texture. To revive them, let them sit on the counter for about 30 minutes before eating.
Freezer Instructions: These freeze beautifully, which is great for holiday prep! Freeze them *un-glazed*. Place the baked cookies in a single layer on a baking sheet and flash freeze for an hour. Once solid, transfer them to a heavy-duty freezer bag, squeezing out as much air as possible. They keep their quality for up to 3 months. Thaw them overnight on the counter, then glaze them just before serving.
Glaze Timing Advice: Never store fully glazed cookies long-term in the fridge unless you absolutely have to. The humidity in the fridge can make the glaze weep or look shiny/wet. If you plan to freeze them, always wait to apply the glaze until they are fully thawed and at room temperature. If you apply the glaze and *then* freeze, it’s usually fine for about a month, but the texture of the glaze suffers slightly.
Frequently Asked Questions
Final Thoughts
There you have it—my tried, tested, and absolutely adored recipe for the most comforting pumpkin spice cookies you’ll ever bake. Seriously, once you experience that perfect soft bite, you’ll understand why I’m so passionate about this version. It’s more than just a cookie; it’s that warm, fuzzy feeling of fall wrapped up in a single treat. Don’t let the chilling time intimidate you; it’s the secret ingredient to avoiding flat, sad cookies! Remember to use good, fresh spices, and don’t be afraid to peek in the oven right at the 10-minute mark. These disappear in minutes at my house, and I’m hoping they become a cherished staple in yours, too. If you try this out, please drop a comment below and tell me how your family reacted, or let me know if you tried any fun variations—I’m always looking for new ways to tweak perfection! Happy baking, friends!
pumpkin spice cookies
Ingredients
Main Ingredients
- 0.5 cup unsalted butter softened
- 0.75 cup light brown sugar packed
- 0.25 cup granulated sugar
- 1 large egg
- 1 tbsp vanilla extract
- 2 tbsp cream or half-and-half
- 2 cups all-purpose flour
- 1 tbsp pumpkin pie spice
- 2 tsp corn starch
- 1 tsp baking soda
- pinch salt optional and to taste if nuts are salted
- 2 cups pecan halves Fisher brand preferred
Instructions
Preparation Steps
- In a stand mixer fitted with paddle attachment, cream together butter, brown sugar, granulated sugar, egg, and vanilla on medium-high speed for about 4 minutes until fluffy.
- Scrape down sides of bowl, add cream or half-and-half, and mix on low speed until combined, about 1 minute.
- Add flour, pumpkin pie spice, corn starch, baking soda, and optional salt. Mix on low speed just until incorporated, about 1 minute.
- Add pecan halves and mix on low speed for 30 seconds just to combine.
- Using a 1/4-cup measure or large cookie scoop, form 14 equal dough mounds. Roll into balls and flatten slightly.
- Place dough balls on a plate and cover with plastic wrap. Refrigerate for at least 3 hours or up to 5 days. Do not bake unchilled dough to avoid spreading too much.
- Preheat oven to 350°F. Line baking sheets with silicone mats or grease them lightly. Space cookies at least 2 inches apart, baking about 8 per sheet.
- Bake for 10 minutes until edges are set and tops appear just set but still slightly glossy in the center. Avoid overbaking.
- Allow cookies to cool on the baking sheet for 10 minutes before serving. Do not transfer immediately to racks.