I’m not sure what it is about honey lemon bars that keeps me coming back to the kitchen every few weeks, but there’s something incredibly comforting about them. Maybe it’s the way the tangy brightness of the lemon wakes up your taste buds, while the honey lends this gentle sweetness that’s totally unlike your usual tart bars. I remember discovering these bars on a rainy afternoon when I was craving something fresh but also cozy—a total game-changer compared to your typical lemon squares. My kids, who usually aren’t big fans of tart desserts, now beg for “Mom’s special lemon bars” every time I bake them. They’re surprisingly easy to whip up without any fancy ingredients, and honestly, the smell alone brings everyone running. If you love that sweet-tart combo but want something a little softer and more mellow, these honey lemon bars will become your new dessert obsession—I promise.
What is honey lemon bar?
So, what exactly are honey lemon bars? Think of them as the love child of a classic lemon bar and a honey-sweetened dessert—pretty much a heavenly cross between tart and sweet with a soft, tender crumb. It’s essentially a layered bar dessert where a buttery crust meets a lemony filling that’s lightly sweetened with honey instead of just pure sugar. The honey adds depth and smoothness, balancing out the lemon’s zing without overpowering it. The bars get their name because the star flavors are, of course, honey and lemon, but the texture and method are inspired by classic bars you might be more familiar with—just a little gentler and often easier on your palate. I find the honey really mellows things out, which makes these bars perfect for anyone who finds traditional lemon bars a bit too puckery. They’re so approachable even if you’re not a pro baker, and honestly, once you try them, you’ll want to make them again and again.
Why you’ll love this recipe?
What I adore about this recipe (besides everyone’s “wow, these are amazing!” reaction) is how stunningly simple it is. You really don’t need to be a baking whiz to pull these off—they’re forgiving and don’t require any fancy techniques. Plus, the flavor? It’s a knockout. The honey creates this naturally smooth sweetness that mingles perfectly with the fresh lemon juice and zest, making the bars taste bright but never harsh or overly sour. I always tell friends who are intimidated by lemon desserts to give this one a shot because it’s like the gentle cousin of lemon bars who’s got all the charm without the “whoa, that’s tart” surprise.
Another thing I love? The ingredients are so budget-friendly—you probably have most of them lying around your pantry already, and honey, unlike processed sugar, feels like a thoughtful, natural upgrade. The crust is buttery and soft but sturdy enough to hold the luscious lemon filling, which makes slicing these bars super satisfying. They’re versatile too—great as a quick snack, dressy dessert, or anything in between. If you’ve ever made classic lemon bars or even lemon poppy seed muffins, consider this your new twist. I’ve even swapped the honey for maple syrup a couple times when I was out, and it worked surprisingly well. Honestly, these bars disappear in minutes whenever I bake them, so keep a sharp eye if you don’t want to share.
How do I make honey lemon bars?
Quick Overview
This recipe comes together in just a few easy stages: you start with a simple buttery crust, whip up a fresh honey-lemon filling, and then bake it all until perfectly set. The best part? There’s no need for any crazy equipment or precision baking—just a bowl, a whisk, and love. This method lets you really savor the flavors without stress. The filling ends up silky and smooth, while the crust creates a soft-but-firm base that makes every bite delightful. I promise you don’t need to be an expert to get great results here—it’s that easy and very forgiving!
Ingredients
For the Main Batter:
- 1 cup all-purpose flour – go for good quality flour for a tender crust
- 1/2 cup unsalted butter, softened – room temp for easy creaming, use real butter if you can
- 1/4 cup granulated sugar – just enough to add subtle sweetness to the crust
- Pinch of salt – enhances flavor and balances sweetness
For the Filling:
- 3 large eggs – room temperature helps everything blend smoothly
- 1/2 cup freshly squeezed lemon juice (about 2-3 lemons) – fresh is key for that bright zing
- Zest of one lemon – don’t skip this, it gives incredible lemon aroma
- 1/3 cup honey – I prefer a mild clover or wildflower honey for a delicate sweetness
- 2 tbsp all-purpose flour – provides just the right amount of structure
For the Glaze:
- 1/4 cup powdered sugar – sifted to avoid lumps
- 1-2 tsp lemon juice – adjust to get a smooth but pourable glaze
- Optional: pinch of honey to drip on top for extra shine
Step-by-Step Instructions
Step 1: Preheat & Prep Pan
Pop your oven on at 350°F (175°C). Grease or line an 8×8-inch baking pan with parchment paper, leaving some overhang for easy removal later. I always do this the night before if I’m prepping—they tend to stick otherwise, and waiting an extra minute to prep saves me some cleanup headaches.
Step 2: Mix Dry Ingredients
Start by whisking the flour, sugar, and salt for the crust in a bowl. Getting these evenly combined before adding the butter ensures your crust stays crumbly and tender, not dense or uneven. Before mixing wet into dry, the texture should be sandy and light—if it feels too sticky, double-check your measurements.
Step 3: Mix Wet Ingredients
In another bowl, whisk the eggs until foamy, then stir in the lemon juice, zest, honey, and flour. The batter will look glossy and smooth. I always clap my hands whenever I get that perfect smoothness because it means no dry streaks and my filling is going to bake perfectly. If your honey is super thick, warm it just a bit to help it blend faster—you don’t want clumps.
Step 4: Combine
Slowly pour the wet mixture into your dry ingredients and fold gently. Don’t overmix here; just enough until everything comes together with no pockets of flour. If you stir too much, your bars can turn out tough, which is a rookie mistake I made all the time before learning this tip.
Step 5: Prepare Filling
The filling is essentially the wet mixture you just combined—once smooth and combined, it’s ready. This slight thickening from the flour in the filling makes sure things set up just right after baking, giving you that nice bar texture.
Step 6: Layer & Swirl
Pour half of the crust batter into the pan and spread evenly. Then add your lemon filling on top, spreading carefully. Finish with the rest of the crust batter and use a butter knife or small spatula to gently swirl the layers for a marbled effect. The swirl doesn’t have to be perfect—sometimes I deliberately swirl randomly for a more rustic, homemade look.
Step 7: Bake
Slide the pan into the oven and bake for about 25–30 minutes, or until the bars look set and the edges are golden. Insert a toothpick in the center; it should come out mostly clean but may have some moist crumbs—don’t mistake that for raw batter. Every oven bakes differently, so start checking at 22 minutes if you’re cautious.
Step 8: Cool & Glaze
Let the bars cool completely on a wire rack, at least 30 minutes or longer. This part is critical; rushing the glaze on warm bars can make it runny. Once cooled, mix your glaze ingredients together until smooth, then drizzle or spread evenly on top. The glaze should be just thick enough to hold its shape but still pull across the bars easily. For an extra pop, add a tiny drizzle of honey after the glaze has set—it’s a little flourish I learned from my grandma.
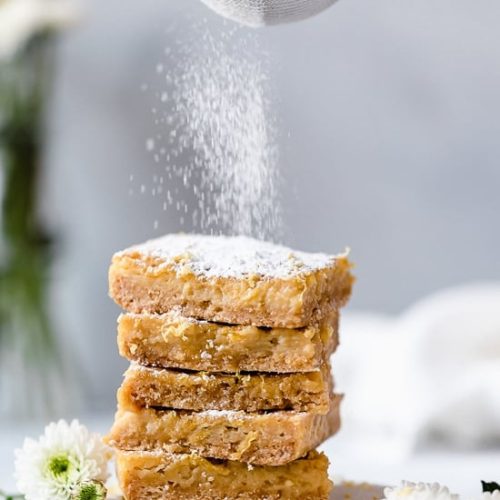
Step 9: Slice & Serve
Use a sharp knife and cut into squares or rectangles. To get neat edges, dip the knife in hot water and wipe between each cut—a trick that makes all the difference! These bars are fantastic served at room temperature but also delicious chilled. My kids love them chilled straight from the fridge on hot days because they’re refreshing without being icy.
What to Serve It With
For Breakfast: A cup of freshly brewed drip coffee or a light green tea pairs beautifully, and I like to serve these bars alongside a bowl of Greek yogurt topped with a sprinkle of granola to perk up the morning.
For Brunch: These bars brighten any brunch spread. Plate them next to fluffy scrambled eggs and a citrus salad, with mimosas or a sparkling lemonade to match the vibrant flavors.
As Dessert: Keep it simple—serve these bars with a scoop of vanilla bean ice cream or a dollop of whipped cream. Add a few fresh berries on the side and you’ve got an elegant but effortless dessert.
For Cozy Snacks: My absolute favorite way is to enjoy these with a warm cup of chamomile tea curled up with a blanket on lazy afternoons. The honey and lemon combo soothes and comforts, making this bar a go-to “pick-me-up” snack any day of the week.
Fun fact: at family gatherings, these bars become instant stars. One of my cousins insists on pairing them with a drizzle of local honey and a sprinkle of coarse sea salt for a grown-up twist that’s pretty irresistible.
Top Tips for Perfecting Your Honey Lemon Bars
Lemon Juice Quality: Freshly squeezed lemon juice is non-negotiable here. Bottled lemon juice just doesn’t bring the same bright zip. I usually zest and juice the lemons before starting so everything’s ready when needed.
Honey Choice: Use a mild honey for the filling—too strong a flavor (like buckwheat) can overwhelm the delicate lemon. I recommend clover or wildflower honeys. If your honey is very thick, warm it gently to ease mixing.
Mixing Advice: Overmixing the batter is the biggest culprit when bars turn out tough or dry. Fold ingredients gently, and stop as soon as everything combines. The filling should be smooth but not overly whipped.
Swirling Technique: For that lovely marbled look, don’t swirl too aggressively. Use a gentle zigzag motion with a thin knife or skewer, just a few swirls to keep the layers distinct but integrated beautifully.
Baking Tips: I position the rack in the middle of my oven to bake evenly—sometimes, if the edges brown too quickly, I cover with foil loosely part way through. For a slightly chewier crust, pull the bars out right as the center sets; if you like firmer bars, give them the full baking time.
Glaze Variations: If you want something a little different from the classic lemon glaze, try mixing in a bit of orange zest or swapping out lemon juice for a splash of fresh lime. For a richer glaze, add a teaspoon of softened butter before drizzling.
I made the mistake once of glazing too soon—impatient as I was—and ended up with a runny mess, so trust me on waiting for the bars to cool completely before glazing. It’s a subtle thing, but it makes all the difference.
Storing and Reheating Tips
Room Temperature: Honey lemon bars keep nicely at room temp for 2 days if you cover them well with plastic wrap or store in an airtight container. Make sure to keep them away from direct sunlight to prevent the glaze from melting.
Refrigerator Storage: For longer freshness (up to 5 days), store bars in a sealed container in the fridge. This helps keep the texture moist and the glaze intact. Bring to room temperature before serving for the best flavor.
Freezer Instructions: You can freeze these bars for up to 3 months. Wrap individual bars or the whole tray tightly in plastic wrap and foil. Thaw overnight in the fridge, then let sit out for 30 minutes before serving.
Glaze Timing Advice: If freezing or storing long-term, I recommend glazing bars after thawed—glazing beforehand can lead to a cracked or dull finish when thawed. For quick storage, glaze before refrigerating or serving.
Frequently Asked Questions
Final Thoughts
These honey lemon bars hold a special place in my heart—not just for the way they taste, but because they bring everyone into the kitchen with smiles and happy memories. They remind me that sometimes the simplest things, made with fresh ingredients and a little patience, can be the most satisfying. Whether you’re looking for a quick snack that feels a little decadent or a dessert that impresses with minimal effort, these bars deliver every single time. I’d encourage you to try them exactly as written first, then experiment with swaps and twists—it’s so much fun to make the recipe your own! I absolutely can’t wait to hear how yours turn out. Feel free to drop me a comment or share your favorite variations. Happy baking and enjoy every bite!
honey lemon bars
Ingredients
Main Ingredients
- 0.375 cup white whole wheat flour
- 0.375 cup all purpose flour
- 0.25 cup light brown sugar not packed
- 3 tablespoons cornstarch
- 2 teaspoons lemon zest grated
- 0.5 teaspoon baking powder
- 0.25 teaspoon kosher salt
- 4 tablespoons unsalted butter cut into bits and chilled
- 1 tablespoon 0% Greek yogurt
- 0.333 cup honey
- 3 large eggs lightly beaten
- 2 tablespoons white whole wheat flour
- 0.125 teaspoon kosher salt
- 1 teaspoon lemon zest grated
- 5 tablespoons fresh lemon juice
- 1 tablespoon powdered sugar for dusting on top
Instructions
Preparation Steps
- Preheat the oven to 350°F.
- Prepare an 8-inch square glass or ceramic baking dish by lightly spraying the inside with baking spray.
- Cut 2 sheets of parchment paper 15 x 15 inches each, fold them in half so they are 7.5 x 15 inches to make them sturdier.
- Line the pan with the 2 long sheets of parchment paper placed perpendicular to each other, allowing overhang to use as handles for removing the bars after baking.
- Spray the inside of the parchment with baking spray.
- In a food processor, combine the flours, brown sugar, cornstarch, lemon zest, baking powder, and salt; process until well combined.
- Add the chilled butter and Greek yogurt to the flour mixture and pulse about a dozen times. Press the mixture evenly into the prepared pan, including up the sides about 1/4 inch to contain the filling.
- Bake the crust at 350°F until evenly browned, about 30 minutes. Turn off the oven and cool the crust on a rack for at least 20 minutes.
- Increase oven temperature to 325°F once crust is cooled.
- Prepare the filling by whisking the eggs, honey, and lemon zest in a medium bowl. Add the flour 1 tablespoon at a time and salt, mixing well after each addition.
- Stir in the fresh lemon juice and pour the filling over the cooled crust.
- Bake at 325°F for 22 to 25 minutes until the filling is set.
- Cool completely before lifting the bars out of the pan using the parchment handles. For best texture, refrigerate overnight.
- Cut into 12 squares using a clean hot knife, cleaning the knife between slices.
- Dust with powdered sugar just before serving.