There’s just something about the combo of rich chocolate and creamy peanut butter that feels like a hug on the inside, right? I still remember the first time I made this chocolate peanut butter pie—it was for a family gathering, and let’s just say it vanished faster than I could snap a picture. It’s that kind of dessert that hits all the right notes: smooth, decadent, and just a touch nostalgic if you grew up sneaking spoonfuls of peanut butter straight from the jar like I did. If you’re familiar with classic peanut butter cups, this pie is basically their grown-up, fancier cousin with layers of silky chocolate and a luscious peanut butter filling. Plus, unlike some fancy desserts that intimidate you with complicated steps, this one feels like a warm invite from the kitchen, saying, “Hey, come sit and relax—we’ve got dessert handled.” Trust me, it’s a lifesaver when you want something indulgent but don’t have all day to fuss around.
What is chocolate peanut butter pie?
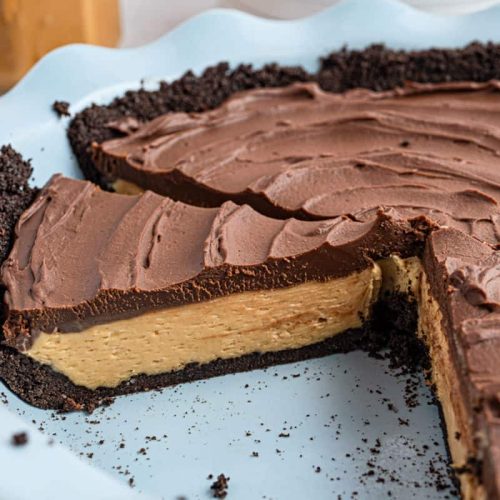
So what exactly is a chocolate peanut butter pie? Think of it as a dreamy, no-bake pie where the luscious peanut butter filling meets a chocolate crust and finish. It’s essentially a chilled dessert that’s creamy, slightly sweet, and loaded with the classic combo of chocolate and peanut butter you’ve probably been obsessed with since forever. The name is pretty straightforward—it’s a pie that puts those two flavors front and center. What I love about it is how approachable it feels; you don’t have to be a dessert wizard to whip it up, but it tastes like you spent hours fussing over it. Plus, it’s flexible—perfect for those times when you want a make-ahead dessert for family dinners, potlucks, or just a midnight snack that feels indulgent yet satisfying.
Why you’ll love this recipe?
Okay, I’m going to be honest—chocolate peanut butter pie has a special place in my heart, mostly because it’s one of those desserts that everyone loves and rarely leaves leftovers. What I love most about this pie is the flavor. The chocolate crust has this rich, slightly bittersweet edge that perfectly balances the creamy, sweet peanut butter filling. Every bite melts in your mouth, and the flavors just dance together—the familiar nutty notes with the deep chocolate undertones. It’s the sort of pie that your family will ask for on repeat, and you won’t mind making it because it’s crazy simple to put together.
Speaking of simplicity, this recipe seriously couldn’t be easier. It feels like cheating how little effort it takes for such a showstopper dessert. No long baking times or complicated sauces—just pure, smooth goodness. Plus, it won’t break the bank. We’re talking common pantry staples like peanut butter, cream cheese, and chocolate wafers in the crust, so it’s super budget-friendly. And because it’s versatile, you can dress it up with whipped cream, chopped peanuts, or even a drizzle of caramel if you’re feeling fancy that day. It’s like the classic peanut butter cup but on a canapé scale, which means it pairs brilliantly with a scoop of vanilla ice cream or a cup of strong coffee.
Honestly, if you like the richness of chocolate cheesecake or the simplicity of a peanut butter cup, this pie is a fun middle ground. I’ve made this countless times, and every time it just feels a little like a small celebration in the kitchen—plus, it makes a fantastic gift when you bring it to someone’s house. Trust me on this one, it’s a winner!
How do I make chocolate peanut butter pie?
Quick Overview
This recipe comes together in just a few simple steps: start with a chocolate cookie crust that you press into your pan, whip up a creamy peanut butter filling that’s smooth as silk, swirl in a little chocolate for extra flair, and then chill until it’s perfectly set. The beauty of this method is that there’s no complicated baking or waiting around—just a quick assembly that leaves you with a pie that’s full of texture and flavor. This is perfect when you need dessert stat or want to prepare something ahead of time for your weekend get-together.
Ingredients
For the Crust:
- 1 12 cups chocolate wafer crumbs (I buy the premade kind for ease, but you can crush your own)
- 5 tablespoons unsalted butter, melted (helps the crust pack together nicely)
- 2 tablespoons sugar (optional, but it balances the slight bitterness of the wafer crumbs)
For the Filling:
- 1 cup creamy peanut butter (I always use natural, smooth peanut butter—tastes fresher and less sugary)
- 8 oz cream cheese, softened (this gives it that silky texture)
- ¾ cup powdered sugar (you can adjust this depending on how sweet you like it)
- 1 teaspoon vanilla extract (because vanilla never disappoints)
- 1 cup heavy whipping cream, whipped stiff (adds lightness and fluffiness)
For the Glaze:
- 4 oz semisweet chocolate, chopped
- ¼ cup heavy cream (adds gloss and smooth consistency)
- 1 teaspoon butter (optional, but adds shine)
Step-by-Step Instructions
Step 1: Preheat & Prep Pan
I usually start by grabbing a 9-inch pie pan or springform pan and lightly greasing it just to make life easier when it’s time to slice. No oven here since everything’s no-bake! Just make sure your crust will compact well since it needs to hold everything together after chilling.
Step 2: Mix Dry Ingredients
Throw your chocolate wafer crumbs and sugar (if using) in a bowl and mix until evenly combined. The texture should look like moist sand. This step helps the sugar get evenly distributed, so your crust is nicely balanced between sweet and chocolatey.
Step 3: Mix Wet Ingredients
Next, melt your butter and stir it right into the crumb mixture until everything is coated. This makes the crust stick together like magic when you press it into the pan. No lumps—just smooth, buttery crumbs.
Step 4: Combine
Press the crumb mixture firmly into the bottom and up the sides of your pan. I always do mine with the back of a spoon, pressing tight to avoid gaps. If the crust feels crumbly, a quick extra pat with your hands helps. Pop it into the fridge while you whip up your filling.
Step 5: Prepare Filling
In a large bowl, beat the cream cheese, peanut butter, powdered sugar, and vanilla together until silky smooth—no lumps, promise! Then fold in the whipped cream gently, aiming for a fluffy and light texture. I’ve learned that folding gently keeps all that air in, making the filling feel luscious. Feel free to taste here—sometimes I add a touch more powdered sugar if my peanut butter is super salty.
Step 6: Layer & Swirl
Pour most of the peanut butter filling into your chilled crust, smoothing it out. Then, melt your chopped chocolate with cream and butter over a double boiler or microwave, stirring until glossy. Drizzle the glaze over the filling and lightly swirl it in with a knife or skewer—this makes it look super fancy without extra effort.
Step 7: Bake
Since this is a no-bake pie, we skip the oven altogether. Instead, pop the whole thing in the fridge for at least 4 hours, but ideally overnight. This chilling step is key for the flavors to meld and the pie to firm up just right.
Step 8: Cool & Glaze
Once chilled, if you want extra chocolate drizzle, you can warm another small batch of glaze and drizzle it on top just before serving. It adds a nice shiny finish and gives a little extra chocolate punch.
Step 9: Slice & Serve
Use a sharp, warm knife (dip it in hot water and wipe dry) to slice neat pieces—otherwise, you might get scraping. Serve chilled, maybe with a dollop of whipped cream or a sprinkle of chopped peanuts for crunch. My kids actually ask for seconds before I can blink!
What to Serve It With
For Breakfast: I know this sounds indulgent, but trust me—if you’re a peanut butter fan, a small slice alongside your morning coffee can be a total treat. I like pairing it with a strong black coffee or a milky latte to balance the richness.
For Brunch: Dress it up by slicing smaller tarts or mini pies and serve with fresh berries. A chilled glass of milk or even sparkling water with lemon keeps things light and refreshing.
As Dessert: This pie shines after dinner. Try it with a scoop of vanilla or espresso ice cream and a sprinkle of flaky sea salt to boost the chocolate-peanut magic. A small pour of warmed caramel sauce can also make it feel extra special.
For Cozy Snacks: On a lazy afternoon, I’ll slice off a wedge and enjoy it with a cup of hot cocoa or tea—perfect for curling up with a good book or binge-watching a show.
Our family likes to finish Sunday dinners with this pie; it brings everyone together with smiles and happy sighs. If you’re hosting friends, it’s a no-fail crowd-pleaser that gets rave reviews every time.
Top Tips for Perfecting Your Chocolate Peanut Butter Pie
Crust Prep: Press the crumbs firmly and evenly. If you don’t pack it down well, the crust can crumble when slicing. I learned this after a few failed attempts where my pie was delicious but messy.
Mixing Advice: When combining the cream cheese and peanut butter, make sure they’re softened to room temperature—this makes your filling ultra silky and avoids lumps. Don’t overmix once you fold in the whipped cream; gentle folds keep the airy texture intact.
Swirl Customization: For a show-stopping look, try adding peppermint extract or a pinch of cinnamon to the glaze during melting. You can also add chopped peanuts or even swirl in some caramel ribbons for a twist. Use a skewer in wide, swooping motions to create pretty marbling without overdoing it.
Ingredient Swaps: Out of cream cheese? Greek yogurt or mascarpone can work but will change the texture slightly—greeker yogurt makes it tangier, mascarpone richer. If you’re dairy-free, try coconut cream in place of heavy cream and vegan cream cheese substitutes. I’ve tested almond milk whipped with a stabilizer, and it actually made the pie creamier, which was a happy surprise.
Baking Tips: Because this is a refrigerated pie, the key is chilling time. The longer it rests, the firmer and more flavorful it becomes. I usually make it the day before to let everything set perfectly. Also, store it in the coldest part of your fridge to avoid softening.
Glaze Variations: Want to shake things up? Try a peanut butter glaze made with powdered sugar, peanut butter, and a tiny bit of milk for drizzle instead of chocolate, or dust with cocoa powder or powdered sugar for a more understated finish. Always warm your glaze slowly and stir often to keep it silky smooth.
Storing and Reheating Tips
Room Temperature: I don’t recommend this pie sitting out for long—since it’s cream-based, keep it covered and serve within 2 hours max for safety and freshness.
Refrigerator Storage: Keep the pie tightly covered with plastic wrap or in an airtight container. It’s best eaten within 3-4 days. I’ve found that keeping it on a middle rack prevents temperature fluctuations that can soften the filling.
Freezer Instructions: Yes, you can freeze this pie! Wrap it tightly with aluminum foil and plastic wrap to prevent freezer burn. It keeps well for up to 2 months. Thaw in the fridge overnight before serving to maintain texture and avoid weeping.
Glaze Timing Advice: If you plan to freeze the pie, hold off on the glaze until after thawing to keep it fresh and shiny. For fridge storage, glaze before chilling to let the chocolate set nicely on top.
Frequently Asked Questions
Final Thoughts
Honestly, this chocolate peanut butter pie has become my go-to for impressing guests and treating my family on weekend nights. It hits that sweet spot of being rich without feeling heavy, creamy without being overly dense, and it just fills the kitchen with such a cozy, inviting smell as it chills. I love how approachable it is—no fuss, just pure comfort food vibes in pie form. If you’re a fan of peanut butter cups or chocolate desserts with a twist, I’d say dive right in. You’ll find this one to be a repeat for birthdays, holidays, or just “I need something sweet right now” moments. And hey, once you make it, I’d love to hear about your tweaks and favorite toppings—every time I make this, it feels like discovering a little new joy. Happy baking!
chocolate peanut butter pie
Ingredients
Main Ingredients
- 25 cookies Oreo Cookies
- 5 tablespoons unsalted butter melted
- 6 ounces semi-sweet chocolate
- 0.75 cup heavy whipping cream
- 1 tablespoon butter
- 8 ounces cream cheese softened to room temperature
- 0.75 cup creamy peanut butter
- 0.33 cup granulated sugar
- 4 ounces Cool Whip thawed
Instructions
Preparation Steps
- Place Oreo cookies in a food processor and blend at high speed until finely chopped. Slowly add melted butter while blending until crumbs pull away from the sides.
- Press the cookie crumb mixture firmly into the bottom and up the sides of a 9-inch pie plate. Freeze while preparing the filling.
- Put chopped semi-sweet chocolate into a heat-proof bowl and set aside.
- Heat heavy whipping cream and 1 tablespoon of butter over medium-low heat until cream simmers and butter melts, without boiling.
- Pour hot cream mixture over chocolate and let sit for 2 minutes, then stir until smooth. Refrigerate about 30 minutes.
- In a large bowl, beat softened cream cheese, peanut butter, and granulated sugar together until well combined.
- Fold in thawed Cool Whip gently until just mixed. Spread filling evenly into frozen Oreo crust.
- Chill pie in refrigerator for 30 minutes. Pour slightly thickened ganache over filling and smooth or swirl with back of spoon.
- Refrigerate pie for at least 2 more hours or until set. Serve chilled.