There’s something downright magical about a funfetti cake roll—the smell of vanilla and sugar dancing through the air, the little bursts of colorful sprinkles hiding inside each slice, and the soft, pillowy texture that just melts in your mouth. I remember the first time I made it on a rainy Saturday afternoon; my kitchen smelled like a celebration even though it was just us at home. It’s a dessert that feels like a party, but is surprisingly easy to pull off when you’re craving something sweet and special without turning on the oven for hours. If you love classic funfetti cake but sometimes find it too rich or heavy, this roll is the lighthearted cousin that steals the show every time. My kids ask for this one constantly—and trust me, it disappears in minutes whenever I bring it to a gathering.
What is Funfetti Cake Roll?
Think of a funfetti cake roll as the ultimate birthday cake in a new form. It’s essentially a thin sheet of moist vanilla sponge cake speckled with those cheerful little rainbow sprinkles, rolled up tight with a creamy filling that perfectly complements the sweetness. The “funfetti” part comes from those sprinkles (aka “confetti” for your cake), giving every bite a playful pop of color and surprise. It’s a cross between a classic jelly roll and that nostalgic funfetti cake you might remember from your childhood birthday parties. The concept is super approachable—no fancy piping or layers, just something joyful and delicious you can slice and share. It looks fancy, but really it’s a friendly, welcoming kind of dessert you’ll feel proud serving to friends and family.
Why you’ll love this recipe?
What I adore most about this funfetti cake roll is that it mixes the best of both worlds: the look and flavor of a celebration cake, but with the speed and ease of a roll cake. The flavor is exactly what you want—sweet, vanilla-forward with just the right hint of buttery richness, plus those little rainbow sprinkles melting into the batter add a surprise crunch and color. It’s not overly sweet, so even if you’re a bit sugar-shy, you’ll find it indulgent without being cloying. Another thing I love is how gentle the texture is—it’s soft and moist but holds together beautifully when sliced, which isn’t always the case with rolled cakes. I’ve made dozens of variations, but this one’s a lifesaver on busy nights when you want to whip up a treat without diving into a complicated recipe.
Bonus points? This recipe is budget-friendly and calls for pantry staples you probably already have. And the versatility? You can dress it up with flavored creams, swap out fillings, or turn it into a mini-layered cake for special occasions. It’s like a blank canvas inviting you to make it your own. If you’ve ever enjoyed a Swiss roll or other jelly roll desserts, you’ll feel right at home here—and if you adore funfetti cupcakes or classic funfetti cake, this takes it to the next level without adding complexity.
How do I make Funfetti Cake Rolls?
Quick Overview
This funfetti cake roll is a simple, straightforward process. The trick is making just the right sponge cake—it’s light, airy, and flexible, so it rolls up without cracking. You’ll mix the batter with sprinkles folded in, bake it as a thin layer, then spread your delicious frosting or filling before rolling it tight. It’s quicker than you might think and doesn’t require fancy equipment. What makes this method special is the balance between moistness and structure—a little extra care in folding the batter and gentle rolling turns a basic sponge into a showstopper. When you’re done, you’ve got a colorful, festive dessert that’s perfect for sharing or a sweet solo treat.
Ingredients
For the Main Batter:
- 1 cup all-purpose flour – Use a fresh, finely milled flour for the best texture
- 1 teaspoon baking powder – For that gentle rise without heaviness
- ¼ teaspoon salt – Just enough to balance flavors
- 4 large eggs, room temperature – This gives the cake its airy sponge texture
- ¾ cup granulated sugar – Adjust if you prefer a less sweet cake
- 1 teaspoon vanilla extract – The star flavor, never skimp on this!
- ⅓ cup whole milk – Adds moisture and tenderness
- ⅓ cup vegetable oil – Keeps the cake soft and flexible
- ½ cup rainbow sprinkles – Use good-quality ones that won’t bleed color into the batter
For the Filling:
- 1 cup heavy cream – Whip until soft peaks for a light texture
- ¼ cup powdered sugar – Sweeten to taste, but don’t go too heavy
- 1 teaspoon vanilla extract – For a smooth, creamy vanilla touch
- Optional: 2 tablespoons cream cheese – For a slight tang and thicker consistency
For the Glaze:
- 1 cup powdered sugar – Sifted to avoid lumps
- 2 tablespoons milk or fresh cream – Adjust for a smooth pourable consistency
- ½ teaspoon vanilla or almond extract – Play with flavors here!
- Optional: pinch of salt – To balance the sweetness
Step-by-Step Instructions
Step 1: Preheat & Prep Pan
Heat your oven to 350°F (175°C). Line a 15×10 inch jelly roll pan with parchment paper, making sure it touches the edges for easy removal. Lightly grease the paper so the cake doesn’t stick—this little step saves you a lot of heartache later. I always do this prep the night before if I’m busy the next day; no rushing required!
Step 2: Mix Dry Ingredients
In a medium bowl, whisk together the flour, baking powder, and salt until well combined. This step is key for an even rise and structure. Sifting helps here too, but if you’re out of one, just whisk well—you want them thoroughly mixed and free of lumps.
Step 3: Mix Wet Ingredients
In a separate large bowl, beat the eggs with the sugar until thick, pale, and tripled in volume—this takes about 5-7 minutes with a hand mixer. You’re looking for a ribbon stage where the batter falls off the whisk slowly and stands on the surface for a moment before sinking in. Then add the vanilla, milk, and oil, mixing gently to combine.
Step 4: Combine
Now, gently fold the dry ingredients into the wet mixture in batches—think gentle cloud-moving motions, not vigorous stirring. Overmixing will deflate the batter, leading to a denser cake that might crack when rolled. This is the part where I remind myself to slow down and be patient. Finally, fold in the sprinkles carefully, so they’re spread evenly but not crushed or bleeding.
Step 5: Prepare Filling
While the batter bakes, whip the cream with powdered sugar and vanilla until soft peaks form. If using, beat in the cream cheese for a luscious, tangy cream that sticks well inside the roll. Taste and adjust sweetness to your liking; I sometimes add a little lemon zest for brightness.
Step 6: Layer & Swirl
Pour the batter evenly into the pan, smoothing the top with a spatula. For a little extra flair, swirl a spoonful of filling gently on top before baking—this creates a marble effect when sliced, which my kids love. It’s totally optional but adds some fun texture and looks gorgeous.
Step 7: Bake
Bake for about 12–15 minutes or until the cake springs back lightly when touched and a skewer inserted in the center comes out clean. Oven temperatures vary, so start checking around 12 minutes. Remember, overbaking dries it out and makes rolling tricky, so keep a close eye!
Step 8: Cool & Glaze
As soon as it comes out of the oven, invert the cake onto a clean kitchen towel dusted lightly with powdered sugar. Peel off the parchment carefully, then roll the cake and towel together while it’s still warm—this trains it to roll without cracking later. Let it cool completely before unrolling and spreading the filling. Once rolled up again, drizzle with your glaze or set the glaze aside if you want to keep it fresh longer.
Step 9: Slice & Serve
Use a sharp serrated knife to slice the roll into neat rounds about an inch thick. I find chilling the roll for 20 minutes lets it slice cleanly without squishing. Serve at room temp or chilled—both ways taste divine. Sometimes I add a few extra sprinkles on top or a handful of fresh berries for a festive touch.
What to Serve It With
For Breakfast: Pair a slice with strong, black coffee or a frothy cappuccino. The creaminess of the filling and bursts of sprinkles feel like a special weekend treat that starts the day with a smile.
For Brunch: Serve it alongside fresh fruit and perhaps a glass of sparkling mimosa or vanilla chai latte. It balances sweet but isn’t too heavy for a mid-morning indulgence, and it looks stunning on a brunch table.
As Dessert: Top with a dusting of powdered sugar or a scoop of vanilla ice cream. My family loves it served with fresh raspberries or a drizzle of warm berry sauce—sweet, creamy, and visually fun.
For Cozy Snacks: Just a simple cup of hot cocoa is enough here. This cake roll shines in those quiet moments curled up on the couch, with the warmth and sweetness bringing instant comfort. Funfetti cake roll and pj’s? Yes, please.
We often celebrate little wins at home with this cake—like the end of a busy week or a sunny afternoon. It’s a reminder that joy can come in colorful, simple bites, and I hope it becomes one of your favorite go-tos as well.
Top Tips for Perfecting Your Funfetti Cake Roll
Batter Folding: Always fold gently to keep that delicate airiness intact. I learned the hard way that overmixing makes it dense and prone to breakage when rolling.
Sift Your Sugar and Flour: This helps keep the batter smooth and even, which really contributes to the sponge’s softness.
Sprinkle Placement: Use good-quality non-melting sprinkles and fold them in carefully at the end. If they bleed, your cake will be streaky instead of fun and colorful.
Swirl Technique: Don’t overdo the filling swirl on the batter. A little swirling before baking adds a fantastic marbled look; too much can cause uneven baking.
Glaze Consistency: The glaze should be pourable but not runny. Add milk slowly to powdered sugar, and if it’s too thick, thin it out bit by bit. Almond extract adds a lovely nutty warmth if you’re bored of vanilla.
Rolling the Cake: Roll it up while warm the first time with a towel to train it. If you skip this, your cake might crack. If cracks happen, just fill them with extra cream and nobody will know!
Ingredient Swaps: I’ve tested with almond milk and it actually made the cake creamier. Coconut oil works too if you prefer a non-vegetable oil. For gluten-free baking, rice flour blends do quite well here (more on that below!).
Baking Timing: Every oven is different, so start checking at 12 minutes. Underbaking results in a sticky cake hard to roll; overbaking dries it out.
After years of baking this roll, these little tips make all the difference. Trust me, every crack was a lesson, and now it’s one of the easiest special treats I’ve got in my repertoire.
Storing and Reheating Tips
Room Temperature: You can keep the cake roll covered with plastic wrap or an airtight cake dome for up to 2 days. The moisture stays balanced and the filling stays fluffy without refrigeration if your kitchen isn’t too warm.
Refrigerator Storage: Store in an airtight container for up to 4 days. Make sure the glaze dries fully before refrigerating, or it might run. I usually bring it to room temperature before serving to refresh the creaminess.
Freezer Instructions: Wrap the roll tightly in plastic wrap, then in foil, and freeze for up to 3 months. Thaw overnight in the fridge for best texture, then unwrap and let rest at room temp before slicing.
Glaze Timing Advice: Adding glaze right before serving gives the best visual impact and fresh taste. If freezing, skip glazing and glaze after thawing.
I’ve found these methods keep the cake just as delicious as the day it was made, which is comforting when craving a quick slice late at night.
Frequently Asked Questions
Final Thoughts
Making this funfetti cake roll never fails to brighten my day, and it’s honestly one of those recipes I cherish because it balances nostalgia with sheer delight. It’s approachable enough to make on a whim yet feels like a little handmade gift when you serve it to loved ones. From the first whisk of eggs to that colorful swirl of sprinkles and creamy filling, every step feels like a warm hug in baking form. If you’re ever in the mood to experiment, try swapping the vanilla for almond or adding citrus zest to the filling—these small twists keep the recipe fresh and exciting. I can’t wait to hear how yours turns out, and be sure to share your own funfetti twist or family traditions in the comments. Happy baking—and remember, sometimes the simplest treats bring the biggest smiles!
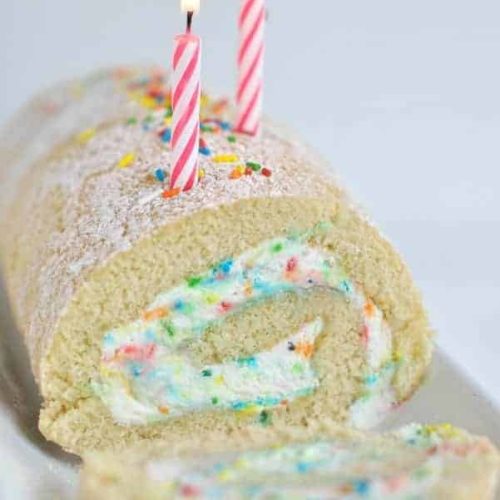
Funfetti cake roll
Ingredients
Main Ingredients
- 3 large eggs
- 1 cup granulated sugar
- 0.33 cup water
- 2 teaspoons vanilla extract
- 1 cup all-purpose flour
- 1 teaspoon baking powder
- 0.25 teaspoon kosher salt
- 0.25 cup powdered sugar for dusting towel
- 1.5 cups heavy whipping cream
- 0.25 cup granulated sugar
- 1 teaspoon vanilla extract
- 0.5 cup sprinkles (jimmies) rainbow colored
Instructions
Preparation Steps
- Line a 15x10x1 inch baking sheet with parchment paper and spray with baking spray or grease and flour. Sprinkle powdered sugar onto a large clean dish towel and set aside.
- In a large mixing bowl, beat eggs for 2-3 minutes. Add granulated sugar, water, and vanilla extract and beat for an additional minute until fully incorporated. Beat in flour, baking powder, and salt until smooth. Pour batter into prepared baking sheet.
- Bake in a preheated 375°F oven for 11-13 minutes until the cake is springy to the touch.
- Remove cake from oven and immediately invert onto the powdered sugar-covered towel. Peel off parchment paper. Place a clean sheet of parchment paper over the back of the cake and roll the cake up in the towel carefully from short end to short end. Cool for one hour.
- To make the filling, beat heavy whipping cream until soft peaks form. Add granulated sugar and vanilla extract and continue beating until stiff peaks form. Gently fold in sprinkles, being careful not to stir too much to avoid bleeding the colors.
- Once cooled, unroll the cake gently and remove the parchment paper. Spread the funfetti whipped cream filling evenly over the cake and re-roll without the towel. Optionally, dust with powdered sugar or extra sprinkles. Refrigerate wrapped in plastic wrap. Best served within 1-2 days.