There’s something almost magical about roasting Brussels sprouts that turns even the pickiest eaters into fans. I still remember the first time I tried roasting them instead of boiling—oh my, the difference! The smell that fills the kitchen, that crispy little char on the edges, and the tender, slightly nutty interior… it’s like Brussels sprouts hit their glow-up moment. My husband was skeptical at first, but after one bite of these roasted Brussels sprouts, he was hooked. This is one of those dishes I reach for when I want something satisfying but effortless—and secretly healthy too. It’s like the roasted potatoes of the veggie world, but with a little green punch that makes you feel proud to serve it. Whether it’s a weeknight side or a holiday table star, this recipe never fails to impress.
What is Roasted Brussels sprouts?
Think of roasted Brussels sprouts as the coolest, easiest way to make a humble veggie totally crave-worthy. Brussels sprouts themselves are these tiny cabbage-looking green buds that, when roasted, develop an irresistibly crispy exterior and a sweet, mellow flavor inside. The roasting process caramelizes their natural sugars, which means no bitter bites here—just a lovely mixture of crispy, charred bits and soft, tender centers. It’s essentially Brussels sprouts’ glow-up from the often mushy, overcooked version many of us grew up with. You toss them with some olive oil, salt, and pepper, pop them in a hot oven, and let the magic happen. I often think of them as the superstar side dish that works at any table, from casual dinners to fancy feasts.
Why you’ll love this recipe?
What I love most about this roasted Brussels sprouts recipe is how straightforward it is and how it almost never fails to disappear seconds after hitting the table. First off, the flavor is something special: you get that perfect balance of savory, earthiness, and a touch of sweetness thanks to caramelization. That crispy outside with tender inside texture? Pure magic. Plus, it’s packed with nutrients, which gives me peace of mind feeding it to my family. The simplicity really can’t be overstated—you just need a handful of classic pantry ingredients and an oven. No fancy gadgets, no long prep. It’s also incredibly forgiving; I’ve accidentally roasted them a minute or two too long and they still tasted delightful. Budget-wise, Brussels sprouts are often affordable, especially in season, and they stretch nicely for a family dinner. I also love how versatile these roasted sprouts are—from tossing them with balsamic glaze for a fancy touch to sprinkling Parmesan for a cheesy twist. If you enjoy roasted veggies like my roasted cauliflower recipe, this one’s going to become just as much of a staple in your kitchen.
How do I make Roasted Brussels sprouts?
Quick Overview
Busy weeknights have met their match with this simply stunning roasted Brussels sprouts recipe. You’re basically tossing trimmed sprouts with olive oil and seasoning, spreading them out on a baking sheet, and roasting until they’re gloriously browned and crispy on the edges. This method brings out their best texture and flavor without any fuss. I love how the high roasting temperature creates that irresistible outer crunch while keeping them tender inside, and I always make sure not to overcrowd the pan so they roast instead of steam. Seriously, if you can chop and toss, you’ve got this in the bag.
Ingredients
For Roasted Brussels sprouts:
- 1 ½ pounds Brussels sprouts, trimmed and halved – look for firm, bright green sprouts, avoiding any that are wilted or yellowed.
- 3 tablespoons good-quality olive oil – I prefer extra virgin for that fruity flavor.
- ½ teaspoon kosher salt – don’t skimp; salt brings out the veggies’ natural sweetness.
- ¼ teaspoon freshly ground black pepper – freshly cracked is best for that bite.
- Optional: 1-2 garlic cloves, thinly sliced, or a sprinkle of red pepper flakes for a little heat.
Step-by-Step Instructions
Step 1: Preheat & Prep Pan
Kick things off by preheating your oven to 425°F (220°C). While it heats, line a large baking sheet with parchment paper or a silicone mat—this helps prevent sticking and makes clean-up easier. Make sure to give the sheet a good size because crowded sprouts tend to steam instead of roast, and nobody wants soggy Brussels sprouts! I usually space them out in a single layer with the cut sides facing down for maximum browning.
Step 2: Trim and Halve the Brussels Sprouts
Cut off the tough stems and remove any yellow or damaged outer leaves. Then slice each sprout in half from top to bottom. This not only helps them roast evenly but also exposes that cut surface to the heat, which crisps up beautifully. I learned the hard way that skipping the trimming step often leaves you with woody bites that guests don’t love.
Step 3: Toss with Oil and Seasonings
In a big bowl, toss the halved sprouts with olive oil, salt, pepper, and if you’re using, garlic or red pepper flakes. Make sure every piece gets some love with oil and seasoning—this is what makes that amazing crust. I often use my hands for this part because it’s easier to really coat everything evenly.
Step 4: Arrange on the Baking Sheet
Spread the Brussels sprouts cut side down in a single layer on your prepared baking sheet. I find the best color and crispness happen when the cut sides have direct contact with the pan. Trust me, this step is key—if you don’t get that, your roast results won’t be as good. No overlapping!
Step 5: Roast Until Golden and Tender
Pop the pan in the oven and roast for about 20-25 minutes. Halfway through (around 12 minutes), give the sprouts a little shake or turn to brown the other side as well. Keep your eye on them because every oven is a bit different—mine can go from perfect to burnt in minutes! You’re looking for that deep golden brown, crispy edges, and a tender inside that gives when you poke with a fork.
Step 6: Serve Warm and Enjoy
Once done, I like to add a little extra sprinkle of salt or drizzle a bit of balsamic vinegar for a tangy contrast right before serving. Sometimes, I throw on a handful of toasted pine nuts or shaved Parmesan for a special touch. Serve these babies hot and watch them disappear in minutes.
What to Serve It With
For Breakfast: Roasted Brussels sprouts are surprisingly fantastic alongside eggs—whether scrambled, fried, or poached—and a piece of crusty toast. Pair them with a bold, black coffee or an herbal chai for a morning kick that awakens your taste buds.
For Brunch: Serve your roasted sprouts with a tangy yogurt dip or a lemony aioli and a sparkling mimosa for a light, elegant brunch. The crispiness plays so well against creamy dips and fresh, zesty citrus drinks.
As Dinner Sides: These sprouts adore beef, chicken, or salmon. They’re a crisp, savory green punch that complements rich proteins without stealing the spotlight. For cozy dinners, toss in some caramelized onions or crispy bacon bits and serve alongside mashed potatoes or wild rice.
For Cozy Snacks: When you need a quick veggie fix, roasted Brussels sprouts are the ultimate snack. Warm, crisp, and addictive, I often have leftovers just reheated for an after-school nibble or paired with hummus as a nutrient-packed treat.
My family’s go-to combo is these sprouts with roasted garlic mashed potatoes and a nice roast chicken on Sundays. The contrast of textures and flavors together is pure comfort food magic that everyone asks for again and again.
Top Tips for Perfecting Your Roasted Brussels Sprouts
Trim Right: Always cut off the stem and remove the outer leaves if they look floppy. That gets rid of bitterness and ensures all your sprouts roast evenly.
Don’t Skip Halving: Halving exposes the inner layers to heat and caramelization, creating that gorgeous crispiness. Whole sprouts take way longer and rarely get as crunchy.
Keeps It Dry: Moisture is the enemy of crispiness. After washing, make sure to dry your sprouts thoroughly. A salad spinner works wonders here.
High Heat Is Your Friend: Roasting at 425°F is what caramelizes those sugars and crisps the edges. Lower temps often leave you with soft, uninspiring veggies.
Don’t Crowd the Pan: Crowding leads to steaming, and steaming means no crispiness. Give your sprouts breathing room, spread out on the pan.
Optional Extras: I like adding garlic slices or red chili flakes before roasting for flavor. Tossing in a squeeze of lemon juice right after roasting adds a fresh punch. And sometimes, I try a sprinkle of smoked paprika or Parmesan just before serving for an extra layer of yum.
Turning Matters: Flip or shake your pan halfway through roasting so the sprouts brown all over. I learned this one the hard way—if you don’t, you’ll get one side burnt and the other barely cooked.
Glaze it Up: For a sweet-savory twist, drizzle balsamic reduction right after roasting. You’ll want to do this while they’re still warm so it sticks nicely.
One thing I’ve learned is that roasting a little longer than you think is usually better than undercooking. You’ll get those addictively crispy edges, which is honestly what makes or breaks the dish in my kitchen.
Storing and Reheating Tips
Room Temperature: Roasted Brussels sprouts are best eaten fresh, but they’ll keep covered on the counter for a few hours without losing much crunch.
Refrigerator Storage: Pop leftovers into an airtight container, and they’ll stay good for about 3-4 days. When you reheat, I recommend using the oven or a toaster oven instead of the microwave to help them crisp back up.
Freezer Instructions: Roasted Brussels sprouts don’t freeze brilliantly because of their texture, but if you need to, spread them on a baking sheet to freeze first, then transfer to a sealed freezer bag. Consume within 2 months. Reheat slowly in the oven to avoid sogginess.
Glaze Timing Advice: If you’re glazing with balsamic or another sauce, wait until right before serving. Adding glaze before storing can make them soggy or sticky. Trust me, that fresh drizzle really seals the deal.
Frequently Asked Questions
Final Thoughts
Honestly, roasted Brussels sprouts have become one of those little joys in my kitchen that never get old. They’re quick, simple, and the kind of side I can count on to get eaten without complaint. I hope when you try this recipe, it brings you the same little happy moment of discovering a veggie secret gone right. Play around with seasoning and garnishes—this recipe is a wonderful base for your own spin. If you’re in the mood for more roasted vegetable goodness, try pairing these sprouts with my honey roasted carrots or my balsamic roasted cauliflower recipes for an all-star veggie spread. Drop a comment below and let me know how yours turn out or if you add your special twist—sharing is caring, after all! Happy roasting!
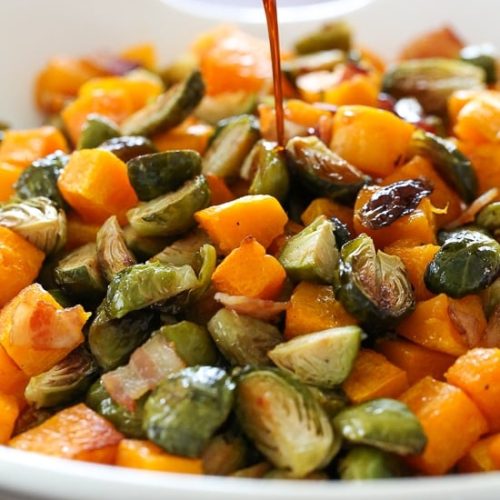
Maple Soy Glazed Roasted Brussels Sprouts and Butternut Squash with Bacon
Ingredients
Main Ingredients
- 1 pound butternut squash peeled, seeded and cut into 0.5-inch cubes
- 1 tablespoon olive oil
- 0.5 teaspoon Kosher salt
- freshly ground black pepper to taste
- 1 pound Brussels sprouts trimmed and quartered
- 2 strips center cut bacon chopped
- 2 tablespoons pure maple syrup
- 2 tablespoons reduced sodium soy sauce
Instructions
Preparation Steps
- Preheat oven to 400 degrees F. Spray a sheet pan with cooking spray.
- In a large bowl, combine the butternut squash, 0.5 tablespoon olive oil, 0.25 teaspoon salt, and black pepper. Toss to coat. In another bowl, combine Brussels sprouts with remaining 0.5 tablespoon olive oil, 0.25 teaspoon salt, and pepper. Toss well.
- Spread the vegetables evenly on the sheet pan. Sprinkle the chopped bacon on top. Roast for 20 minutes.
- Using a spatula, toss the veggies and roast for an additional 15 minutes until tender and slightly caramelized.
- Meanwhile, in a small saucepan, combine maple syrup and soy sauce. Simmer over medium-low heat for 5 minutes until slightly thickened. Remove from heat.
- Transfer roasted vegetables to a serving dish, drizzle with the maple soy glaze, and toss to coat evenly before serving.