You know those nights? The ones where the clock is ticking, the kids are clamoring for something sweet, and the thought of pulling out all the baking pans feels like too much? Yeah, those nights. This little banana dessert jar recipe has become my absolute go-to, my culinary superhero cape, if you will. It’s the kind of thing that feels utterly decadent, like you’ve spent hours in the kitchen, but in reality, it comes together surprisingly fast. I remember the first time I made it for a neighborhood potluck – people were raving, asking for the recipe, and I almost felt a little guilty because it was just *that* easy. It’s not quite a cake, not quite a pudding, but somehow it’s even better, a perfect harmony of moist banana goodness and creamy topping, all nestled in a cute little jar. Honestly, it’s the answer to so many sweet cravings, and I can’t wait to share it with you!
What is a banana dessert jar?
So, what exactly *is* this magic in a jar? Think of it as a deconstructed, individual serving of pure banana bliss. It’s essentially a moist, incredibly flavorful banana cake or bread-like base, layered with a luscious, often cream cheese or whipped cream based filling, and sometimes topped with a simple glaze or a sprinkle of something crunchy. The “jar” part isn’t just for show; it makes it super portable, perfectly portioned, and honestly, just adorable. It’s like a personal slice of heaven that you can enjoy without all the fuss of slicing and serving a whole larger dessert. The name itself, “banana dessert jar,” really says it all – it’s a dessert, starring bananas, served in a jar. Simple, elegant, and oh-so-delicious. It’s the kind of treat that makes you feel like you’ve accomplished something special, even on a Tuesday night.
Why you’ll love this recipe?
Honestly, there are so many reasons why this banana dessert jar recipe has earned a permanent spot in my recipe rotation, and I bet it will for you too. First off, the flavor is just out of this world. It’s that comforting, nostalgic taste of ripe bananas, but elevated. The cake base is unbelievably moist and tender, thanks to the bananas and a little secret ingredient I’ll share later, and it’s not overly sweet on its own, which is perfect because it balances out the richness of the filling. Speaking of the filling, it’s usually a no-bake situation, which is a huge win in my book. It’s creamy, dreamy, and adds a wonderful contrast in texture and taste to the banana base. And the simplicity! I cannot stress this enough. When I say this is easy, I mean it. You can whip up the batter in less time than it takes to preheat your oven. This makes it an absolute lifesaver on busy weeknights or when unexpected guests pop over. Plus, it’s incredibly budget-friendly. Bananas are usually on sale, and the other ingredients are pantry staples. You don’t need any fancy equipment or exotic ingredients. And the versatility? Oh, the possibilities! You can customize the filling, add nuts, chocolate chips, a swirl of caramel… the list goes on. It’s just a perfect balance of deliciousness, ease, and affordability that’s hard to beat. It truly stands out because it delivers such a gourmet experience with minimal effort.
How do I make banana dessert jars
Quick Overview
This recipe is all about creating individual portions of pure joy. We’ll start by making a wonderfully moist banana cake base, then whip up a simple, decadent filling, and finally, layer it all up in jars. The beauty here is its straightforward nature – no complicated techniques, just simple mixing and assembly. It’s designed to be foolproof, so even if you’re new to baking, you’ll nail this. The whole process is about building flavor and texture, layer by delicious layer, resulting in a dessert that looks as good as it tastes and is ready to be enjoyed in its own personal vessel.
Ingredients
For the Main Batter:
This is where the magic begins, and ripe bananas are your best friend here. Look for bananas that are spotty and fragrant – the spottier, the sweeter and more flavorful they’ll be! For the flour, all-purpose is great, but I’ve also tested this with a good quality gluten-free blend, and it turned out beautifully creamy. If you’re using unsalted butter, just make sure to add a pinch more salt to balance the sweetness. The eggs should be at room temperature; it helps them incorporate better and makes the batter lighter. A splash of vanilla extract really brings out those warm banana notes, and a pinch of cinnamon is optional but highly recommended for that cozy vibe. I always use a good quality baking soda; it makes all the difference in getting that perfect rise and tender crumb.
For the Filling:
This is where you can really play! My go-to is a cream cheese-based filling because it’s tangy and rich, cutting through the sweetness of the banana. Make sure your cream cheese and butter are softened – this is crucial for a smooth, lump-free filling. A bit of powdered sugar sweetens it up just right, and a touch of heavy cream or milk makes it luxuriously smooth. Sometimes, if I’m feeling fancy, I’ll add a little lemon zest for brightness or even a spoonful of Peanut Butter for a different twist.
For the Glaze:
This is entirely optional, but it adds a lovely finish. A simple powdered sugar glaze made with milk or lemon juice is my favorite. You want it to be thick enough to drizzle but not so thick that it’s hard to work with. Think of a consistency that flows but still holds its shape a little. Sometimes, I’ll just dust with a bit of powdered sugar or add some chopped nuts for crunch instead.
Step-by-Step Instructions
Step 1: Preheat & Prep Pan
First things first, get your oven preheated to 350°F (175°C). This ensures it’s perfectly ready when your batter is. While the oven heats up, grab your jars. Any clean glass jars will do – Mason jars, jam jars, even recycled baby food jars if you’re making mini ones! I like to use jars that are about 4-6 ounces for individual servings. You don’t need to grease or flour them for the cake batter since we’re layering, but make sure they are completely dry.
Step 2: Mix Dry Ingredients
In a medium bowl, whisk together your flour, baking soda, cinnamon (if using), and salt. Whisking them together ensures everything is evenly distributed, so you don’t end up with pockets of baking soda or salt in your finished dessert. This step is simple but important for a consistent texture throughout your banana dessert jar.
Step 3: Mix Wet Ingredients
In a larger bowl, mash your ripe bananas until they’re mostly smooth, with just a few small lumps remaining – those little banana bits are lovely! Then, beat in your softened butter and eggs until well combined. Stir in the milk and vanilla extract. This mixture should smell wonderfully sweet and banana-y already!
Step 4: Combine
Now, it’s time to bring them together. Gradually add the dry ingredients to the wet ingredients, mixing on low speed or by hand until just combined. Be careful not to overmix! Overmixing develops the gluten in the flour, which can lead to a tougher cake. Stop mixing as soon as you no longer see streaks of dry flour. A few small lumps are perfectly fine; they actually contribute to a more tender crumb.
Step 5: Prepare Filling
While your batter rests for a moment, let’s get that luscious filling ready. In a separate bowl, beat together the softened cream cheese and butter until they are smooth and creamy. Gradually add the powdered sugar, mixing until well incorporated. Finally, stir in the heavy cream or milk until the filling reaches your desired consistency – it should be thick but spreadable.
Step 6: Layer & Swirl
This is the fun part! Spoon a layer of the banana batter into the bottom of each jar, filling it about a third of the way. Then, add a dollop of the cream cheese filling. You can swirl it gently with a toothpick or the back of a spoon if you like, or just leave it as a distinct layer. Repeat with another layer of batter, followed by another layer of filling, filling the jars to about three-quarters full. This leaves room for expansion during baking and for any topping.
Step 7: Bake
Carefully place the filled jars onto a baking sheet (this makes them easier to handle and catches any potential drips). Bake for 25-30 minutes, or until a toothpick inserted into the cake layer comes out clean. The exact time will depend on your oven and the size of your jars. Keep an eye on them; you want the cake to be cooked through but still wonderfully moist.
Step 8: Cool & Glaze
Once baked, let the jars cool on a wire rack for about 15-20 minutes. They’ll be very hot! While they’re cooling, you can prepare your glaze. Whisk together powdered sugar with a tablespoon or two of milk or lemon juice until you have a smooth, drizzle-able consistency. Once the jars are slightly cooled but still warm, drizzle the glaze over the top. If you’re just dusting with powdered sugar or adding nuts, do that now too.
Step 9: Slice & Serve
Technically, you don’t need to slice these because they’re already portioned! Let them cool completely before serving or chilling. They are absolutely delicious served slightly warm, or perfectly chilled. The flavors really meld and deepen as they sit. You can serve them directly in the jars with a spoon. It’s the easiest and cutest dessert presentation ever!
What to Serve It With
These banana dessert jars are so wonderfully versatile; they fit into almost any meal or occasion. For a special breakfast treat, I love serving them with a freshly brewed cup of coffee. The warmth of the coffee and the comforting sweetness of the banana dessert jar make for a perfect start to the day. You can even top them with a dollop of Greek yogurt and a sprinkle of granola for added texture and a slightly healthier edge. For brunch, they look absolutely charming on a dessert table. They pair beautifully with a glass of chilled mimosas or a light sparkling cider. I often serve them alongside fresh fruit salad; the vibrant colors and fresh flavors complement the rich dessert perfectly. As a dessert, they are just divine. Imagine serving them after a hearty dinner – a perfectly portioned, elegant treat that satisfies everyone’s sweet tooth without being overwhelming. I like to serve them with a side of whipped cream or a tiny scoop of vanilla bean ice cream. And for those cozy, spontaneous snack moments, these jars are my secret weapon. They’re perfect for an afternoon pick-me-me-up with a cup of tea or a glass of cold milk. My kids absolutely adore them as a special after-school treat. It’s a comforting, familiar flavor that always hits the spot.
Top Tips for Perfecting Your Banana Dessert Jars
Over the years, I’ve learned a few little tricks that help make these banana dessert jars absolutely perfect every single time. First, when it comes to the bananas themselves, ripeness is key. Don’t shy away from those really brown, spotty bananas. They’re sweeter and mash up beautifully, giving you the best flavor and moisture. Squeeze them gently to test; if they give easily, they’re ready. For the batter, remember that gentle mixing is your friend. Overmixing flour can lead to a tough dessert, and we want these to be melt-in-your-mouth tender. Mix just until the dry ingredients are incorporated – a few lumps are actually a good sign! When it comes to the filling, make sure your cream cheese and butter are truly softened. I usually leave mine out on the counter for at least an hour, or I’ll microwave them for very short bursts (like 15 seconds) until they’re pliable but not melted. This ensures a super smooth, lump-free filling. For the layering and swirling, don’t overthink it! A few gentle swirls with a toothpick or the back of a spoon create a pretty marbled effect, but honestly, distinct layers are just as delicious. The most important thing is to not overfill your jars; leave a little space at the top for the cake to rise. Baking can sometimes be a bit tricky because jars conduct heat differently than traditional pans. Keep an eye on the baking time, and always do the toothpick test – it’s the most reliable way to know when they’re done. If your jars start to look like they’re browning too quickly on top, you can always loosely tent them with foil. Finally, for the glaze, consistency is everything. Start with less liquid than you think you’ll need and add more very gradually until you get that perfect drizzling consistency. It should be thick enough to coat the top but thin enough to spread easily. Trust me, these little tips will elevate your banana dessert jars from good to absolutely spectacular!
Storing and Reheating Tips
These banana dessert jars are fantastic for making ahead, which is one of the reasons I love them so much. For storing them at room temperature, they’re best eaten the same day they’re made, especially if they have a cream cheese filling. If they are glaze-free or just have a dusting of powdered sugar, they can typically last up to 24 hours at room temperature in an airtight container, but I always recommend chilling them if you’re not eating them right away. Refrigerator storage is where they really shine. Once they’ve cooled down completely, seal the jars tightly with their lids. They’ll stay delicious and moist in the fridge for about 3-4 days. The flavors actually meld together beautifully over time, so they might even taste better on day two! When it comes to freezing, these are surprisingly freezer-friendly. Wrap the cooled jars tightly first in plastic wrap and then in aluminum foil. They can be stored in the freezer for up to 2 months. To thaw, just remove them from the freezer and let them thaw in the refrigerator overnight. You can then bring them to room temperature for about 30 minutes before serving, or enjoy them chilled. If you’ve added a glaze and plan to store them for a while, I often find it’s best to add the glaze just before serving, especially if you’re refrigerating or freezing, as it can sometimes soften or become a bit sticky. For a simple powdered sugar dusting, it holds up a bit better over time. Always check for freshness by giving them a sniff and a look – if they seem off, it’s best to err on the side of caution.
Frequently Asked Questions
Final Thoughts
So there you have it – my absolutely favorite banana dessert jar recipe. It’s the kind of recipe that brings a smile to my face every time I make it, and it always brings joy to whoever gets to eat it. It’s that perfect blend of simple, comforting, and just plain delicious that makes it a winner in my kitchen. I truly believe that everyone needs a reliable, easy dessert in their repertoire, and this one fits the bill perfectly. Whether you’re looking for a quick treat for yourself, a crowd-pleaser for a gathering, or a way to use up those overripe bananas on your counter, this recipe is your answer. Give it a try, and don’t be afraid to play around with the filling or toppings to make it your own! If you love this banana dessert jar, you might also enjoy my One-Bowl Banana Bread Muffins or my Easy Chocolate Banana Cream Pie. I can’t wait to hear what you think! Let me know in the comments how yours turned out and what delicious variations you came up with. Happy baking, and enjoy every single spoonful!
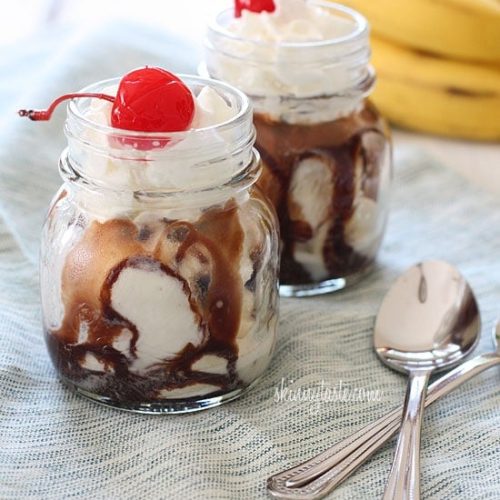
Guiltless Banana Split in a Jar
Ingredients
Main Ingredients
- 1 medium Dole banana sliced
- 0.67 cup nonfat vanilla frozen yogurt Stonyfields recommended
- 2 tablespoon Hershey's Lite chocolate syrup
- 4 tablespoon whipped topping
- 2 count cherries for garnish
Instructions
Preparation Steps
- Place half of the banana slices in the bottom of each jar.
- Top each with 1/3 cup of frozen yogurt, then 1 tablespoon each of chocolate syrup.
- Finish with the whipped cream and top with a cherry and get your spoons ready to dig in!