Oh, you know those nights. The ones where the clock is ticking, the kids are circling like hungry little wolves, and the thought of wrangling a complicated meal feels like climbing Mount Everest in flip-flops. Yeah, I’ve been there more times than I can count. And on those nights, my absolute, go-to, save-the-day recipe is these baked chicken tenders. They’re not just “good for baked,” they’re genuinely spectacular. Forget those sad, soggy versions you might have encountered elsewhere. These are golden, crunchy, and packed with flavor that even my pickiest eaters devour. They’re honestly a revelation, and I can’t wait to share them with you. Think of them as the ultimate upgrade to everyone’s favorite comfort food.
What are baked chicken tenders?
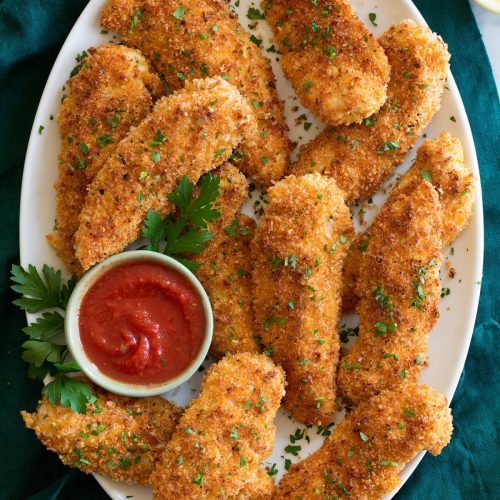
So, what exactly *are* these magical baked chicken tenders? At their heart, they’re Chicken Breast strips, coated in a glorious mixture, and baked until they’re perfectly tender on the inside and delightfully crisp on the outside. The “baked” part is key, of course, because it means less fuss, less mess, and way less oil than traditional frying. But don’t let that fool you into thinking they’re less delicious. The magic happens in the coating and the baking technique, which gives them this incredible texture and flavor that rivals anything you’d get at a restaurant. It’s essentially taking all the best parts of crispy fried chicken and making it a weeknight hero. My family calls them “super chicken” because they disappear so fast!
Why you’ll love this recipe?
Let’s talk about why this recipe is going to become your new best friend in the kitchen. First and foremost, the flavor is absolutely unreal. We’re talking a savory, seasoned crust that’s incredibly satisfying. And the chicken itself stays so juicy! What I love most is the sheer simplicity. You don’t need a ton of fancy ingredients or complicated steps. It’s truly a lifesaver on those rushed evenings when you still want to serve something wholesome and delicious. Plus, it’s incredibly budget-friendly. chicken breast is usually pretty affordable, and the pantry staples I use for the coating won’t break the bank. And the versatility! Oh my goodness, you can serve these with so many things. They’re not just for kids; adults go crazy for them too. I’ve even made a platter of these for a casual get-together, and they were the first thing to disappear. They’re just consistently fantastic, and honestly, that’s what I look for in a recipe I’ll make again and again.
How do I make Baked Chicken Tenders?
Quick Overview
The process is surprisingly straightforward. We’ll slice the chicken, create a flavorful seasoned coating, dip the chicken in it, and then bake them on a sheet pan until they’re golden and crispy. The key is the combination of a few pantry staples that create a magical crunch without frying. It’s a simple assembly line that leads to maximum deliciousness with minimal effort. Trust me, it’s so easy you’ll wonder why you ever bothered with other methods.
Ingredients
For the Chicken:
You’ll need about 1.5 pounds of boneless, skinless chicken breasts. Look for ones that are roughly the same thickness so they cook evenly. If you can find them, great, but don’t stress if they’re a little varied. I usually just trim any excess fat.
For the Coating:
This is where the magic happens! You’ll need:
- 1 cup panko breadcrumbs: This is non-negotiable for that ultimate crunch. Regular breadcrumbs just don’t give you the same crispy texture.
- 1/4 cup grated Parmesan cheese: Adds a salty, cheesy depth of flavor.
- 1 teaspoon garlic powder: Essential for that savory kick.
- 1 teaspoon onion powder: Another flavor booster that really rounds things out.
- 1/2 teaspoon smoked paprika: For a hint of smokiness and beautiful color.
- 1/4 teaspoon salt: Adjust to your taste, but don’t skip it!
- 1/4 teaspoon black pepper: Freshly ground is always best.
For the Binder:
You need something to help the coating stick. I’ve found that a simple mixture works wonders:
- 1/2 cup milk (any kind works – I often use whole milk for richness, but almond or oat milk are great too!)
- 1 large egg: This helps bind everything together.
Step-by-Step Instructions
Step 1: Preheat & Prep Pan
First things first, get your oven preheated to 400°F (200°C). While it’s heating up, line a large baking sheet with parchment paper. This is a lifesaver for cleanup! You can also lightly grease the parchment paper if you want extra insurance against sticking, though usually, it’s not necessary.
Step 2: Mix Dry Ingredients
In a shallow dish or pie plate, combine the panko breadcrumbs, grated Parmesan cheese, garlic powder, onion powder, smoked paprika, salt, and black pepper. Give it a really good whisk or stir with a fork until everything is well-distributed. This ensures every bite of chicken is perfectly seasoned. You want a lovely, fragrant mixture.
Step 3: Mix Wet Ingredients
In a separate medium bowl, whisk together the milk and the egg until they’re just combined. Don’t over-whisk it; you just want them to be one uniform liquid. This creates the sticky base for our breadcrumbs to cling to.
Step 4: Prepare the Chicken
Now, let’s get the chicken ready. Slice each chicken breast into strips about 1/2 to 3/4 inch thick. Try to make them relatively uniform in size so they cook at the same rate. You can pat them dry with a paper towel if they seem particularly wet; this helps the binder adhere better.
Step 5: Coat the Chicken
This is the fun part! Take each chicken strip, dip it into the milk and egg mixture, letting any excess drip off for a second. Then, dredge it thoroughly in the panko mixture, pressing gently to make sure the breadcrumbs adhere well. Place the coated chicken strips in a single layer on your prepared baking sheet, making sure they aren’t touching. This is crucial for getting them nice and crispy on all sides!
Step 6: Bake
Pop that baking sheet into your preheated oven. Bake for 18-25 minutes, flipping the tenders halfway through. The exact time will depend on the thickness of your chicken strips and your oven. You’re looking for them to be golden brown and cooked through. You can always check the internal temperature with a meat thermometer; it should read 165°F (74°C).
Step 7: Cool Slightly and Serve
Once they’re done, remove the baking sheet from the oven. Let the chicken tenders rest on the baking sheet for just a few minutes before serving. This allows the juices to redistribute, making them even more tender. Then, serve them hot and crispy!
What to Serve It With
This is where the fun really begins! These baked chicken tenders are so versatile. For a quick and easy breakfast (yes, breakfast!), I love serving them with some scrambled eggs and a side of fresh fruit. It’s a protein-packed start to the day that feels like a treat. For a more substantial weekend brunch, they’re fantastic alongside some fluffy pancakes or waffles, maybe with a drizzle of honey. For a light lunch, I’ll toss them into a big salad with some avocado and a zesty vinaigrette. And of course, for dinner, they’re a complete winner with classic sides like oven-baked sweet potato fries, a big green salad, or some roasted broccoli. They’re also incredible dipped in your favorite sauces – honey mustard is a classic, but don’t be afraid to experiment! We even sometimes have them as a late-night snack, just warm them up with a little ranch dip. It’s a comfort food dream!
Top Tips for Perfecting Your Baked Chicken Tenders
Over the years, I’ve learned a few tricks that make these baked chicken tenders absolutely perfect every single time. For starters, using panko breadcrumbs is a non-negotiable for me. They’re lighter and create a much crispier coating than regular breadcrumbs. Don’t skimp on pressing the breadcrumbs onto the chicken; that’s what gives you that lovely, even crust. When it comes to the binder, make sure your egg and milk mixture isn’t too thick or too thin. If it’s too thin, it’ll just run off, and if it’s too thick, it won’t coat evenly. A little tip I love: if you have chicken pieces that are significantly different thicknesses, you can bake the thicker ones for a few minutes longer. I’ve also found that making sure the chicken strips aren’t crowded on the baking sheet is absolutely essential. If they’re too close together, they’ll steam instead of getting crispy. That’s a lesson I learned the hard way early on! For ingredient swaps, if you’re out of milk, you can use buttermilk for a tangier flavor, or even plain yogurt thinned with a little water. And if you’re feeling adventurous with seasonings, try adding a pinch of cayenne pepper for a little heat, or some dried herbs like rosemary or thyme to the breadcrumb mixture.
Storing and Reheating Tips
These baked chicken tenders are best enjoyed fresh, but they store surprisingly well! If you have any leftovers (which is rare in my house!), let them cool completely on a wire rack before storing. For room temperature storage, it’s best to refrigerate them within two hours of cooking, and they’ll be good for up to 3-4 days. Store them in an airtight container in the refrigerator. To reheat, my favorite method is in a toaster oven or a regular oven at around 350°F (175°C) for about 5-10 minutes. This helps them regain some of their crispiness. Microwaving works, but they can get a bit softer. If you’re planning ahead, these freeze really well! Once completely cooled, wrap individual tenders or a batch in plastic wrap, then in foil or a freezer-safe bag. They can stay frozen for up to 2-3 months. To thaw, transfer them to the refrigerator overnight, then reheat as usual. I usually avoid glazing them if I plan to freeze, and add any sauce after reheating.
Frequently Asked Questions
Final Thoughts
So there you have it – my tried-and-true recipe for the most delicious baked chicken tenders. They’re a testament to the fact that you can have incredibly satisfying, crispy food without all the fuss and mess of frying. I truly hope you give these a try. They’ve brought so much joy (and full bellies!) to my family, and I’m confident they will for yours too. If you love these, you might also enjoy my recipe for crispy baked fish sticks or my easy sheet pan chicken fajitas. Don’t forget to let me know how yours turn out in the comments below! I absolutely love hearing about your cooking adventures and any little tweaks you make. Happy baking, and enjoy every single crispy bite!
Baked Chicken Tenders
Ingredients
Main Ingredients
- 0.33 cup all-purpose flour
- 2 large eggs
- 1.33 cups panko bread crumbs
- 0.67 cup finely shredded parmesan cheese
- 1 tsp Italian seasoning
- 1 tsp paprika
- 1 tsp garlic powder
- 2 Tbsp olive oil
- 2 lbs chicken tenders about 12 larger tenders, more if smaller
- Salt and freshly ground black pepper to taste
- 1 Tbsp minced fresh parsley optional
Instructions
Preparation Steps
- Move oven rack up one level from center and preheat oven to 425 degrees F. Spray a large oven safe cooling rack with non-stick cooking spray and set over a rimmed 18 by 13-inch baking sheet.
- Pour flour into a small shallow dish.
- Crack and whisk eggs in a second shallow dish.
- In a third dish (such as a pie plate) toss together panko bread crumbs, parmesan cheese, Italian seasoning, paprika and garlic powder. Drizzle with olive oil then toss well to evenly coat.
- Season both sides of chicken tenders with salt and pepper.
- Working with two at a time dip chicken tenders in flour on each side, gently shake excess off. Then transfer to eggs and coat both sides, let excess egg run off.
- Transfer to panko mixture. Coat both sides in panko mixture while pressing so mixture adheres well (you can scoop mixture up over the chicken and press, you want lots of it to stick).
- Transfer chicken tenders to prepared wire rack on baking sheet leaving some space between each piece. Repeat process to coat all chicken tenders.
- Bake in preheated oven until chicken is cooked through (165 in center of largest pieces), about 15 to 20 minutes. If you find they are browning too much just tent with foil near the end.
- Garnish with parsley if using and serve warm with desired dipping sauce (creamy honey mustard, marinara, ranch, pesto, bbq sauce, etc.).