Okay, confession time. I have a major weakness for cheesecake. Like, a really big one. The creamy, tangy, dreamy goodness just calls to me. But sometimes, the thought of making a whole cheesecake, with the water bath and the careful chilling, feels like a marathon I just don’t have the energy for, especially after a long day. That’s where these incredible cheesecake cookies come in. They’re my secret weapon for getting that exact cheesecake flavor and texture, but in a portable, bake-in-a-flash cookie form. Seriously, if you love cheesecake as much as I do, or if you’re just looking for a truly special cookie recipe that’s way more exciting than your average Chocolate Chip, you’ve got to try these cheesecake cookies. They’re like a little bite of heaven and they always, always disappear lightning fast at my house.
What is cheesecake cookie?
So, what exactly *are* cheesecake cookies? Think of them as your favorite classic cheesecake, but miniaturized and baked into a soft, chewy cookie. It’s not just a cream cheese flavored cookie; it’s a cookie that genuinely *tastes* like cheesecake. We achieve that incredible flavor and texture by incorporating cream cheese right into the Cookie Dough, along with a few other smart additions that mimic that signature tang and richness. It’s essentially taking all the best parts of a baked cheesecake – that slightly sweet, slightly tart, super smooth filling – and transforming it into an easy-to-handle, incredibly delicious cookie. It’s the perfect solution when you want that cheesecake experience without the commitment of a whole pie. They’re surprisingly simple to make, which is always a huge win in my book!
Why you’ll love this recipe?
There are so many reasons why this cheesecake cookie recipe has become a staple in my kitchen, and I just know you’re going to fall in love with them too. First off, the flavor is out of this world. We’re talking about a bright, tangy cream cheese punch that’s perfectly balanced by the sweetness of the cookie. It’s not overly sweet, which I really appreciate, and there’s that subtle, delightful richness that just makes you want another one. And the texture? Oh my goodness. They’re wonderfully soft and chewy on the inside with just the slightest hint of a crisp edge. It’s that perfect cookie texture that makes them so addictive.
Beyond the amazing taste, the simplicity is a huge draw. I’ve made this recipe countless times, and it never fails. Even if you’re not a seasoned baker, you can whip these up with confidence. Most of the ingredients are pantry staples, making it a budget-friendly treat too. Plus, they’re incredibly versatile. You can enjoy them plain, drizzle them with a simple glaze, or even add your favorite fruit toppings. What I love most about these cheesecake cookies is that they feel fancy enough for a special occasion, but they’re also the perfect treat for a Tuesday afternoon craving. They’re a lifesaver when I need a quick dessert that feels impressive. Honestly, the smell that fills my kitchen when these are baking is pure magic – it’s comforting and exciting all at once!
How do I make cheesecake cookies?
Making these cheesecake cookies is surprisingly straightforward, and I promise, the results are absolutely worth it. The process is pretty similar to making standard drop cookies, but with a few key steps to ensure that perfect cheesecake flavor and texture. You’ll be amazed at how quickly they come together, from mixing the dough to pulling the first warm, gooey batch from the oven.
Quick Overview
Essentially, we’re creaming together butter and sugar, then adding cream cheese and eggs to create a rich, flavorful base. Dry ingredients are mixed separately and then combined gently. A quick chill helps them hold their shape, and then they’re baked until golden. The optional glaze is super simple and takes them to the next level! It’s a recipe that delivers big on flavor without requiring a lot of fuss, making it perfect for busy days or when you just need a quick sweet fix.
Ingredients
For the Main Batter:
Butter: 1 cup (2 sticks) unsalted butter, softened. Make sure it’s truly softened, not melted! This is key for a good creamy base.
Granulated Sugar: 1 ½ cups. This gives us that classic cookie sweetness.
cream cheese: 8 ounces, full-fat, softened. This is non-negotiable for that authentic cheesecake tang and creamy texture! Soften it by leaving it out on the counter for about an hour, or briefly microwave it (very carefully!).
Eggs: 2 large eggs, room temperature. Room temperature eggs incorporate better into the dough, creating a smoother texture.
Vanilla Extract: 2 teaspoons. A good quality vanilla really makes a difference here.
All-Purpose Flour: 3 cups. Spooned and leveled, not scooped! This ensures you don’t add too much flour, which can make the cookies dry.
Baking Soda: 1 teaspoon. This helps with leavening and gives the cookies that perfect chew.
Salt: ½ teaspoon. Balances the sweetness and enhances all the flavors.
For the Glaze (Optional, but highly recommended!):
Powdered Sugar: 1 ½ cups. Sifted for a super smooth glaze.
Milk or Cream: 2-3 tablespoons. Start with 2 and add more by the teaspoon until you reach your desired drizzling consistency.
Lemon Juice (optional, for extra tang): 1 teaspoon. Just a little bit brightens up the glaze beautifully.
Step-by-Step Instructions
Step 1: Preheat & Prep Pan
First things first, preheat your oven to 350°F (175°C). Line your baking sheets with parchment paper. This is a lifesaver for easy cleanup and ensures your cookies don’t stick. I always have my baking sheets ready to go before I start mixing!
Step 2: Mix Dry Ingredients
In a medium bowl, whisk together the all-purpose flour, baking soda, and salt. Whisking them together ensures they’re evenly distributed, which helps the cookies bake evenly and have the right texture. Set this aside for now.
Step 3: Mix Wet Ingredients
In a large bowl, using an electric mixer (a stand mixer or a hand mixer works perfectly), cream together the softened butter and granulated sugar until light and fluffy. This usually takes about 3-5 minutes. Next, beat in the softened cream cheese until it’s well combined and smooth. Don’t worry if it looks a little lumpy at first; just keep mixing. Then, beat in the eggs one at a time, making sure each is fully incorporated before adding the next. Finally, stir in the vanilla extract.
Step 4: Combine
Gradually add the dry ingredients to the wet ingredients, mixing on low speed just until combined. Be careful not to overmix here! Overmixing can develop the gluten too much, leading to tougher cookies. You want to stop as soon as you no longer see streaks of flour. The dough will be soft and a bit sticky, which is exactly what we want for a chewy cookie.
Step 5: Prepare Filling
This step is more about ensuring your cream cheese is properly softened and then mixing it well with the butter and sugar. The key is that smooth, creamy base. If your cream cheese is cold, it can lead to a lumpy dough, so make sure it’s nice and pliable!
Step 6: Layer & Swirl
This step isn’t quite applicable for these cookies as they’re a single dough, not layered. My apologies for any confusion! The beauty of these cheesecake cookies is their simple, delicious texture without complex layering.
Step 7: Bake
Drop rounded tablespoons of dough onto your prepared baking sheets, leaving about 2 inches between each cookie. I like to use a cookie scoop for uniform size. Bake for 10-12 minutes, or until the edges are lightly golden and the centers look set but are still slightly soft. They’ll continue to cook a bit on the baking sheet after you take them out, so it’s important not to overbake them. This is how we get that signature soft, chewy texture!
Step 8: Cool & Glaze
Let the cookies cool on the baking sheets for about 5 minutes before transferring them to a wire rack to cool completely. While they’re cooling, you can whip up the glaze. In a small bowl, whisk together the sifted powdered sugar, 2 tablespoons of milk (or cream), and the optional lemon juice. Add more milk, a teaspoon at a time, until you reach a drizzly consistency. Once the cookies are completely cool, drizzle the glaze over the tops. This is where they really start to look and taste like miniature cheesecakes!
Step 9: Slice & Serve
Once the glaze has set slightly, your cheesecake cookies are ready to be enjoyed! They are absolutely divine when they’re still a little warm, but they’re also fantastic at room temperature. I love them cut in half for a smaller bite, or enjoyed whole with a cup of coffee.
What to Serve It With
These cheesecake cookies are so versatile, they fit perfectly into almost any occasion, from a casual afternoon treat to a more elegant gathering. They’re a fantastic way to satisfy that cheesecake craving in a bite-sized package.
For Breakfast: Honestly, who says you can’t have a little indulgence in the morning? These are amazing with a hot cup of coffee or a strong black tea. Their tanginess cuts through the richness of the coffee beautifully. I often pop one into my son’s lunchbox for a special midday surprise.
For Brunch: They make a delightful addition to any brunch spread. Arrange them on a pretty platter alongside fresh fruit, pastries, and maybe some mimosas. They add a touch of sweetness and elegance without being too heavy. I’ve served these at Easter brunch and they were a huge hit with everyone, from the littlest ones to the grandparents.
As Dessert: This is probably their most natural habitat! Serve them after dinner, perhaps with a scoop of vanilla ice cream or a fresh berry compote. They’re also wonderful alongside a decadent chocolate dessert for a sweet and tangy contrast. For a more sophisticated touch, a light dusting of cocoa powder or a few fresh raspberries on top can be stunning.
For Cozy Snacks: My personal favorite time to enjoy these is curled up on the couch with a good book and a tall glass of cold milk. They’re the ultimate comfort food. They’re also perfect for when you have unexpected guests pop by; a quick batch of these always makes an impression and shows you’ve put in effort, even when you haven’t!
Top Tips for Perfecting Your Cheesecake Cookies
I’ve made these cheesecake cookies more times than I can count, and through trial and error, I’ve picked up a few tricks that I think will help you achieve the absolute best results. These little tips can make a big difference in the final texture and flavor!
Zucchini Prep: This section seems to be a mix-up from a different recipe! For *these* cheesecake cookies, there’s no zucchini involved. My apologies for the confusion. The key here is focusing on the cream cheese and butter. Ensure your cream cheese and butter are properly softened. If they’re too cold, they won’t cream together properly, leading to a less smooth dough and potentially tougher cookies. If they’re too warm or melted, the cookies might spread too much. Aim for that perfect, pliable, room-temperature consistency.
Mixing Advice: When you add the dry ingredients to the wet, remember my motto: “mix until *just* combined.” Seriously, resist the urge to keep mixing once you no longer see dry flour. Overmixing develops the gluten in the flour, which is the enemy of a tender, chewy cookie. A few streaks of flour left are perfectly fine; they’ll disappear as the dough rests briefly or bakes.
Swirl Customization: Since this recipe is for a uniform cookie dough, there aren’t really any swirls to customize. However, if you wanted to add a little something extra, you could gently fold in some mini chocolate chips or a tablespoon of lemon zest into the dough before baking. Just be sure to mix them in gently to avoid overworking the dough.
Ingredient Swaps: While I haven’t experimented extensively with swaps in this specific recipe because it’s so perfected as-is, I can offer some general advice. For the flour, using a good quality all-purpose is best. Gluten-free blends *might* work, but you’d likely need to adjust the liquid content, and the texture could be different. For the dairy, full-fat cream cheese is essential for the flavor and texture. Using a lighter version might result in a less rich cookie and one that spreads more. For the glaze, if you don’t have milk, a bit of water can work in a pinch, but it will be less rich.
Baking Tips: Oven temperatures can vary wildly! I highly recommend an oven thermometer to ensure your oven is actually at 350°F (175°C). Keep an eye on the cookies during the last few minutes of baking. The edges should be set and lightly golden, but the centers should still look a little soft and underdone. They will firm up significantly as they cool on the baking sheet. Pulling them out at the right moment is crucial for that chewy texture.
Glaze Variations: If you’re not a fan of lemon, you can omit the lemon juice from the glaze and just use milk. For a more citrusy kick, you can add a tiny bit of orange zest. If you want a thicker glaze, use less liquid. For a thinner glaze that drizzles more readily, add more liquid a teaspoon at a time. You could even experiment with a strawberry glaze by mixing in a little strawberry jam puree.
Storing and Reheating Tips
One of the best things about these cheesecake cookies is how well they store! They actually tend to get even chewier and more delicious on the second day, if they last that long. Here’s how I usually keep them fresh:
Room Temperature: Once completely cooled, I store these in an airtight container at room temperature. They’ll stay perfectly soft and delicious for about 3-4 days. I avoid stacking them too high if they have glaze on them, just to prevent sticking, or I’ll put a piece of parchment paper between layers.
Refrigerator Storage: If it’s particularly warm in your house, or if you’ve added any fresh fruit toppings, you might want to store them in the refrigerator. They’ll keep well in an airtight container for up to a week. Just be aware that refrigeration can sometimes slightly firm up the cookie; they’ll soften again at room temperature.
Freezer Instructions: These cookies freeze like a dream! I like to freeze them *before* glazing, though. Once cooled, place them in a single layer on a baking sheet and freeze until solid (about 1-2 hours). Then, transfer them to a freezer-safe bag or airtight container, separating layers with parchment paper. They’ll keep well in the freezer for up to 2-3 months. To thaw, simply remove them from the freezer and let them come to room temperature. You can then add the glaze once they’re thawed and at room temp. If you want to reheat a glazed cookie, a few seconds in a very low oven or toaster oven can warm them up, but be careful not to melt the glaze too much.
Glaze Timing Advice: For the best texture, I always recommend glazing *after* the cookies have completely cooled. This prevents the glaze from melting into a sticky mess on the warm cookies and allows for a clean, pretty drizzle. If you plan to freeze them, definitely freeze them *un-glazed* and glaze them after thawing.
Frequently Asked Questions
Final Thoughts
There you have it – my go-to recipe for the most delightful cheesecake cookies! I truly believe these little bites are a game-changer. They capture that beloved cheesecake flavor and texture in a format that’s so much easier and quicker to make. They’re perfect for satisfying a craving, impressing guests, or just adding a little bit of sunshine to your day. The combination of the tangy cream cheese, the sweet cookie base, and that optional dreamy glaze is just pure magic.
If you’re a fellow cheesecake lover, or you’re looking for a new cookie recipe to fall in love with, I honestly can’t recommend these enough. They’re a testament to how simple ingredients and a few smart steps can create something truly special. I’d be absolutely thrilled to hear how your cheesecake cookies turn out! Please leave a comment below and share your experience, or any creative twists you tried. Happy baking, and enjoy every single bite!
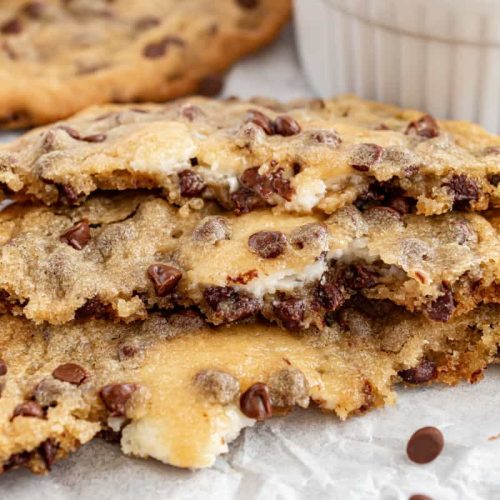
cheesecake cookies
Ingredients
Cookie Dough Ingredients
- 1.25 cup salted butter softened
- 1 cup light brown sugar packed
- 0.5 cup granulated sugar
- 2 teaspoon vanilla extract
- 2 large eggs
- 2.75 cup all-purpose flour
- 1 teaspoon baking soda
- 2 cup mini semi-sweet chocolate chip morsels
Cheesecake Filling Ingredients
- 8 oz cream cheese softened
- 0.5 cup powdered sugar
- 0.5 teaspoon vanilla extract
Instructions
Preparation Steps
- Make the cookie dough by beating the softened butter with both sugars for several minutes, until fully blended.
- Add in vanilla and eggs. Beat until combined.
- Add flour and baking soda, mixing just until blended. Fold in chocolate chips.
- Chill cookie dough in refrigerator for at least 30 minutes.
- For the filling, beat cream cheese, powdered sugar, and vanilla until fully combined, about 3-4 minutes. Chill in refrigerator until ready to use.
- Preheat oven to 350 degrees F. Line a cookie sheet with parchment paper.
- Using a 2 Tablespoon cookie scoop, scoop cookie dough into palm of your hand and flatten into a circle (about 2-inches to 2 1/2-inches). Place on parchment paper at least 4 inches apart (I put 4 cookies on a sheet at a time).
- Using a small scoop, drop about 1 Tablespoon of cheesecake filling into the center of each cookie dough circle. Using the 2 Tablespoon scoop, grab another scoop of cookie dough, flatten in your hand and place gently over the cheesecake.
- Pick up the entire cookie and press edges together so that cheesecake doesn't come out. Place back on cookie sheet. Repeat for remaining cookies. Press a few extra chocolate chips on top, before baking, if desired.
- Bake in preheated oven for 12-14 minutes. The cookies will have lightly golden edges, but be sure to not OVERBAKE them. You want them a little soft in the center (I always err on undercooking vs overcooking).
- Allow cookies to sit on cookie sheet for 5-8 minutes to cool (they will continue to cook slightly) and then remove them to cool completely on a wire rack.
- Refrigerate cookies for at least one hour before serving for best flavor!