Oh, hello there! Come on in, grab a mug, let’s chat. You know, sometimes I get a craving that just won’t quit. It’s that deep, primal yearning for something wonderfully salty, perfectly chewy, and with that unmistakable, slightly sweet pretzel dough flavor. And honestly, nothing beats homemade pretzels. Not the ones you get from a street cart, and definitely not those pre-packaged things that have the texture of cardboard. I’m talking about the real deal – soft, pillowy on the inside, a beautiful golden-brown crust on the outside, with just the right amount of chew. My kids practically beg for these, and honestly, so do I! This homemade pretzels recipe is truly my go-to when that craving hits, and it’s so much simpler than you might think. Forget those complicated recipes with a million steps; this one’s a lifesaver. It’s the kind of recipe that makes your kitchen smell like a bakery and brings a smile to everyone’s face. If you love a good soft pretzel, you are going to adore this.
What are home made pretzels?
So, what exactly are we talking about when we say “homemade pretzels recipe”? Well, think of it as the most comforting hug in dough form. These aren’t your typical hard, crunchy pretzels you might find in a snack bag. Oh no, these are glorious, soft, bready delights that have that classic pretzel shape, usually a twisted knot. The magic happens in a few key steps. We start with a simple yeasted dough, which gives them that wonderful rise and airy interior. Then comes the crucial part: a quick dip in a baking soda bath before they hit the oven. This is what gives them that signature dark crust and slightly unique flavor that’s so distinctive. It’s essentially taking simple pantry staples and transforming them into something truly special, something you’d happily share… or maybe keep all to yourself. It’s that good!
Why you’ll love this recipe?
Honestly, where do I even begin with why you’ll absolutely fall head over heels for this homemade pretzels recipe? First off, the flavor is just out of this world. That gentle sweetness of the dough, combined with the slightly malty, almost toasty flavor from the baking soda bath, is pure perfection. And the texture? Oh, the texture! They’re wonderfully soft and chewy on the inside, with a slightly crisp, golden-brown exterior that has just the right amount of resistance. My absolute favorite part is biting into one when it’s still warm from the oven, maybe with a little sprinkle of sea salt melting on top. Pure bliss!
Beyond the incredible taste, this recipe is surprisingly simple. I know, the word “yeast” can sometimes send people running for the hills, but trust me on this one. This dough is really forgiving and straightforward to work with. You don’t need any fancy equipment, just your hands and a little patience. It’s one of those recipes that makes you feel like a kitchen wizard, transforming basic ingredients into something so impressive. And the cost-efficiency? Fantastic! Flour, yeast, salt, a little sugar, and baking soda are all super budget-friendly staples you probably already have. You can make a huge batch for a fraction of what you’d pay at a bakery or theme park. Plus, think of the versatility! These aren’t just for snacking. They’re amazing for game day, movie nights, holiday gatherings, or even just a Tuesday evening when you need a little something special.
How do I make homemade pretzels?
Quick Overview
In a nutshell, this recipe is about creating a simple yeast dough, letting it rise, shaping it into those iconic pretzel twists, giving it a quick dip in a baking soda solution, and then baking it until golden. The beauty of this method is how it builds flavor and that signature chewy texture. You’ll be amazed at how quickly the dough comes together, and the shaping is actually kind of fun, almost meditative! The baking soda bath is the secret weapon that gives these pretzels their unique character. It’s a fuss-free process that yields incredibly rewarding results, far better than anything store-bought.
Ingredients
For the Dough:
This is where the magic starts. You’ll need good quality all-purpose flour – nothing fancy, just your everyday kind. Make sure your yeast is fresh; I always check the expiration date, and if I’m unsure, I’ll do a quick proofing test (more on that in the tips!). Warm water is key – not too hot, not too cold, just comfortably warm, like a cozy bath for the yeast. A little granulated sugar feeds the yeast and adds a touch of sweetness to the dough, and good old salt enhances all those lovely flavors. A touch of butter or oil makes the dough tender and adds richness.
For the Baking Soda Bath:
This is the secret sauce! You’ll need water and baking soda. It sounds simple, but this alkaline bath is what gives pretzels their distinctive dark brown color and that slightly chewy, almost alkaline flavor that sets them apart. Just make sure you’re using regular baking soda, not baking powder, as they’re quite different!
For the Topping (Optional, but HIGHLY Recommended!):
Coarse sea salt is my absolute favorite. Those little crunchy crystals on top are just divine. You can also try everything bagel seasoning, sesame seeds, or even a sprinkle of shredded cheese towards the end of baking for a savory twist.
Step-by-Step Instructions
Step 1: Preheat & Prep Pan
First things first, let’s get that oven preheated to a nice, hot 400°F (200°C). While the oven is warming up, grab a couple of baking sheets. Line them with parchment paper; this is a lifesaver for easy cleanup and prevents any sticking. If you don’t have parchment, a light greasing of the pans will do, but parchment is my preferred method. Make sure you have enough space to lay out your pretzels without them touching.
Step 2: Mix Dry Ingredients
In a large mixing bowl (or the bowl of your stand mixer if you’re using one), whisk together the flour, sugar, and salt. This ensures everything is evenly distributed, so you don’t get pockets of salt or sugar. If you’re using instant yeast, you can add it right in here. If you’re using active dry yeast, I like to proof it first (see my tips below), but you can add it here with the dry ingredients if you’re confident it’s fresh.
Step 3: Mix Wet Ingredients
In a separate, smaller bowl or a liquid measuring cup, combine the warm water and melted butter (or oil). If you’re proofing active dry yeast, this is where you’d add it to the warm water and sugar and let it sit for about 5-10 minutes until it gets foamy. This tells you your yeast is alive and ready to do its job. The water should feel comfortably warm to the touch, not hot, as too much heat can kill the yeast.
Step 4: Combine
Now, pour the wet ingredients into the bowl with the dry ingredients. If you’re using a stand mixer, attach the dough hook and mix on low speed until everything starts to come together. If you’re mixing by hand, use a sturdy spoon or spatula to combine. Once it forms a shaggy dough, turn it out onto a lightly floured surface and knead. Knead for about 8-10 minutes by hand, or 5-7 minutes with a stand mixer, until the dough is smooth, elastic, and no longer sticky. It should feel wonderfully soft and pliable. Don’t be tempted to add too much extra flour; a slightly sticky dough will often become perfect as you knead.
Step 5: Prepare Filling
While the dough is doing its thing and rising, let’s talk about what goes inside or on top of these beauties! This recipe focuses on the classic pretzel, so the “filling” here is more about the preparation for baking and toppings. If you wanted to do a filled pretzel, you’d prepare your filling at this stage – think cheese, chocolate chips, or even cinnamon sugar.
Step 6: Layer & Swirl
Once your dough has had its first rise (it should be roughly doubled in size), punch it down gently. Divide the dough into equal portions. For classic pretzels, I usually aim for about 8-10 pieces. On a lightly floured surface, roll each piece into a long rope, about 20-24 inches long and about ½ inch thick. The thickness is important for that perfect chewy interior. Now for the fun part: shaping! Take a rope and twist it into a pretzel shape. There are tons of great videos online if you need a visual, but the basic idea is to cross the ends and bring them back down to the center. Place the shaped pretzels on your prepared baking sheets. Don’t worry if they’re not perfectly uniform; that’s part of the charm of homemade!
Step 7: Bake
This is where the magic really happens. You’ll need a large pot or baking dish to create your baking soda bath. Bring about 8 cups of water to a boil in the pot, then carefully stir in about ½ cup of baking soda. It will fizz up, so be cautious! Working in batches, gently lower each pretzel into the boiling baking soda solution for about 20-30 seconds per side. Use a slotted spatula or spider strainer to lift them out, letting any excess liquid drain off. Place them back on the parchment-lined baking sheets. Now, sprinkle them generously with coarse sea salt (or your desired topping). Bake in your preheated oven for 12-18 minutes, or until they’re a deep golden brown. Keep an eye on them; ovens can vary!
Step 8: Cool & Glaze
Once they’re out of the oven, the aroma is incredible! Let them cool on the baking sheets for a few minutes before transferring them to a wire rack to cool completely. If you’re adding a glaze, this is the time. A simple powdered sugar glaze with a splash of milk or water is lovely. You can also do a cream cheese glaze or even a chocolate drizzle. For a simple powdered sugar glaze, whisk together about 1 cup of powdered sugar with 1-2 tablespoons of liquid until you reach your desired drizzling consistency. Drizzle over the cooled pretzels and let the glaze set.
Step 9: Slice & Serve
These are honestly best served warm, shortly after they’ve cooled enough to handle. You can slice them in half horizontally for a sandwich-like experience, or just enjoy them as they are. They’re perfect for dipping in mustard, cheese sauce, or even just eating plain. The smell alone is enough to make everyone gather in the kitchen, so be prepared for happy faces and quick disappearances!
What to Serve It With
Oh, these homemade pretzels are so much more than just a snack! They’re incredibly versatile. For a delightful breakfast or brunch, imagine them served alongside a cup of hot coffee or a mimosa. You could even slice them and serve them with a smear of cream cheese and some smoked salmon for an elegant touch. I sometimes serve them warm, cut in half, with scrambled eggs and bacon – it feels so celebratory and special, even on a weekend morning.
As a dessert? Absolutely! Drizzle them with melted chocolate or caramel sauce, or serve them with a side of decadent chocolate fondue. A sprinkle of cinnamon sugar while they’re still warm is also divine. For cozy snacks, they’re unparalleled. Serve them with a hearty beer (my husband’s favorite!), or with a warm bowl of tomato soup on a chilly evening. My kids love dipping them in honey mustard or just plain cheese sauce. They are a lifesaver for unexpected guests or when you just need a comforting bite. Seriously, they fit into almost any meal or occasion.
Top Tips for Perfecting Your Homemade Pretzels
Okay, let’s talk about elevating your pretzel game. I’ve made these countless times, and over the years, I’ve picked up a few tricks that really make a difference. First, for the dough, it’s all about the kneading. You want it smooth and elastic. If it feels too sticky, resist adding too much extra flour; just keep kneading. A slightly tacky dough will often work itself out. Conversely, if it’s too dry, add just a teaspoon of water at a time. Temperature is also crucial with yeast. Make sure your water is warm, not hot. If you’re using active dry yeast and are unsure if it’s alive, proof it! Sprinkle it over warm water with a pinch of sugar and let it sit for 5-10 minutes. If it gets foamy, your yeast is good to go. If not, start over with fresh yeast.
The shaping can be a little tricky at first, but don’t stress about perfection. The key to a good pretzel shape is rolling the dough into a long, even rope. If one end is thicker than the other, it’ll bake unevenly. I find that a gentle, consistent rolling motion works best. For the baking soda bath, be prepared for it to bubble up! Use a wide, shallow pot so the pretzels have room to float. Don’t overcrowd the pot; work in batches. And the timing in the bath is important – too short and you won’t get that signature color and flavor, too long and they can get mushy. Aim for that 20-30 seconds per side.
When it comes to toppings, coarse sea salt is my go-to for that classic flavor. Sprinkle it on right after the baking soda bath, while the surface is still wet, so it adheres well. For ingredient swaps, if you don’t have butter, a neutral oil like vegetable or canola oil works just fine. And if you’re in a pinch and don’t have active dry yeast, instant yeast can often be used directly in the dry ingredients, but always check the package for specific instructions. Baking time can vary wildly depending on your oven, so keep a close eye on them, especially during the last few minutes. You’re looking for a deep, rich golden brown, not just pale yellow. The smell is your best indicator when they’re getting close!
Storing and Reheating Tips
These homemade pretzels are truly at their best eaten fresh, ideally within a few hours of baking. But let’s be real, sometimes we make too many (a good problem to have!), or we want to have some ready for later. If you have leftovers and want to enjoy them at room temperature, store them in an airtight container or a zip-top bag for up to 2 days. They’ll soften a bit over time, but they’ll still be delicious. Just make sure they’re completely cooled before sealing them up, otherwise, you’ll end up with condensation, which makes them soggy.
For refrigerator storage, they’ll last a bit longer, typically 3-4 days. Again, an airtight container is your best bet. The texture might change slightly in the fridge – they can sometimes get a little drier or chewier. To reheat, I find the best method is to pop them in a moderate oven (around 300°F or 150°C) for about 5-10 minutes. This helps revive that lovely crispness on the outside and warmth on the inside. Microwaving can make them rubbery, so I generally steer clear of that unless I’m in a desperate hurry, and even then, it’s just for a few seconds. If you’re planning to freeze them, let them cool completely first. Wrap them tightly in plastic wrap, then place them in a freezer-safe bag or container. They’ll keep well in the freezer for up to 2-3 months. Thaw them overnight on the counter or use the low-heat oven method mentioned above.
A quick note on glaze: If you’ve glazed your pretzels, it’s best to store them at room temperature if you plan to eat them within a day. The glaze can get a bit sticky or soft in the fridge. For longer storage, it’s often better to glaze them just before serving.
Frequently Asked Questions
Final Thoughts
There you have it – my absolute favorite way to make homemade pretzels! I truly believe this recipe is a game-changer. It takes a little bit of effort, sure, but the reward of pulling those golden, chewy, perfectly salty pretzels out of your oven is just unbeatable. They’re such a wonderful way to bring a bit of joy and comfort into your kitchen, and they’re guaranteed to impress your family and friends. Whether you’re craving a savory snack or a slightly sweet treat, these pretzels hit the spot every single time. They remind me of happy times, movie nights, and lazy weekends. I really hope you give this homemade pretzels recipe a try; I can’t wait to hear how yours turn out! If you have any twists or favorite toppings, be sure to share them in the comments below. Happy baking, everyone!
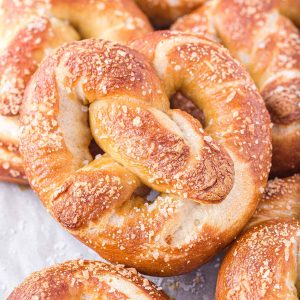
Homemade Soft Pretzels from Pizza Dough
Ingredients
Main Ingredients
- 13.8 ounce can Premade Pizza Dough
- 6 cups Water (for boiling)
- 0.33333333333333 cup Baking Soda
- 1 large Egg White
- 1.5 tablespoons Water (for egg wash)
- Coarse Sea Salt For topping
Instructions
Preparation Steps
- Preheat the oven to 400 degrees Fahrenheit and line a sheet pan with parchment paper.
- Open the can of pizza dough and cut the dough into 4 even sections. There is no need to unroll the pizza dough.
- Using your hands, roll each dough section into an approximately 24-inch long rope. Use a little flour if needed for stickiness.
- Make a “U” shape with one rope of dough. Twist the ends around each other once, leaving room at the ends. Pull the ends back down to the bottom of the circle to create a pretzel shape. Repeat with the remaining dough sections.
- Bring the 6 cups of water and baking soda to a boil in a large pot.13.8 ounce can Premade Pizza Dough
- Lower each pretzel, individually, into the boiling water, using a mesh strainer, for 30 seconds and then carefully pull it back out. (These can fall apart easily so keeping it in the strainer will be the safest bet). Do not over cook dough.
- Gently pat dry with a paper towel. Do this for all the pretzels and then place them back on the sheet pan.
- Prepare the egg wash by whisking together the egg white and 1 ½ Tablespoons of water. Brush the egg wash over the tops and sides of the pretzels and then sprinkle with coarse sea salt.13.8 ounce can Premade Pizza Dough
- Bake in the oven for 14-17 minutes or until they turn golden brown.
- Plate and serve either warm or cold.