You know those recipes that just feel like a warm hug? This orange layer Cake Recipe is definitely one of those for me. It takes me right back to my grandmother’s kitchen, the air thick with the sweet, citrusy scent of oranges baking. Whenever I’m craving something truly special, something that feels both a little bit elegant and delightfully comforting, this is what I whip up. It’s not just any cake; it’s a sunshine-filled masterpiece that tastes like pure joy. Forget those fancy bakery cakes that cost an arm and a leg; this homemade orange layer cake is surprisingly simple to make and tastes infinitely better. I’ve tried so many orange cake recipes over the years, searching for that perfect balance of moist crumb, vibrant citrus flavor, and just the right amount of sweetness. Some were too dry, others too oily, and a few just tasted… well, like fake orange. But this one? This orange layer cake recipe is the one I’ve landed on, the one I’ve tweaked and perfected, and the one that always gets rave reviews. It’s like a classic vanilla cake had a baby with the most fragrant orange blossom, and I am here for it!
What is an orange layer cake?
So, what exactly is this glorious orange layer cake I keep raving about? Think of it as your favorite tender, moist vanilla cake, but elevated. We’re infusing every single bite with the bright, zesty essence of fresh oranges. It’s not just a hint of orange; it’s a full-on citrus celebration! We achieve this by using both fresh orange juice and the zest from the orange peel, which carries all those wonderful aromatic oils. The result is a cake that’s incredibly fragrant and has a naturally sweet, slightly tangy flavor that cuts through the richness. It’s essentially a sunny disposition in cake form. It’s layered, of course, which is where the visual appeal and the fun of slicing into it comes in. Each layer is kissed with that incredible orange flavor, and when you put them together with a creamy frosting or a simple glaze, it becomes something truly magical. It’s the kind of cake that looks impressive but is made with simple, honest ingredients you probably already have in your pantry.
Why you’ll love this recipe?
Honestly, there are so many reasons why this orange layer Cake Recipe has become my go-to. First and foremost, the flavor is just out of this world. You get that unmistakable, bright, and refreshing taste of real orange. It’s not artificial or overpowering; it’s just perfectly balanced, like sunshine in every bite. It’s like taking a bite of a perfectly ripe orange, but in cake form! Plus, the texture is absolutely divine – super moist and tender, never dry or crumbly. It’s the kind of cake that makes you close your eyes with the first bite.
And let’s talk about simplicity! While it looks like it belongs in a fancy bakery, this orange layer Cake Recipe is surprisingly straightforward. I’ve made it on busy weeknights when I needed a little pick-me-up, and it comes together quicker than you might think. No complicated steps or obscure ingredients here! I also love that it’s incredibly cost-effective. Fresh oranges are usually pretty affordable, and the other ingredients are pantry staples. It’s a way to create something truly special without breaking the bank.
What really sets it apart for me, though, is its versatility. You can dress it up with a rich buttercream, a light cream cheese frosting, or even just a simple dusting of powdered sugar. It’s perfect for birthdays, holidays, or just because you deserve a treat. I’ve even made mini versions for parties, and they’re always a hit. It’s a recipe that truly stands on its own, but if you’re looking for something similar in terms of crowd-pleasing deliciousness, you might also enjoy my Lemon Blueberry Pound Cake: What are some good recipes for this?, which has that same bright, fruity vibe, or my , which has that same bright, fruity vibe, or my , whichClassic Vanilla Bean Cake for when you want pure, unadulterated comfort. But for that specific burst of citrusy sunshine, this orange layer cake is unbeatable.
How to Make Orange Layer Cake
Quick Overview
This orange layer cake recipe is all about layering simple, fresh flavors for maximum impact. We start by creaming butter and sugar until light and fluffy, then add eggs and vanilla. The magic really happens when we incorporate fresh orange zest and juice into the wet ingredients, and then alternate them with the dry ingredients. We’ll bake these beauties until they’re golden and fragrant, then let them cool completely before a simple yet elegant glaze or frosting. It’s a straightforward process that yields an absolutely stunning result. No fancy equipment needed, just your basic baking tools and a love for all things citrusy!
Ingredients
For the Main Batter:
2 ½ cups all-purpose flour (spooned and leveled). Using a good quality flour makes a difference, trust me. It’s the backbone of our cake!
1 ½ teaspoons baking powder. This gives our cake its lift and airy texture.
½ teaspoon baking soda. Works with the acidic orange juice to create tenderness.
½ teaspoon salt. It sounds small, but it balances the sweetness and enhances all the flavors.
1 cup (2 sticks) unsalted butter, softened. Make sure it’s truly softened, not melted. This is key for a light and fluffy batter.
1 ¾ cups granulated sugar. Sweetness is important, but we’re balancing it with the orange.
3 large eggs, at room temperature. Room temperature eggs incorporate better and create a smoother batter.
1 teaspoon pure vanilla extract. Always go for pure! It makes a world of difference.
1 cup fresh orange juice (from about 2-3 navel oranges). Fresh is non-negotiable here! No bottled stuff will give you that vibrant flavor.
Zest of 2 large oranges (about 2 tablespoons). This is where the intense, fragrant orange aroma comes from. Don’t skip it!
For the Filling:
This recipe is designed to be delicious on its own, but a simple filling elevates it further. You can choose one of these options:
Option 1: Orange Cream Cheese Frosting
8 ounces cream cheese, softened
½ cup (1 stick) unsalted butter, softened
3-4 cups powdered sugar, sifted
2-3 tablespoons fresh orange juice
Zest of 1 orange (optional, for extra zing)
Option 2: Whipped Cream with Orange Zest
2 cups heavy whipping cream, cold
¼ cup powdered sugar
1 teaspoon pure vanilla extract
Zest of 1 orange
For the Glaze (if not using frosting):
1 ½ cups powdered sugar, sifted
3-4 tablespoons fresh orange juice
Zest of 1 orange (optional)
Step-by-Step Instructions
Step 1: Preheat & Prep Pan
First things first, let’s get our oven ready and our pans prepared. Preheat your oven to 350°F (175°C). I usually place my oven rack in the center. For this recipe, you’ll need two 8-inch round cake pans. Grease them really well with butter or non-stick spray, then line the bottoms with parchment paper. After that, lightly flour them, tapping out any excess. This might seem like a lot of fuss, but it ensures your beautiful orange layer cake won’t stick and will slide right out when it’s done!
Step 2: Mix Dry Ingredients
In a medium bowl, whisk together the all-purpose flour, baking powder, baking soda, and salt. Whisking them together helps to evenly distribute the leavening agents and salt, which means a more consistent rise and flavor throughout your cake. Give it a good whisk until everything looks well combined.
Step 3: Mix Wet Ingredients
In a large bowl (or the bowl of your stand mixer), cream the softened unsalted butter and granulated sugar together. Beat them on medium-high speed until the mixture is light, fluffy, and pale yellow. This process, called creaming, incorporates air, which is crucial for a tender cake crumb. This usually takes about 3-5 minutes. Now, add the eggs one at a time, beating well after each addition. Scrape down the sides of the bowl as needed. Stir in the vanilla extract. In a separate small bowl or liquid measuring cup, whisk together the fresh orange juice and the orange zest. This is where all that wonderful citrus perfume comes from!
Step 4: Combine
Now it’s time to bring everything together! With the mixer on low speed, gradually add the dry ingredients to the wet ingredients, alternating with the orange juice mixture. Start and end with the dry ingredients. So, add about one-third of the dry ingredients, mix until just combined, then add half of the orange juice mixture, mix, then another third of the dry, the rest of the orange juice, and finally the last third of the dry ingredients. Be careful not to overmix at this stage! Overmixing can develop the gluten in the flour too much, leading to a tough cake. Mix only until no streaks of flour remain. The batter will be thick but pourable.
Step 5: Prepare Filling
If you’re making the orange cream cheese frosting, beat the softened cream cheese and butter together until smooth and creamy. Gradually add the sifted powdered sugar, alternating with the orange juice, until you reach your desired consistency and sweetness. Beat in the orange zest if using. If you’re opting for the whipped cream, whip the cold heavy cream with the powdered sugar and vanilla extract until stiff peaks form. Gently fold in the orange zest. Make sure your cakes are completely cooled before you think about frosting or filling!
Step 6: Layer & Swirl
Once your cake layers have completely cooled on a wire rack (this is super important, otherwise your frosting will melt!), it’s time to assemble. If your cakes have a dome, you can gently level them with a serrated knife for a flatter surface. Place one cake layer on your serving plate or cake stand. Spread a generous layer of your chosen filling over the top. Then, carefully place the second cake layer on top. If you’re just using the glaze, you’ll apply that after the cakes have cooled and been stacked.
Step 7: Bake
Pour the batter evenly into your prepared cake pans. Bake for 30-35 minutes, or until a wooden skewer or toothpick inserted into the center of the cakes comes out clean. The tops should be golden brown and spring back lightly when touched. Keep an eye on your oven, as baking times can vary. If you notice one cake is browning faster, you can loosely tent it with foil.
Step 8: Cool & Glaze
Let the cakes cool in their pans on a wire rack for about 10-15 minutes before inverting them onto the wire rack to cool completely. Once they are totally cool, you can apply your glaze. For the glaze, whisk together the sifted powdered sugar, orange juice, and zest (if using) until smooth and pourable. You want a consistency that’s thick enough to coat the cake but not so thick that it’s hard to spread. Drizzle or spread it over the top of the cake, letting it drip down the sides. If you’re frosting, apply your frosting evenly over the top and sides of the cake.
Step 9: Slice & Serve
And there you have it! Your stunning orange layer cake. For the cleanest slices, use a sharp knife dipped in hot water and wiped dry between each cut. This cake is delightful served at room temperature. It’s perfect on its own, or with a dollop of extra whipped cream on the side.
What to Serve It With
This orange layer cake recipe is so versatile, it fits into almost any meal or occasion. For breakfast, I love a thin slice with my morning coffee. It’s not overly sweet, so it feels like a perfect little treat to start the day. A light dusting of powdered sugar is all it needs here.
For a weekend brunch, I’ll usually frost it with that lovely orange cream cheese frosting and perhaps garnish with some fresh orange segments or candied orange peel. It looks absolutely beautiful on a brunch spread and pairs wonderfully with a mimosa or a sparkling cider.
As a dessert, it’s a showstopper. I’ll often serve it with a side of raspberry coulis for a pop of contrasting color and tartness, or a scoop of vanilla bean ice cream. The cool ice cream against the tender cake is just heavenly. My family also loves it with a light drizzle of honey and a sprinkle of toasted slivered almonds for a bit of crunch.
And for those cozy snack moments? This cake is perfect. Sometimes, late at night, I just want something sweet, and a generous slice of this orange layer cake with a glass of milk or a cup of herbal tea is pure comfort. My kids absolutely devour it this way. It’s become a tradition for us on movie nights!
Top Tips for Perfecting Your Orange Layer Cake
Over the years, I’ve learned a few tricks that make this orange layer cake recipe even better. First, when it comes to the oranges, use fresh ones! The zest has those essential oils that give the cake its incredible aroma and flavor. Don’t be tempted by pre-grated zest or bottled juice; it just won’t be the same. Make sure you zest the oranges *before* you juice them – it’s so much easier that way! And when you zest, try to only get the colored part, avoiding the bitter white pith underneath.
When mixing your batter, remember the golden rule: don’t overmix! Once the flour is added, mix just until it disappears. Overmixing develops gluten, which can make your cake tough and dense. I always stop mixing as soon as I don’t see dry flour anymore. The batter might look a little lumpy, and that’s perfectly fine. Trust me, it’s better than a tough cake!
For the swirls in the batter if you’re doing a visual swirl effect with a glaze, make sure your glaze is a good consistency – not too thin, not too thick. You want it to hold its shape just enough to create a pattern. I’ve learned that swirling too much can actually muddy the colors and patterns, so a few gentle swirls are usually best.
Now, for ingredient swaps. If you’re out of regular butter, you can try using a good quality margarine, but the flavor won’t be quite as rich. For the orange juice, if you’re in a pinch, you could use a mix of half orange juice and half milk, but the flavor won’t be as intense. I’ve also experimented with using a combination of all-purpose flour and almond flour, about 50/50, and it adds a lovely subtle nutty flavor and even more moisture. Just be aware that almond flour can make cakes a bit denser.
Baking can be tricky! Always preheat your oven properly. I find that using the center rack gives the most even heat. If your oven tends to run hot, you might need to reduce the temperature slightly or shorten the baking time. The toothpick test is your best friend here; when it comes out clean, your cake is done. Don’t be afraid to slightly underbake rather than overbake, as the cake will continue to cook a little on the hot wire rack.
And for the glaze, consistency is everything! If it’s too thick, add a tiny bit more orange juice, a teaspoon at a time. If it’s too thin, add more sifted powdered sugar. I like my glaze to be thick enough to coat but still have a lovely flow. Sometimes I’ll add a splash of milk to the glaze for a brighter white finish, but then it won’t have that perfect citrus tang.
Storing and Reheating Tips
This orange layer cake recipe is a dream to store, which makes it perfect for making ahead. If you’ve frosted it with a buttercream, it can usually sit out at room temperature for a day or two, as long as your kitchen isn’t too warm. Just make sure it’s covered loosely with a cake dome or foil to prevent it from drying out. The rich frosting acts as a good protector.
For longer storage, the refrigerator is your best friend. Place the cake in an airtight container or wrap it well in plastic wrap, then foil. It should stay fresh in the refrigerator for up to 4-5 days. I find that the flavors actually meld and improve on the second day! When you’re ready to serve, you can either let it come to room temperature on its own, which takes about an hour, or you can gently warm a slice in the microwave for about 10-15 seconds. Be careful not to overheat it, though!
If you need to freeze this glorious cake, I highly recommend doing so before glazing or frosting, if possible. If you do freeze it frosted, make sure the frosting is stable (like a buttercream) and not too delicate. Wrap the cooled cake layers individually and tightly in plastic wrap, then a layer of foil. You can also freeze slices. It will keep well in the freezer for up to 2-3 months. Thaw it overnight in the refrigerator, then let it come to room temperature for a few hours before serving. If you’ve frozen unfrosted layers, you can frost them once they’re thawed and at room temperature.
Regarding the glaze, it’s best applied when the cake is completely cooled and just before serving, especially if you plan to store it. If you need to store a glazed cake, make sure the glaze has set up firmly first. For best results with a glazed cake stored in the fridge, you might want to let it sit out for about 30 minutes to an hour before serving so the glaze softens slightly.
Frequently Asked Questions
Final Thoughts
This orange layer cake recipe is more than just a dessert to me; it’s a cherished memory baked into deliciousness. It’s that perfect balance of bright, zesty orange flavor and wonderfully moist, tender cake that always hits the spot. It’s simple enough for a casual afternoon treat but impressive enough to be the star of any celebration. It’s the kind of cake that makes people ask for the recipe, and that’s always the best compliment, right?
If you love this recipe, I think you’ll also adore my Lemon Poppy Seed Bread for another burst of citrus goodness, or my Coconut Cream Cake for a different kind of decadent, moist delight. These recipes share that same passion for vibrant flavors and satisfying textures that I know you’ll love.
So, go ahead, gather your oranges, and give this orange layer cake recipe a try. I promise you won’t be disappointed. I can’t wait to hear how yours turns out and what special occasions you bake it for! Happy baking, and enjoy every single delightful bite!
Orange Layer Cake
Ingredients
Cake Layers
- 2.5 cups all-purpose flour
- 1.75 tsp baking powder
- 0.25 tsp baking soda
- 0.5 tsp salt
- 0.5 cup unsalted butter, room temperature
- 0.5 cup vegetable oil
- 1.5 cups sugar
- 0.5 tsp vanilla extract
- 4 large eggs
- 0.75 cup milk
- 0.5 cup fresh orange juice
- 2 tbsp fresh orange zest
Cream Cheese Frosting
- 2.5 cups heavy whipping cream, cold
- 1.5 cups powdered sugar
- 1 tbsp vanilla extract
- 16 oz cream cheese, room temperature
- 1 Orange gel icing color optional
Orange Simple Syrup & Garnish
- 6 tbsp fresh orange juice (about 2-3 oranges)
- 4 tbsp powdered sugar
- Orange slices optional garnish
Instructions
Make the Cake Layers
- Preheat oven to 350°F (176°C) and prepare three 8 inch cake pans with non-stick baking spray and parchment circles on the bottom.
- Combine the flour, baking powder, baking soda and salt in a medium-sized bowl and set aside.
- Add the butter, oil, sugar and vanilla extract to a large mixer bowl and beat together until light in color and fluffy, about 2-3 minutes. Do not skimp on the creaming time.
- Add the eggs one at a time, mixing until mostly combined after each. Scrape down the sides of the bowl as needed to be sure all ingredients are well incorporated.
- Add half of the dry ingredients to the batter and mix until mostly combined.
- Add the milk, orange juice, and orange zest and mix until well combined.
- Add the remaining dry ingredients and mix until well combined and smooth. Scrape down the sides of the bowl as needed to be sure all ingredients are well incorporated. Do not over mix the batter.
- Pour the batter into the prepared cake pans and bake for 18-23 minutes, or until a toothpick comes out clean.
- Let the cakes cool in the pans for 2-3 minutes, then flip them out onto cooling racks and let them rest until they reach room temperature.
Make the Frosting
- Add the heavy whipping cream, powdered sugar and vanilla extract to a large mixing bowl and whip on high speed until stiff peaks form. Set aside.
- In another mixing bowl, add the cream cheese and beat until smooth and creamy. Add about 1/3 of the whipped cream to the cream cheese and gently fold together to combine so that you don’t deflate the whipped cream. When mostly combined, add another third of the whipped cream and gently fold together, then add the final third and gently fold together until completely combined. Set aside.
Make the Syrup & Build the Cake
- Combine the orange juice and powdered sugar for the syrup in a small bowl. Set aside.
- To build the cake, use a large serrated knife to remove the domes from the top of the cakes so that they’re flat. These cakes don’t have a large dome, but I like to make sure they’re completely flat.
- Place the first layer of cake on a serving plate or a cardboard cake round. Drizzle the cake layer with 4 tablespoons of orange syrup, then spread about 1 cup of frosting on top of the cake layer. Add the second cake layer, another 4 tablespoons of orange syrup and another cup of frosting. Top the cake with the final layer and frost the outside of the cake.
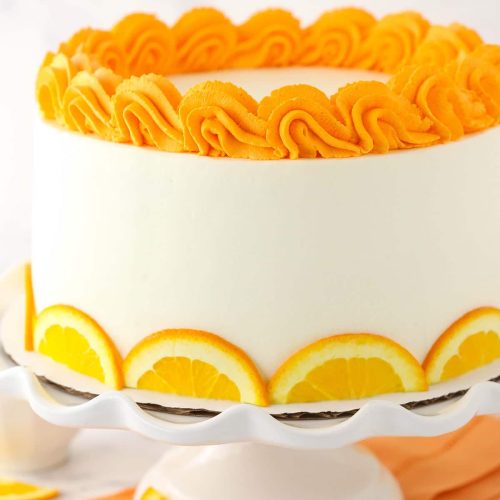
- Color the remaining whipped frosting with orange gel icing color, then pipe a border around the top outer edge of the cake.
- Decorate the bottom of the cake with some orange slices if desired. Store well-covered in the fridge until ready to serve. Cake is best served cool, but not super cold.