There are some recipes that just feel like a warm hug, you know? The kind that transport you back to your grandma’s kitchen or make a regular Tuesday feel like a special occasion. For me, that’s absolutely this cannoli cake. I’ve been making variations of this for years, tweaking it here and there, and I finally landed on the version that makes everyone in my family go wild. It’s got all the incredible flavors of a traditional cannoli – that creamy ricotta, a hint of citrus, a touch of sweetness – but in this wonderfully moist, easy-to-slice cake form. Honestly, if you’re a fan of the classic Italian pastry, you are going to adore this. It’s like having your favorite dessert, but it’s somehow even easier to share (or, let’s be real, devour all by yourself). I remember the first time I tried to make a layered cannoli cake, it was a disaster. The filling was too loose, the cake was dry… you get the picture. But this version? It’s a lifesaver, and it’s become my go-to for birthdays, potlucks, or honestly, just when I need a serious treat.
What is cannoli cake?
So, what exactly *is* cannoli cake? Think of it as your beloved cannoli filling and the crispy shell, reimagined into a soft, tender cake. Instead of a fried shell, we’re baking a gorgeous, moist cake that has those signature cannoli flavors baked right in. The “cannoli” aspect comes from both the filling – a creamy, sweet ricotta mixture that we’ll swirl through the batter and also layer on top – and sometimes a hint of orange zest or citrus in the cake itself, mimicking the traditional pastry. It’s not quite a cheesecake, and it’s definitely not just a regular vanilla cake. It’s this beautiful hybrid that captures the essence of a cannoli in a way that’s approachable for any home baker, even if you’ve never rolled out a pastry dough in your life. It’s essentially a celebration of those iconic Italian dessert flavors, made into something comforting and shareable.
Why you’ll love this recipe?
There are so many reasons why this cannoli cake has earned a permanent spot in my recipe binder, and I think you’ll fall in love with it for many of the same reasons! First off, the flavor is just out of this world. You get that creamy, dreamy ricotta filling, beautifully balanced with a subtle sweetness and a hint of bright citrus that cuts through the richness. It’s not overly sweet, which is something I really appreciate. Then there’s the texture – the cake itself is incredibly moist and tender, a perfect canvas for that luscious filling. It truly tastes like a decadent dessert without being heavy.
And can we talk about simplicity? I know “cake” can sometimes sound intimidating, but trust me, this is one of the most straightforward cakes I’ve ever made. The batter comes together in one bowl (yes, really!), and the filling is just a matter of mixing a few ingredients. It’s one of those recipes that feels impressive when you serve it, but the actual hands-on time is minimal. This is a lifesaver on busy nights when you still want to whip up something special.
Financially, this is a great option too. The ingredients are all pretty standard pantry staples or easily found at any grocery store. You don’t need any fancy, expensive extracts or rare flours. It feels like a treat, but it’s surprisingly budget-friendly.
Plus, it’s wonderfully versatile! You can serve it as is, dust it with a little powdered sugar, or add some chocolate chips to the filling for an extra punch. It’s perfect for a casual afternoon tea, a sophisticated dessert after dinner, or even as a breakfast treat if you’re feeling decadent. What I love most about this cannoli cake is that it manages to be both comforting and elegant. It’s the kind of dessert that makes people ask for the recipe, and you can proudly say, “Oh, this? I whipped it up!”
How do I make [Recipe Name]?
Quick Overview
This cannoli cake is all about bringing together a tender, moist cake base with a rich, creamy ricotta filling. We’ll make a simple cake batter, fold in a portion of the cannoli filling, swirl it for a beautiful marble effect, and then bake it to golden perfection. A final touch of glaze or a simple dusting of powdered sugar seals the deal. It’s a straightforward process that yields incredibly impressive results, perfect for bakers of all levels!
Ingredients
For the Main Batter:
- 3 cups all-purpose flour (spooned and leveled) – I always use a good quality all-purpose flour for a reliable texture.
- 1 ½ teaspoons baking powder – This gives us that nice lift.
- ½ teaspoon baking soda – Works with the acidity for a tender crumb.
- ½ teaspoon salt – Essential for balancing flavors.
- 1 cup (2 sticks) unsalted butter, softened – Make sure it’s truly softened, not melted, for the best emulsion.
- 1 ¾ cups granulated sugar – For that perfect sweetness.
- 3 large eggs – At room temperature, they incorporate better.
- 1 teaspoon vanilla extract – Pure vanilla extract makes a difference!
- 1 cup whole milk, at room temperature – I find whole milk gives the best richness, but 2% works too.
- Zest of 1 large orange – This is key for that authentic cannoli vibe!
For the Filling:
- 2 cups (about 16 oz) whole milk ricotta cheese, drained VERY well – This is crucial! Squeeze out as much liquid as possible using cheesecloth or a fine-mesh sieve. Watery ricotta means a soggy cake.
- ½ cup powdered sugar, sifted – Sifting prevents lumps.
- ¼ cup mini chocolate chips (optional) – My kids always beg for these!
- 1 teaspoon vanilla extract
- ½ teaspoon orange zest (optional, but recommended!)
For the Glaze:
- 1 cup powdered sugar, sifted
- 2-3 tablespoons milk or heavy cream – Start with less and add more to reach desired consistency.
- ½ teaspoon vanilla extract
Step-by-Step Instructions
Step 1: Preheat & Prep Pan
First things first, preheat your oven to 350°F (175°C). Grease and flour a 9×13 inch baking pan, or line it with parchment paper, leaving some overhang on the sides to make lifting it out easier. I always like to lightly grease the parchment too, just for good measure. This ensures your beautiful cannoli cake doesn’t stick.
Step 2: Mix Dry Ingredients
In a medium bowl, whisk together the flour, baking powder, baking soda, and salt. Give it a good whisk to ensure everything is evenly distributed. This is a simple step, but it’s important for making sure your leaveners are working properly and you don’t end up with pockets of baking soda. Set this aside for now.
Step 3: Mix Wet Ingredients
In a large bowl, cream together the softened butter and granulated sugar until light and fluffy. This usually takes about 3-4 minutes with an electric mixer. Add the eggs one at a time, beating well after each addition. Then, stir in the vanilla extract and the orange zest. Pour in the room temperature milk and mix until just combined. Don’t worry if it looks a little curdled at this stage; it will smooth out.
Step 4: Combine
Now, it’s time to bring it all together. Gradually add the dry ingredients to the wet ingredients, mixing on low speed (or by hand) until just combined. Be careful not to overmix! Overmixing develops the gluten in the flour, which can lead to a tough cake. You want to mix until you no longer see streaks of dry flour. A few lumps are perfectly fine.
Step 5: Prepare Filling
While the cake batter is resting, let’s get that glorious filling ready. In a separate bowl, combine the well-drained ricotta cheese, sifted powdered sugar, vanilla extract, and optional orange zest. If you’re adding chocolate chips, stir them in now. Mix everything until it’s smooth and creamy. Taste it – does it need a little more sweetness? Go ahead and add a touch more powdered sugar if you like. Remember, this filling will be swirled into the cake, so you want it to be spreadable but not runny.
Step 6: Layer & Swirl
Pour about half of the cake batter into your prepared pan and spread it evenly. Dollop about half of the ricotta filling over the batter. Then, gently spread the remaining cake batter over the filling. Dollop the rest of the ricotta filling on top of the second layer of batter. Now, grab a butter knife or a skewer and gently swirl the filling into the batter. Don’t overdo it; you want distinct swirls, not just a uniform mix. This is where the magic happens visually!
Step 7: Bake
Bake in the preheated oven for 35-45 minutes, or until a wooden skewer or toothpick inserted into the center of the cake comes out clean. The top should be golden brown and slightly set. Keep an eye on it, as oven temperatures can vary. If the top is browning too quickly, you can loosely tent it with foil.
Step 8: Cool & Glaze
Once baked, let the cannoli cake cool in the pan on a wire rack for about 15-20 minutes. This allows it to set up properly before you attempt to glaze or slice it. While it’s cooling, whisk together the sifted powdered sugar, vanilla extract, and 2 tablespoons of milk or cream in a small bowl. Add more liquid, a teaspoon at a time, until you reach your desired drizzling consistency. Once the cake is mostly cool (but still a little warm), drizzle the glaze over the top. If you prefer, you can just let it cool completely and dust with powdered sugar.
Step 9: Slice & Serve
Let the cake cool completely before slicing. This is important for the glaze to set and for clean slices. Cut into squares and enjoy! It’s absolutely divine served at room temperature.
What to Serve It With
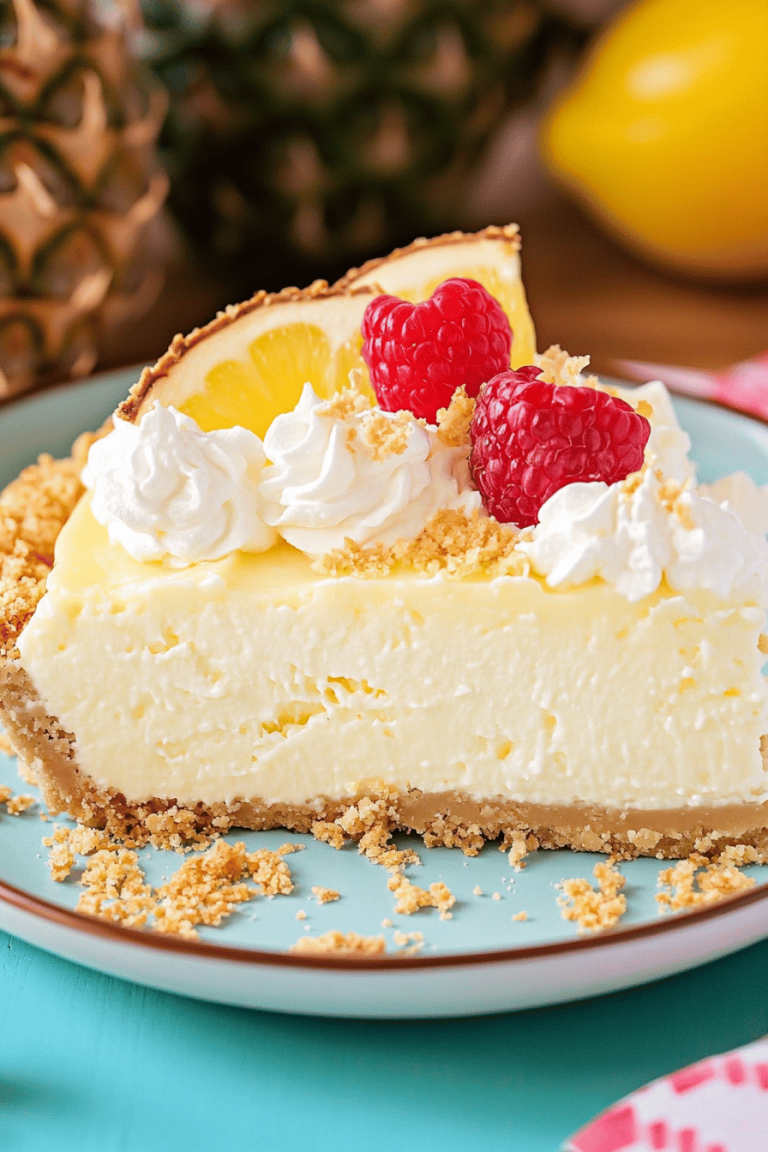
This cannoli cake is so versatile, it truly fits into almost any occasion! For a delightful breakfast, I love serving a warm slice with a strong cup of coffee. The rich flavors of the cake pair beautifully with the bitterness of the coffee, creating a balanced start to the day. For a more elegant brunch, I like to plate a generous slice with a dollop of whipped cream and a few fresh berries – raspberries are particularly lovely. It adds a pop of color and a fresh counterpoint to the richness.
When it comes to dessert, it’s a showstopper on its own, of course. But if you want to go the extra mile, a small scoop of vanilla bean ice cream or a drizzle of chocolate ganache is divine. It’s also fantastic alongside a dessert wine or a sweet liqueur. For those cozy, quiet evenings when you just need something sweet, a simple piece with a glass of milk is pure comfort. My family traditions often involve this cake after Sunday dinner, especially during the holidays. It’s just one of those desserts that brings everyone to the table, happy and satisfied. It truly is a crowd-pleaser, no matter how you serve it.
Top Tips for Perfecting Your [Recipe Name]
After making this cannoli cake countless times, I’ve picked up a few tricks that I think make all the difference. So, lean in, because these are the secrets to making it truly spectacular!
Zucchini Prep: If you decide to add zucchini for extra moisture (which I highly recommend, it makes it even more decadent!), make sure you squeeze out as much liquid as possible. Grate it on the large holes of a box grater, then place it in a fine-mesh sieve over a bowl. Let it sit for at least 15 minutes, then press down firmly with a spoon or your hands to remove excess water. This is crucial for preventing a soggy cake. Freshly grated zucchini works best!
Mixing Advice: The golden rule for almost any cake is to avoid overmixing once you add the flour. Mix until *just* combined. You’ll see some streaks of flour disappear, but don’t keep going until it’s perfectly smooth. A few little lumps are better than developing too much gluten, which leads to a tough, dense texture. I always finish mixing by hand with a spatula to ensure I don’t go overboard.
Swirl Customization: For the swirl effect, you don’t need to be an artist! Just dollop spoonfuls of the ricotta mixture over the batter. Then, take a butter knife or a skewer and gently drag it through the batter and filling. Think of making figure-eights or simple curves. You want to create ribbons of filling throughout the cake, not completely blend everything together. It looks beautiful when you slice into it and see those pockets of creamy filling!
Ingredient Swaps: I’ve experimented with a few things! If you don’t have buttermilk, regular whole milk at room temperature works just fine, as I’ve written in the recipe. For a dairy-free option, I’ve tested this with a good quality dairy-free ricotta alternative and almond milk, and it turned out surprisingly creamy! Just be aware that dairy-free options might alter the texture slightly. For the chocolate chips, feel free to use semi-sweet or dark chocolate. You can even add a handful of Mini Cannoli chips if you can find them!
Baking Tips: Always know your oven! I recommend placing the baking pan in the center of the oven for even heat distribution. If your oven tends to run hot on one side, you might need to rotate the pan halfway through baking. The toothpick test is your best friend here. If it comes out with just a few moist crumbs attached, it’s perfect. If it’s wet with batter, it needs more time.
Glaze Variations: The glaze is super simple, but you can play with it! If you prefer a thicker glaze, use less liquid. For a thinner, more drizzly glaze, add a touch more. You can also add a little lemon juice to the glaze for a citrusy tang, or even a few drops of food coloring if you’re making it for a special occasion.
Storing and Reheating Tips
Storing this delicious cannoli cake is pretty straightforward, and it holds up wonderfully! If you find yourself with leftovers (which is rare in my house, but it happens!), here’s how I handle it:
Room Temperature: For short-term storage, you can keep the cake at room temperature for up to 2 days, provided it’s well-covered. I like to use plastic wrap or an airtight cake carrier. Make sure it’s completely cooled before covering, otherwise, condensation can form and make the glaze sticky. It’s best to add the glaze *after* you take it out of storage if you plan to keep it at room temp for a while, as it can sometimes soften.
Refrigerator Storage: For longer storage, or if your kitchen is particularly warm, I recommend refrigerating the cannoli cake. It will stay fresh and delicious for up to 4-5 days. Store it in an airtight container or wrap it tightly in plastic wrap, then foil. The texture remains surprisingly moist. When you’re ready to serve a slice, I find it’s best to let it sit at room temperature for about 15-20 minutes before cutting. This takes the chill off and allows the flavors to mellow out a bit.
Freezer Instructions: This cake freezes surprisingly well! If you want to make it ahead of time or save some for a future craving, wrap the completely cooled cake (un-glazed is best for freezing) tightly in a layer of plastic wrap, followed by a layer of aluminum foil. It can be stored in the freezer for up to 2-3 months. To thaw, remove it from the freezer and let it thaw overnight in the refrigerator. Once thawed, you can add glaze or a dusting of powdered sugar before serving.
Glaze Timing Advice: If you plan to store leftovers, I often find it’s best to add the glaze right before serving, especially if storing at room temperature. If refrigerating, the glaze should hold up reasonably well, but it might soften slightly. For freezing, it’s definitely best to glaze after thawing. This ensures a nice, crisp glaze on your beautifully preserved cannoli cake.
Frequently Asked Questions
Final Thoughts
So there you have it – my absolute favorite cannoli cake recipe! It’s a dessert that truly has it all: incredible flavor that reminds you of your favorite Italian pastry, a wonderfully tender and moist texture, and a simplicity that makes it achievable for anyone. I honestly believe this is the kind of cake that will become a treasured recipe in your own family. It’s perfect for those moments when you want to impress without spending hours in the kitchen, or when you just need a little bit of sweetness to brighten your day. If you’re looking for other delightful bakes, you might also enjoy my Lemon Ricotta Cake or my classic Italian Almond Cookies. They share that same comforting, delicious Italian-inspired vibe. Give this cannoli cake a try, and I truly can’t wait to hear how yours turns out! Happy baking, my friends!
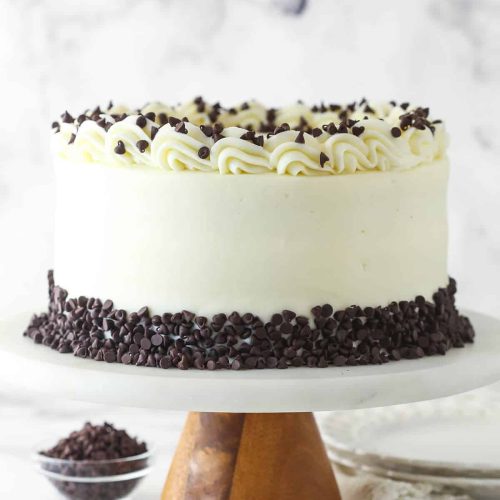
Cannoli Layer Cake
Ingredients
Cannoli Filling
- 0.75 cups ricotta cheese strained
- 0.75 cups mascarpone cheese
- 1.33 cups powdered sugar
- 0.25 cup mini chocolate chips
Cake Ingredients
- 2.5 cups all-purpose flour measured properly
- 2 tsp baking powder
- 0.25 tsp baking soda
- 1 tsp ground cinnamon
- 0.5 tsp salt
- 0.5 cup unsalted butter room temperature
- 0.5 cup vegetable oil
- 1 cup sugar
- 0.5 cup light brown sugar
- 1 tbsp vanilla extract
- 4 large eggs
- 0.5 cup milk
- 0.75 cup sour cream
Mascarpone Frosting
- 1 cup unsalted butter room temperature
- 12 oz mascarpone cheese cool, but not cold
- 8.5 cups powdered sugar approximately 920-1035g
- 1 tsp vanilla extract
- 1 cup mini chocolate chips for decoration
Instructions
Strain the Ricotta
- Line a large strainer with two layers of cheesecloth and put the ricotta cheese on top. Cover the top of the cheese with cheesecloth or some plastic wrap. Put the strainer on top of a bowl with at least an inch or two of space between the bottom of the strainer and the bottom of the bowl for liquid to drain to. You can put something heavy on top the cheese and cheesecloth to help squeeze out liquid, if you’d like. Put in the refrigerator and let the ricotta strain for at least 4 hours, or overnight. I ended up with about 2 tablespoons of liquid being removed from my cheese.
Make the Filling
- Add the strained ricotta, mascarpone cheese and powdered sugar to a mixer bowl and mix on low speed just until well combined. Do not over mix or mix on a high speed or the mascarpone cheese can become thin and watery. You can even stir it all together by hand with a spatula, just to be sure you don’t over mix it. Keep in mind that this is a thinner filling.
- Place the filling in the fridge to firm up a bit, about 2-3 hours. If you make the cake layers while this chills, it should be good to use when the cakes have fully cooled.
Make the Cake Layers
- Prepare three 8-inch cake pans with parchment paper circles in the bottom and grease the sides. Preheat oven to 350°F (176°C).
- Combine the flour, baking powder, baking soda, cinnamon and salt in a medium sized bowl and set aside.
- Add the butter, oil, sugars and vanilla extract to a large mixer bowl and beat together until light in color and fluffy, about 2-3 minutes. Do not skimp on the creaming time.
- Add the eggs one at a time, mixing until mostly combined after each. Scrape down the sides of the bowl as needed to be sure all ingredients are well incorporated.
- Add half of the dry ingredients to the batter and mix until mostly combined.
- Slowly add the milk and sour cream mix until well combined. The batter may look a little curdled, but that’s ok.
- Add the remaining dry ingredients and mix until well combined and smooth. Scrape down the sides of the bowl as needed to be sure all ingredients are well incorporated. Do not over mix the batter.
- Divide the batter evenly between the cakes pans and bake for 20-24 minutes, or until a toothpick comes out with a few crumbs.
- Remove the cakes from the oven and allow to cool for about 2-3 minutes, then remove to cooling racks to cool completely.
Make the Mascarpone Frosting
- Add the butter and mascarpone cheese to a large mixing bowl and just beat until smooth. You don’t want to over mix the mascarpone cheese or it can become thin and watery.
- Add the powdered sugar in two parts and mix until well combined and smooth, again being careful not to over mix. As you add the powdered sugar, it may start to look a little separated, but will come together as you add additional powdered sugar. Just don’t over mix it.
- Add the vanilla extract and gently stir to combine.
Assemble the Cake
- To put the cake together, use a large serrated knife to remove the domes from the top of the cakes so that they’re flat.
- Place the first cake on a serving plate or a cardboard cake round.
- Pipe a dam of frosting around the edge of the cake and then fill it with 1/2 of the cannoli filling.
- Add the second layer of cake, another dam of frosting and the remaining filling inside the dam.
- Add the final layer of cake on top and then add a thin crumb coat of frosting to the outside of the cake. Refrigerate the cake until firm and sturdy, about 1-2 hours.
- Frost the outside of the cake with the remainder of the frosting, then finish it off by pressing some mini chocolate chips onto the outside of the cake, along the bottom.
- Pipe the remaining frosting along the top edge of the cake.
- Refrigerate cake until ready to serve. Store well covered or in an airtight cake carrier. Cake is best if eaten within 3-4 days.