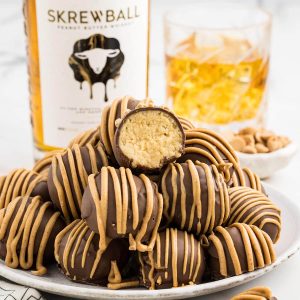
You know those moments when you’re craving something sweet, maybe a little decadent, but you just don’t have the energy for a full-blown baking project? Yeah, I live for those moments, and I’ve got the *perfect* solution. My Skrewball whiskey balls are exactly what you need. Imagine the rich, comforting taste of peanut butter and chocolate, but with a delightful kick of that amazing Skrewball peanut butter whiskey. It’s like a grown-up Reese’s Peanut Butter Cup that’s magically transformed into an easy-to-make treat. Honestly, these little gems disappeared faster than free samples at a grocery store the last time I made them for a get-together. They’re so ridiculously simple, yet they taste like they came from a fancy bakery. If you’ve ever enjoyed a no-bake cookie or a truffle, you’re going to fall head over heels for these Skrewball whiskey balls. They’re my absolute go-to for holiday parties, potlucks, or just a sneaky late-night indulgence when I need a little something special.
What are skewball whiskey balls?
So, what exactly are these magical little spheres of deliciousness? Think of them as a no-bake cookie dough ball, but elevated. We’re taking all the classic components of a delightful treat – creamy peanut butter, sweet chocolate, and a hint of vanilla – and infusing them with the star of the show: Skrewball peanut butter whiskey. It’s not just a splash; it’s enough to give each bite that distinct, warm, nutty, and slightly boozy flavor that makes Skrewball so unique. The “balls” part just refers to their perfectly portioned, easy-to-eat shape. They’re essentially a sweet, boozy, peanut butter confection. The name itself is pretty straightforward, right? Skrewball whiskey + delicious balls = Skrewball whiskey balls! It’s a concept that’s simple, fun, and promises pure, unadulterated joy in every bite. They’re not overly complicated, and that’s part of their charm. They’re the kind of treat that makes people say, “Wow, what *is* this?” and then immediately ask for the recipe.
Why you’ll love this recipe?
Honestly, the list of reasons to love these Skrewball whiskey balls is pretty long, but I’ll try to break down my favorites. First off, the **flavor**. Oh. My. Goodness. You get that unmistakable creamy, salty Peanut Butter base that just melts in your mouth, perfectly balanced by the sweetness of the powdered sugar and the rich chocolate chips. And then, that Skrewball whiskey hits you – it’s not overpowering, but it adds this incredible depth and warmth that just takes it to a whole new level. It’s that signature nutty, slightly sweet whiskey flavor that makes this recipe truly special. And the **simplicity**? It’s almost criminal how easy these are. No baking required! You literally just mix everything together in one bowl, roll them into balls, and chill. That’s it! It’s a lifesaver on those busy nights when you need a dessert in a pinch or when you just want to impress without stressing. Plus, they’re incredibly **cost-efficient**. Most of the ingredients are pantry staples you probably already have on hand, and a bottle of Skrewball goes a surprisingly long way for these. What I also love is their **versatility**. You can totally customize them! Add different kinds of chocolate chips (dark, milk, white), roll them in sprinkles, crushed nuts, or even a little extra cocoa powder. They’re also fantastic for any occasion. Need a quick dessert for a weeknight craving? Done. Bringing something to a holiday potluck? They’ll be the first thing gone. Want to make a unique treat for friends? These are your answer. They’re like a more sophisticated, grown-up version of the no-bake cookies I used to make as a kid, but with a seriously fun twist.
How do I make a skewball whiskey ball?
Quick Overview
The beauty of these Skrewball whiskey balls is their sheer simplicity. We’re essentially creating a no-bake, fudgy dough that’s packed with Peanut Butter flavor and gets a delightful kick from Skrewball whiskey. You’ll combine your wet ingredients, mix in your dry ingredients until a dough forms, then stir in your chocolate chips. From there, it’s just a matter of rolling them into bite-sized balls and letting them firm up in the fridge. It’s a process that takes minutes to mix and then just a little patience while they chill. This method ensures a smooth, rich texture without any baking fuss.
Ingredients
For the Main Batter:
1 cup creamy Peanut Butter (the regular kind, not natural that separates easily, will give you the best texture)
1/2 cup (1 stick) unsalted butter, softened (make sure it’s truly soft, not melted, for best consistency)
1/4 cup Skrewball peanut butter whiskey (this is where the magic happens! You can adjust this slightly to your preference)
1 teaspoon vanilla extract (pure vanilla extract makes a difference in flavor)
3 cups powdered sugar (sifted to avoid lumps, which is a small step that makes a big difference)
For the Mix-ins:
1 cup semi-sweet chocolate chips (or milk chocolate if you prefer sweeter, or even dark chocolate for a richer taste)
Optional for Rolling:
Extra powdered sugar, cocoa powder, or finely chopped peanuts for coating (if desired)
Step-by-Step Instructions
Step 1: Cream the Base
In a large mixing bowl, cream together the softened butter and creamy peanut butter until they are light and fluffy. This is your foundation, so take a moment to really get it smooth and well combined. I usually use an electric mixer for this, but a sturdy whisk and some elbow grease will work too!
Step 2: Add the Flavor Boosters
Pour in your Skrewball peanut butter whiskey and the vanilla extract. Mix this all together until it’s just incorporated. You’ll start to smell that amazing aroma already!
Step 3: Gradually Add Dry Ingredients
Start adding the sifted powdered sugar, about a cup at a time, mixing well after each addition. The mixture will get quite thick. Continue adding the sugar until it’s all incorporated and you have a thick, dough-like consistency. It should be firm enough to hold its shape when rolled.
Step 4: Stir in the Chocolate Chips
Gently fold in the semi-sweet chocolate chips. Be careful not to overmix at this stage; you just want them evenly distributed throughout the dough.
Step 5: Roll into Balls
Using your hands, scoop out about a tablespoon of the mixture at a time and roll it between your palms to form smooth balls. They should be about 1-inch in diameter. If the mixture is too sticky, you can chill the bowl for about 15-20 minutes before rolling. If you’re using any optional coatings, now’s the time to gently roll the balls in them.
Step 6: Chill to Firm Up
Place the rolled Skrewball whiskey balls on a baking sheet lined with parchment paper. This prevents them from sticking. Refrigerate them for at least 30-60 minutes, or until they are firm to the touch. This step is crucial for them to hold their shape and for the flavors to meld beautifully.
Step 7: Serve and Enjoy!
Once chilled and firm, your Skrewball whiskey balls are ready to be devoured! Arrange them on a platter and watch them disappear.
Step-by-Step Instructions (Revised for Recipe Card Integration)
What to Serve It With
These Skrewball whiskey balls are so versatile, they can honestly stand alone as a decadent treat, but here are a few ideas that I’ve found are just *chef’s kiss* perfect.
For Breakfast (or Brunch!): While they are definitely a treat, I’ve been known to grab one (okay, maybe two) with my morning coffee. They’re surprisingly satisfying and give you that little boost of energy. If you’re serving them for brunch, I love to arrange them on a tiered stand alongside other pastries or fruit. They add that unexpected, sophisticated element that guests always rave about.
As Dessert: This is perhaps their most natural habitat. They are the perfect ending to a hearty meal. Serve them with a small glass of milk (yes, even for adults!), a strong cup of coffee, or even a small shot of Skrewball whiskey if you’re feeling extra celebratory. I like to put a few on a small dessert plate with a tiny sprig of mint for a touch of elegance. They also pair beautifully with a scoop of vanilla bean ice cream or a drizzle of chocolate sauce.
For Cozy Snacks: Picture this: you’re curled up on the couch with a good book or movie, a warm blanket, and a few of these Skrewball whiskey balls. Pure bliss! They’re the perfect companion for a lazy afternoon or a cozy evening. I often make a batch when it’s chilly outside, and they just feel like a warm hug in treat form.
My family has a tradition of making these around the holidays. We’ll set up a little “assembly line” and everyone gets involved in rolling the balls. It’s messy, it’s fun, and the reward is a platter full of these amazing treats that we can then enjoy throughout December. They also make fantastic edible gifts. Just pop them in a cute tin or jar, tie a ribbon around it, and you’ve got a homemade present that’s sure to be a hit.
Top Tips for Perfecting Your Skrewball Whiskey Balls
Over the years, I’ve made these Skrewball whiskey balls more times than I can count, and I’ve picked up a few tricks along the way that I think will really help you achieve perfection. Think of these as the little secrets that elevate them from good to absolutely unforgettable.
Peanut Butter Choice is Key: Seriously, use a standard creamy peanut butter. The natural kind that you have to stir because the oil separates? It has too much oil, and it can make your balls too greasy or not firm up properly. Stick with Jif or Skippy – they’re designed for this kind of baking (even no-bake!) and give you that classic, consistent texture we’re going for.
Butter Softness Matters: When I say softened butter, I mean *softened*, not melted. Melted butter will make the mixture too liquidy, and you’ll end up adding way too much powdered sugar to compensate, which can make them chalky. Let your butter sit out at room temperature for about an hour until it’s pliable. It should indent easily when you press it with your finger.
Whiskey Measurement Wisdom: The 1/4 cup of Skrewball whiskey is a good starting point, and it gives a lovely, noticeable flavor. However, if you’re a big fan of that boozy kick, don’t be afraid to add a *little* more, maybe up to 1/3 cup. Just be mindful that adding too much liquid can make the dough too soft to roll. On the flip side, if you want a more subtle hint, you can reduce it to 3 tablespoons. Taste your dough (before adding chocolate chips!) and adjust if needed.
Sift Your Sugar: I cannot stress this enough! Sifting the powdered sugar is a game-changer. It removes any little lumps and ensures that your mixture is perfectly smooth and homogenous. This step really contributes to that melt-in-your-mouth texture that makes these so addictive.
Don’t Overmix When Adding Chips: Once the chocolate chips are in, mix just until they are distributed. Overmixing can break them down, and you want those lovely little pockets of chocolate throughout your balls. Gentle folding is the way to go here.
The Chill Factor: Patience is a virtue, especially with no-bake treats! Chilling the dough before rolling is crucial. If it feels too sticky, pop the whole bowl in the fridge for about 20-30 minutes. This firms it up just enough so you can roll perfect spheres without your hands getting coated in sticky dough. And chilling the final balls until they are firm is essential for them to hold their shape when served or stored.
Optional Coatings: While they’re amazing plain, a little coating can add an extra layer of texture and flavor. Rolling them in a bit of extra cocoa powder gives them a richer, more sophisticated look and taste. Finely chopped peanuts add a delightful crunch, and a light dusting of powdered sugar makes them look like little snow-kissed treats. Experiment and see what you like best!
Ingredient Swaps: I’ve tested this with almond butter, and while it’s good, it changes the flavor profile quite a bit. The classic peanut butter is definitely the way to go for that authentic Skrewball whiskey ball experience. For the chocolate chips, feel free to use milk chocolate if you prefer a sweeter bite, or dark chocolate for a more intense, less sweet flavor. Mini chocolate chips distribute more evenly if you find regular ones too chunky.
Storing and Reheating Tips
One of the best things about these Skrewball whiskey balls is how well they keep, making them perfect for making ahead of time. Here’s how I usually store them to keep them tasting their best:
Room Temperature: If you plan on enjoying them within a couple of days, you can absolutely keep them stored in an airtight container at room temperature. I find they maintain their best texture for about 3-4 days this way. Make sure the container is well-sealed to prevent them from drying out or picking up any off-flavors from your fridge or pantry.
Refrigerator Storage: For longer storage, or if your kitchen tends to be on the warmer side, the refrigerator is your best bet. Place them in an airtight container, and they should stay fresh and delicious for up to 2 weeks. The chilling also makes them even firmer, which some people (myself included!) really enjoy. When you take them out of the fridge, let them sit at room temperature for about 10-15 minutes to soften slightly before serving for the best texture.
Freezer Instructions: These Skrewball whiskey balls freeze surprisingly well! This is my secret weapon for having them ready for unexpected guests or holiday emergencies. Place them in a single layer on a baking sheet and freeze until solid (about 1-2 hours). Then, transfer them to a freezer-safe airtight container or a heavy-duty freezer bag, separating layers with parchment paper to prevent sticking. They’ll keep beautifully in the freezer for up to 2-3 months. To thaw, simply transfer them to the refrigerator overnight, or let them sit at room temperature for a few hours. They might be a touch softer after freezing, but they still taste fantastic.
Glaze Timing Advice: Since these are no-bake balls and don’t typically involve a glaze like a cookie might, this section is a bit different. If you decide to add an optional coating like cocoa powder or chopped nuts, it’s best to do that *just before* you chill them for the final time. If you’re making them to gift and want them to look extra special, you could drizzle them with a little melted chocolate just before serving, but for simple storage, keeping them plain is usually best.
Frequently Asked Questions
Final Thoughts
There you have it – my absolute favorite Skrewball whiskey balls! I really hope you give these a try. They’re just one of those recipes that brings a smile to my face every time I make them, and the joy on people’s faces when they take their first bite is priceless. They truly embody the spirit of Skrewball whiskey – fun, a little bit unexpected, and undeniably delicious. They’re proof that you don’t need a fancy oven or a lot of time to create something truly special. Whether you’re a seasoned baker or a complete beginner, these are practically foolproof. I know I’ll be making these again very soon, especially as the cooler weather starts to settle in. They’re just so comforting and festive. If you love peanut butter, you love chocolate, and you appreciate a good whiskey, then these are calling your name! I can’t wait to hear what you think, so please leave a comment below and let me know how yours turn out, or if you’ve discovered any fun variations! Happy treating!
Skrewball Whiskey Balls
Ingredients
Main Ingredients
- 10 ounces shortbread cookies Lorna Doone brand, 1 package
- 0.75 cup powdered sugar
- 8 ounces cream cheese block, softened to room temperature
- 0.25 cup Skrewball peanut butter-flavored whiskey
- 16 ounces milk chocolate melting discs Ghirardelli brand
- 4 ounces Reese's peanut butter baking chips
- 1 teaspoon coconut oil
Instructions
Preparation Steps
- Line 2 baking sheets with parchment paper or a silicone mat, and set aside.
- In the container of a food processor, add the shortbread cookies and powdered sugar. Pulse for 30 seconds to 1 minute or until you have fine crumbs.
- Add the softened cream cheese and Skrewball peanut butter-flavored whiskey to the food processor and pulse for an additional 20-30 seconds or until the mixture is smooth and all the cream cheese has been fully incorporated.
- Using a 1.5-inch (1.5 tablespoon) cookie scoop, scoop out a level scoop of the whiskey ball mixture and place it onto one of the prepared baking sheets. Repeat until all the cream cheese mixture has been scooped.
- Place the baking tray into the refrigerator for about 5 hours to allow the whiskey balls to firm up enough to be rolled and dipped into chocolate.
- Once the whiskey balls have firmed up, roll each ball in the palm of your hand to make smooth balls for dipping. You can place your tray of smooth whiskey balls back into the refrigerator to stay cold while you melt your chocolate.
- In a microwave-safe bowl, add the milk chocolate melting discs and microwave on high for 1 minute, stir, then melt in 30-second intervals until the chocolate discs are fully melted. Be sure to stir the chocolate between each time in the microwave. Do not overheat your chocolate. Stir until smooth. Allow the melted chocolate to cool slightly before dipping your whiskey balls into it. Tip: Keep the chocolate warm/melted by putting the bowl over a pot of hot water.
- Place a whiskey ball onto a fork and dip the ball into the melted chocolate. Once the ball is fully coated with chocolate, lift the fork out of the chocolate and tap it onto the edge of the bowl to allow any excess melted chocolate to drip off the bottom of the chocolate-coated whiskey ball. Tips: Only take a few of the balls out of the fridge at a time. Dip them and then get a few more balls out to be dipped. Keeping them cold makes it easier to dip.
- Using a toothpick or separate fork, gently slide the coated whiskey ball off the fork and onto the second parchment-lined baking tray. Repeat until all the whiskey balls are coated in the milk chocolate.
- Add the peanut butter chips and coconut oil to a small microwave bowl to make the peanut butter drizzle. Heat for 1 minute at (50-60% power), stir, then heat again in 30-second intervals until the chips are melted. Be sure to stir between each 30-second burst. Stir until smooth.
- Transfer the melted peanut butter chips to a piping bag with a small amount of the tip snipped off. Pipe a drizzle of the melted peanut butter chips in a decorative pattern over the tops of all the chocolate-coated whiskey balls.
- Place the tray of whiskey balls back into the refrigerator for 15 minutes to allow the chocolate and peanut butter to firm up before serving.