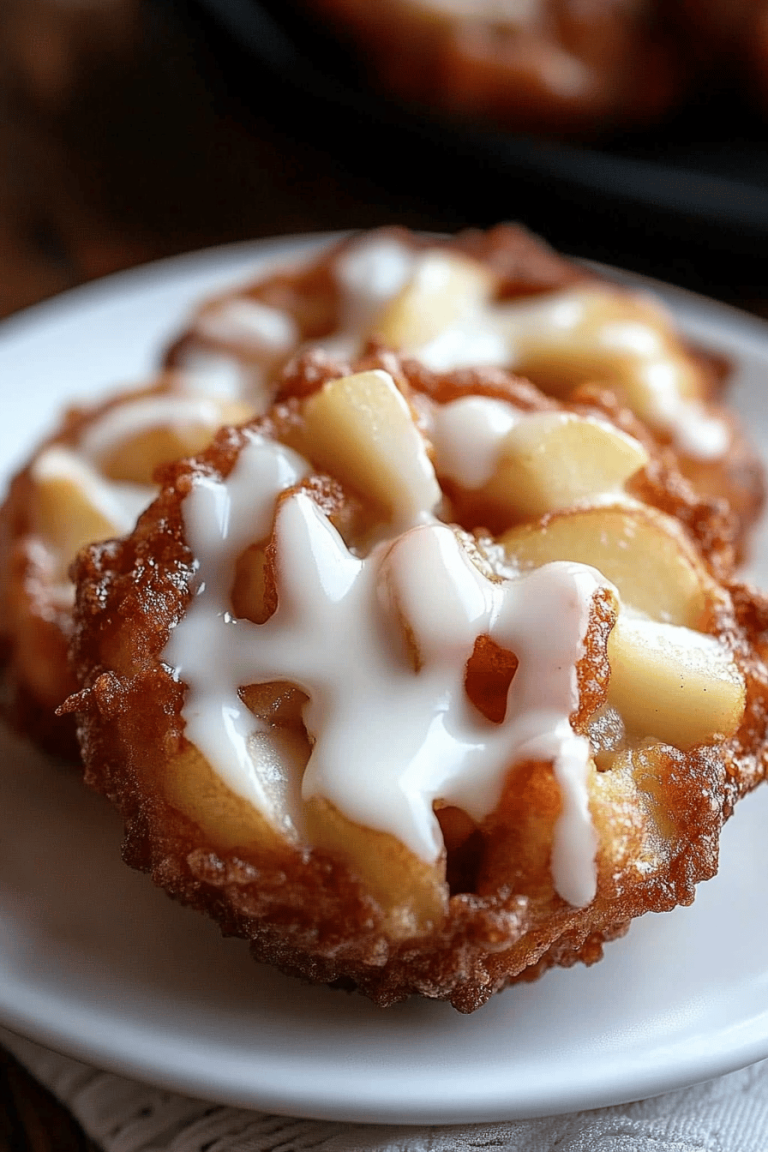
Oh, you guys. I am SO excited to finally share this recipe with you. This apple fritter bread is more than just a baked good; it’s pure comfort in loaf form. The smell that fills my kitchen when this is baking? Absolutely heavenly. It’s a mix of warm spices, sweet apples, and that irresistible, slightly caramel-y aroma that just screams “cozy.” Honestly, if you love those irresistible apple fritters from the bakery but wish you could have that magic without all the fuss of deep frying, then this apple fritter bread is your new best friend. It captures all those incredible flavors and textures – tender cake, sweet apple chunks, a hint of cinnamon spice, all drizzled with a sweet glaze – in a simple, bake-it-in-a-loaf-pan kind of way. It’s like taking all the joy of a freshly made apple fritter and simplifying it for a weeknight bake. My family devours this, and I always make a double batch because one loaf simply doesn’t last long enough. It’s become our go-to for everything from lazy weekend breakfasts to cheering up a gloomy afternoon.
What is Apple Fritter Bread?
So, what exactly *is* apple fritter bread? Think of it as the most delicious mashup you can imagine. It takes the comforting, spiced sweetness of a classic apple fritter and transforms it into an easy-to-bake loaf. Instead of dropping dough into hot oil, we’re swirling a spiced apple mixture into a tender, cake-like batter and baking it all up in a loaf pan. It’s got all the comforting elements: the soft, moist crumb, the tender chunks of apple bursting with flavor, and that warm cinnamon-sugar goodness that you’d find in a traditional fritter. But the magic of it being baked into a loaf means you get those lovely, caramelized edges and a fantastic texture that’s perfect for slicing. It’s not heavy like a Pound Cake, nor is it overly sweet like some quick breads can be. It’s just right – moist, flavorful, and incredibly satisfying. It’s essentially a hug in bread form, and who doesn’t need more of those?
Why you’ll love this recipe?
There are so many reasons why this apple fritter bread has become an absolute staple in my kitchen, and I just know you’re going to fall in love with it too. First off, the FLAVOR. Oh my goodness, the flavor! It’s like a warm hug on a cool day. You get those sweet, tender apple pieces infused with cinnamon, nestled into a moist, slightly spiced cake. It’s familiar and comforting, yet excitingly delicious. And the glaze drizzled over the top? It adds that perfect touch of sweetness and a little bit of shine, making it look as good as it tastes. Then there’s the SIMPLICITY. Seriously, if you can stir ingredients together and bake a loaf, you can make this. There’s no fancy equipment needed, no complicated steps, and it comes together surprisingly quickly. It’s the kind of recipe that feels special but is so easy to whip up, even on a busy weeknight. And let’s talk COST-EFFICIENCY. Apples are usually pretty budget-friendly, and the other ingredients are pantry staples. You get this incredible, bakery-worthy treat without breaking the bank. Plus, it’s so VERSATILE! I love it for breakfast, as a snack, or even as a light dessert with a cup of tea. It’s just one of those recipes that fits into any part of your day. What I love most about this apple fritter bread, though, is that it’s a real crowd-pleaser. My kids, who can be a bit picky sometimes, absolutely adore it. My husband is always asking for a slice (or two!) with his morning coffee. It’s a recipe that brings smiles to faces, and that’s the best kind of baking, don’t you think?
How do I make Apple Fritter Bread?
Quick Overview
Making this apple fritter bread is really as simple as preparing a quick bread batter, folding in a spiced apple mixture, and baking until golden and fragrant. You’ll start by whisking together your dry ingredients, then mixing your wet ingredients separately. Combine them just until they’re married, then gently fold in the delicious apple filling. Pour it all into a prepared loaf pan and bake until a tester comes out clean. The whole process, from start to finish, usually takes under an hour and a half, with most of that being hands-off baking time. It’s a foolproof way to get that amazing apple fritter taste without any of the deep-frying drama!
Ingredients
For the Main Batter:
- 2 ½ cups all-purpose flour
- 1 ½ teaspoons baking powder
- ½ teaspoon baking soda
- 1 teaspoon ground cinnamon
- ¼ teaspoon ground nutmeg
- ½ teaspoon salt
- 1 cup unsalted butter, softened
- 1 ½ cups granulated sugar
- 2 large eggs
- 1 teaspoon vanilla extract
- 1 cup milk (whole or 2% is best for richness)
For the Filling:
- 2 cups peeled and diced apples (about 2 medium apples, Honeycrisp or Fuji work beautifully)
- ¼ cup granulated sugar
- 1 teaspoon ground cinnamon
- 1 tablespoon lemon juice (to prevent browning and add a little zing)
For the Glaze:
- 1 cup powdered sugar
- 2-3 tablespoons milk
- ½ teaspoon vanilla extract
Step-by-Step Instructions
Step 1: Preheat & Prep Pan
First things first, let’s get your oven preheated to 350°F (175°C). You’ll also want to grab a standard 9×5 inch loaf pan and get it ready. I like to grease mine really well with butter or cooking spray, and then give it a little dusting of flour – just tap out any excess. This makes sure your beautiful apple fritter bread doesn’t stick one bit, and nobody wants a loaf stuck in the pan!
Step 2: Mix Dry Ingredients
In a medium bowl, whisk together your flour, baking powder, baking soda, cinnamon, nutmeg, and salt. Give it a good whisk to make sure everything is evenly distributed. This step is crucial because it ensures your leavening agents and spices are perfectly spread throughout the batter, leading to a beautifully even bake and consistent flavor in every slice.
Step 3: Mix Wet Ingredients
In a large bowl, cream together the softened butter and granulated sugar until it’s light and fluffy. This usually takes a few minutes with an electric mixer. Then, beat in the eggs one at a time, making sure each is incorporated before adding the next. Stir in the vanilla extract. This creaming process is key to creating a tender cake-like texture. Next, you’ll alternate adding the milk and the dry ingredient mixture to the butter mixture, beginning and ending with the dry ingredients. Mix on low speed until just combined after each addition. Don’t overmix!
Step 4: Combine
Gently stir the wet and dry ingredients together until just combined. It’s really important not to overmix here! A few streaks of flour are perfectly fine. Overmixing develops the gluten too much, which can lead to a tough bread. We want it tender and moist, remember? Just mix until you don’t see big pockets of dry flour anymore. The batter will be thick, which is exactly what we want.
Step 5: Prepare Filling
While your batter is chilling slightly, prepare the apple filling. In a separate bowl, toss your diced apples with ¼ cup sugar, 1 teaspoon cinnamon, and the lemon juice. The lemon juice not only helps prevent the apples from browning but also adds a lovely little tang that balances the sweetness. The cinnamon and sugar will start to macerate the apples, making them wonderfully tender and flavorful as they bake.
Step 6: Layer & Swirl
Now for the fun part! Pour about half of the batter into your prepared loaf pan. Sprinkle about half of the apple filling evenly over the batter. Then, dollop the remaining batter over the apples, trying to cover as much as possible. Finally, scatter the rest of the apple filling over the top. For that beautiful “fritter” look, you can gently swirl a knife or a skewer through the layers a couple of times. Don’t go crazy; just a few swirls will create lovely pockets of apple throughout your bread.
Step 7: Bake
Pop that loaf pan into your preheated oven. Bake for 50-60 minutes, or until a wooden skewer or toothpick inserted into the center of the loaf comes out clean or with just a few moist crumbs attached. If the top starts to brown too quickly, you can loosely tent it with aluminum foil for the last 15-20 minutes of baking. The aroma that fills your kitchen at this stage is just incredible – pure apple and cinnamon bliss!
Step 8: Cool & Glaze
Once baked, let the apple fritter bread cool in the pan for about 10-15 minutes. This helps it set up properly. Then, carefully invert it onto a wire rack to cool completely. This is super important – if you try to glaze a warm loaf, the glaze will just melt right off! Once it’s fully cooled, whisk together the powdered sugar, 2 tablespoons of milk, and vanilla extract until smooth. Add more milk, a teaspoon at a time, if you prefer a thinner glaze. Drizzle it generously over the top of the cooled loaf. It’s so satisfying to watch it drip down the sides!
Step 9: Slice & Serve
Once the glaze has set a little, it’s time to slice into this masterpiece! Use a serrated knife for the cleanest cuts. Serve it at room temperature. The combination of the moist bread, tender apples, and sweet glaze is absolutely perfect. It’s a treat that feels decadent but is so easy to enjoy any time of day.
What to Serve It With
This apple fritter bread is so wonderfully versatile, it truly shines in so many different settings! For a simple, comforting BREAKFAST, I love it served with a hot cup of coffee or a steaming mug of tea. The warmth of the drink and the sweet, spiced bread are just a perfect start to the day. Sometimes, I’ll toast a slice lightly and serve it with a dollop of plain Greek Yogurt for a little extra protein and tang. For BRUNCH, it’s a fantastic addition to any spread. You can serve it alongside some crispy bacon, scrambled eggs, or a fresh fruit salad. It looks so pretty on a brunch table, and everyone always gravitates towards it. Drizzle a little extra glaze on top just before serving for an elegant touch. As a DESSERT, it’s divine. A warm slice served with a scoop of vanilla bean ice cream or a dollop of whipped cream is pure bliss. The contrast of the warm bread and cold ice cream is just heavenly. And for those COZY SNACKS, this apple fritter bread is unbeatable. It’s the perfect companion to an afternoon cup of tea or a glass of cold milk. My kids often ask for a slice when they get home from school, and it’s the ultimate comfort food when you’re just craving something sweet and satisfying. I’ve even served it slightly warmed with a drizzle of caramel sauce for a more dessert-like feel, and it was a huge hit!
Top Tips for Perfecting Your Apple Fritter Bread
I’ve made this apple fritter bread more times than I can count, and over the years, I’ve picked up a few tricks that really help make it absolutely perfect every single time. For the apples, make sure they are peeled and diced into relatively small, uniform pieces. If they’re too large, they might not soften up enough during baking. I always use Honeycrisp or Fuji apples because they hold their shape well and have a great balance of sweetness and tartness. If your apples are very juicy, you might want to give them a gentle squeeze after tossing them with the sugar and cinnamon to remove a little excess moisture – this helps prevent the bread from becoming too wet. When it comes to mixing the batter, this is where you really want to be careful about overmixing. Once you combine the wet and dry ingredients, just mix until it’s *almost* combined. Those little flour streaks will disappear during baking. Remember, we’re aiming for a tender, moist crumb, and overmixing is the enemy of that! The swirling technique is where you can really have fun. Don’t overdo it; you want distinct swirls of apple throughout the bread, not a muddy mess. Just a few gentle passes with a knife or skewer is perfect. For baking, ovens can vary, so always keep an eye on your loaf. If the top is browning too fast but the center isn’t cooked, don’t hesitate to loosely tent it with aluminum foil. This is a lifesaver! When it comes to the glaze, consistency is key. I like mine thick enough to drip but not so thin that it runs right off. Start with the smaller amount of milk and add more gradually until you achieve your desired drizzle consistency. It’s also super important to let the bread cool completely before glazing; trust me on this one, I’ve learned that the hard way!
Storing and Reheating Tips
One of the best things about this apple fritter bread is how well it keeps. If you’ve managed to resist eating the whole thing in one sitting (good luck!), storing it is a breeze. At ROOM TEMPERATURE, the loaf will stay wonderfully fresh for about 2-3 days, provided you keep it properly covered. I usually wrap it tightly in plastic wrap or place it in an airtight container. It’s perfect for those times when you just want a quick slice with your morning coffee or as an afternoon pick-me-up. For longer storage, REFRIGERATOR Storage is your best bet. Wrap the cooled, unglazed loaf tightly in plastic wrap, then foil, or place it in an airtight container. It should stay delicious for up to a week. The glaze will hold up well in the fridge too. If you want to FREEZE some for later (and I highly recommend doing this!), wait until the loaf is completely cooled and the glaze has set. Then, wrap it very well in plastic wrap, followed by a layer of aluminum foil. You can also place the wrapped loaf in a freezer-safe bag. It will keep beautifully in the freezer for up to 3 months. To thaw, simply remove it from the freezer and let it come to room temperature on the counter. Reheating is optional but lovely! You can gently warm slices in the toaster oven or microwave for a few seconds until just warmed through. This brings back that freshly baked aroma and taste, especially if you’ve stored it unglazed and want to add a fresh drizzle of glaze after warming. If you’ve glazed it before storing, just be mindful that the glaze might soften a bit when reheated. For the best results, I often find it’s nice to glaze only the slices you plan to eat if you’ve stored the unglazed loaf.
Frequently Asked Questions
Final Thoughts
So there you have it – my absolute favorite apple fritter Bread Recipe! I really hope you give this a try because it’s just one of those recipes that brings so much joy. It’s the perfect balance of tender cake, sweet, spiced apples, and that comforting aroma that just makes your house feel like home. It’s so much easier than actual fritters, but you get all that deliciousness in every single slice. If you’re a fan of apple cinnamon flavors, or just love a good, moist quick bread, this recipe is a winner. It’s incredibly forgiving, too, so don’t stress too much about perfection – it always turns out wonderfully. If you love this recipe, you might also enjoy my spiced pear bread or my classic apple crumble! I can’t wait to hear what you think after you bake this. Please leave a comment below and tell me how yours turned out, or share any fun variations you try! Happy baking, everyone!
apple fritter bread
Ingredients
Apple-Cinnamon Mixture (for filling)
- 1 large apple or 2 small, peeled and diced
- 1 tablespoon granulated sugar
- 1 teaspoon cinnamon heaping
Cinnamon-Brown Sugar Mixture (for swirl/topping)
- 0.25 cup light brown sugar packed
- 1 teaspoon cinnamon heaping
Bread Batter
- 1 large egg
- 0.33 cup granulated sugar
- 0.25 cup canola or vegetable oil
- 0.25 cup sour cream or Greek yogurt lite okay
- 1 teaspoon vanilla extract
- 1 cup all-purpose flour
- 1 teaspoon baking soda
- 0.5 teaspoon salt or to taste
Glaze
- 1 cup confectioners' sugar
- 2 tablespoons cream or milk about 2 to 3 tablespoons, or as necessary for consistency
Instructions
Preparation Steps
- Preheat oven to 350°F (175°C). Spray an 8x4-inch loaf pan with floured cooking spray, or grease and flour the pan; set aside.
Apple-Cinnamon Mixture
- To a small bowl, combine the diced apple, 1 tablespoon granulated sugar, and 1 heaping teaspoon cinnamon. Stir to combine; set aside.
Cinnamon-Brown Sugar Mixture
- To a small bowl, combine the light brown sugar and 1 heaping teaspoon cinnamon. Stir to combine; set aside.
Bread
- To a large bowl, add the egg and 0.33 cup granulated sugar, and whisk vigorously until smooth and combined, about 1 minute.
- Add the canola or vegetable oil, sour cream or Greek yogurt, and vanilla extract, and whisk until smooth and combined.
- Add the all-purpose flour, baking soda, and salt, and stir until just combined. Do not overmix.
- Turn half the batter out into the prepared loaf pan, smoothing the top lightly with a spatula. Note that there isn’t a lot of batter, so make sure not to add more than half.
- Evenly sprinkle half the apple-cinnamon mixture over the batter in an even, flat layer; set the remainder aside.
- Evenly sprinkle half the cinnamon-brown sugar mixture over the apples; set the remainder aside.
- Add the remaining batter, smoothing the top lightly with a spatula, making sure to push it into all corners.
- Evenly sprinkle the remaining apple-cinnamon mixture.
- Evenly sprinkle the remaining cinnamon-brown sugar mixture.
- Place the loaf pan on a baking sheet as insurance against overflowing apple juice and bake for about 40 to 48 minutes (a typical bake time is 43 minutes), or until the top is domed, set, and a toothpick inserted in the center comes out clean or with a few moist crumbs but no batter. Note that if you go down too far, you’ll hit juicy apples. The apples on top will be juicy with slight bubbling. In the last 10 minutes of baking, tent the pan with foil (loosely drape a sheet of foil over the pan) to prevent excessive browning on the top and sides of the bread before the center cooks through.
- Allow the bread in the pan to cool on top of a wire rack for at least 30 minutes (or even overnight in the pan) before turning out onto the rack to cool completely before glazing.
Glaze
- In a small bowl, add the confectioners’ sugar and slowly drizzle in the cream or milk, whisking until smooth and combined. Add milk as necessary for desired consistency.
- Evenly drizzle glaze over the cooled bread before slicing and serving. Extra glaze can be spread on the cut surface of the bread like you’d spread butter on toast; or you can halve the glaze recipe if you’re not a 'glaze person'. You can keep glazed items at room temperature, but if you prefer, drizzle glaze only over the portion of bread you plan to consume immediately.