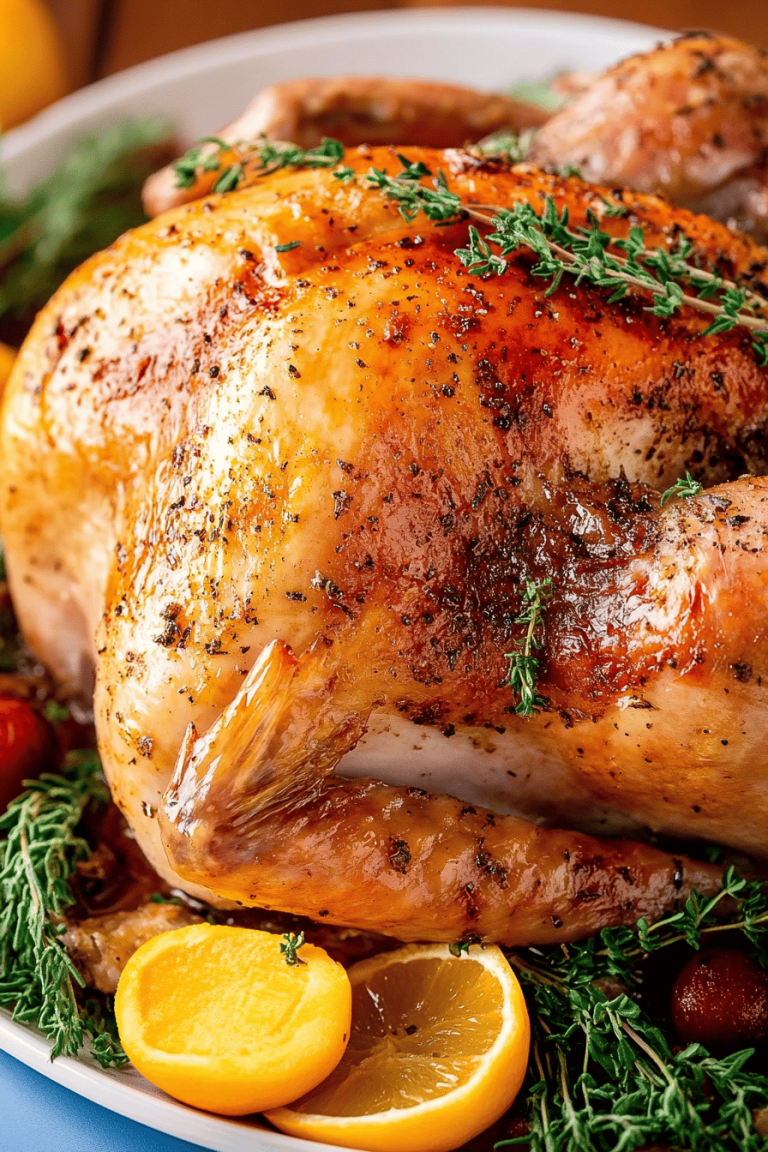
Okay, confession time. Every year, leading up to Thanksgiving, I get this little flutter of panic. It’s not about the mashed potatoes or the stuffing (those are my happy places), it’s about *the bird*. The centerpiece. The main event. The Thanksgiving turkey. For years, my turkeys were… fine. They were edible. They weren’t dry, but they certainly weren’t anything to write home about. Then, a few Thanksgivings ago, I stumbled upon a method that changed everything. It’s not complicated, honestly, but it’s the secret weapon in my holiday arsenal. This isn’t just about cooking a turkey; it’s about creating a golden, juicy, incredibly flavorful masterpiece that will have your guests raving long after the last bite. If you’ve ever felt that pre-Turkey-Day dread, or if you’re just looking to elevate your holiday game, stick around. This Thanksgiving turkey recipe is about to become your new best friend.
What is the famous Thanksgiving turkey?
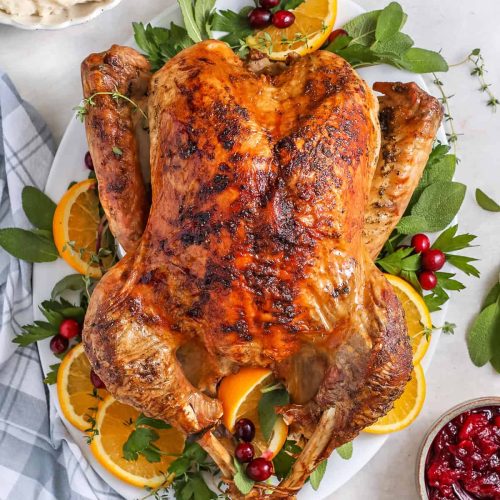
So, what exactly *is* this “famous” Thanksgiving turkey? Think of it as your classic roasted turkey, but with a few clever twists that make all the difference. It’s essentially a beautifully roasted bird that’s incredibly moist on the inside and has the most gorgeous, crispy, golden-brown skin you’ve ever seen. The name “famous” comes from the sheer number of times my family and friends have asked for the recipe after trying it – it’s that good! The concept is simple: we’re going to infuse tons of flavor from the inside out, keep that breast meat from drying out, and ensure every slice is pure holiday magic. It’s the kind of turkey that makes you want to stop everything and just admire it before you even carve.
Why you’ll love this recipe?
Honestly, there are so many reasons why I think you’re going to fall head over heels for this Thanksgiving turkey recipe. First and foremost, the **flavor**. It’s out of this world. We’re talking layers of savory goodness that seep into every part of the meat. You get that classic roasted turkey taste, but amplified. Then there’s the **simplicity**. Despite how impressive the final result looks, the actual active time is surprisingly manageable. Most of the magic happens while the turkey is doing its thing in the oven. And believe me, I’ve had my share of complicated holiday dishes, so something that delivers big on taste without being a five-day project is a lifesaver. It’s also surprisingly **cost-efficient** if you’re looking to feed a crowd without breaking the bank. A good-sized turkey is often more economical per serving than individual cuts of meat. Plus, the **versatility**! This turkey is fantastic on its own, but it also forms the perfect base for so many other dishes. Leftovers? Oh, they’re a dream for sandwiches, pot pies, and even turkey hash. What I love most about this method is how it guarantees juicy results. I’ve tested this with different sizes of birds, and it consistently comes out perfect. It’s the kind of recipe that builds your confidence in the kitchen, especially when you’re hosting. It’s far superior to those quick-fix brines that can sometimes make the skin rubbery or those dry-rubbed birds that, well, end up dry. This one just works, every single time.
How do you make a Thanksgiving turkey?
Quick Overview
The core idea here is simple: we’re going to give our turkey a flavor boost from the inside and out, and then roast it to golden perfection. It involves a delicious herb butter that we’ll get under the skin, a cavity packed with aromatics, and a smart roasting technique that keeps everything moist and delicious. The goal is a turkey that’s so tender and flavorful, you won’t believe how easy it was to achieve. It’s all about strategic flavor layering and not overthinking it!
Ingredients
Thanksgiving turkey: What are some good Thanksgiving turkey recipes?
Here’s what you’ll need to create your holiday masterpiece. I always try to source a good quality, fresh turkey if possible, but a good frozen one works wonders too, just make sure you thaw it completely! For a 12-15 pound bird, this usually works perfectly. You might need to slightly adjust quantities for larger or smaller birds.
– 1 (12-15 pound) whole turkey, fresh or fully thawed
– 1 cup (2 sticks) unsalted butter, softened
– 4 cloves garlic, minced
– 2 tablespoons chopped fresh rosemary
– 2 tablespoons chopped fresh thyme
– 1 tablespoon chopped fresh sage
– 1 teaspoon salt
– 1/2 teaspoon black pepper
For the Cavity Aromatics:
These guys are going to steam and perfume the turkey from the inside, infusing it with a warm, inviting scent and flavor. Don’t skip this part; it’s a game-changer!
– 1 large onion, quartered
– 2 carrots, cut into chunks
– 2 celery stalks, cut into chunks
– 1 lemon, quartered
– Several sprigs of fresh rosemary, thyme, and sage
For Basting (Optional but Recommended):
This adds an extra layer of moisture and helps with that gorgeous browning. If you’re pressed for time, the herb butter alone is fantastic, but a little basting never hurt anyone!
– 1 cup chicken or turkey broth
Step-by-Step Instructions
Step 1: Preheat & Prep Pan
First things first, let’s get that oven ready. Preheat your oven to 325°F (160°C). This lower temperature allows the turkey to cook through evenly without the outside getting too dark too quickly. Grab a sturdy roasting pan. If you don’t have one, a large, rimmed baking sheet will work in a pinch, but a roasting pan is ideal. Make sure it’s big enough to comfortably hold your turkey. If you have a roasting rack, place it in the pan – this helps the air circulate around the bird, ensuring even cooking and crispy skin all around. If not, you can create a makeshift rack with a few large chunks of onion and carrot.
Step 2: Mix Dry Ingredients (for the Butter)
While the oven heats up, let’s make that magical herb butter. In a medium bowl, combine the softened unsalted butter, minced garlic, chopped fresh rosemary, thyme, and sage. Add the salt and pepper. Use a fork or a spatula to mix it all together until it’s well combined and forms a lovely, fragrant paste. Make sure the butter is truly softened – it’ll make it so much easier to spread later. I always leave my butter out on the counter for at least an hour before I start prepping the turkey. This step is where a lot of the deep flavor starts to develop.
Step 3: Mix Wet Ingredients (Prep the Turkey)
Now, it’s time to prepare the star of the show! Remove the turkey from its packaging. Make sure to remove the neck and giblets from the cavities (you can save these for gravy!). Pat the turkey completely dry, inside and out, with paper towels. This is a crucial step for getting crispy skin. Seriously, get it *really* dry. Now, this is the fun part: carefully slide your fingers between the skin and the breast meat, gently separating the skin from the flesh without tearing it. Work your way down the breast, creating a pocket. Do the same for the thighs if you can. We want to create a cozy space for our herb butter to work its magic!
Step 4: Combine (Butter the Bird!)
Take that glorious herb butter you made and spread it evenly under the skin of the turkey, all over the breast meat. Try to get it as far down as you can. Then, take any remaining butter and spread it all over the outside of the turkey. Get it into all the nooks and crannies. This butter is going to melt during cooking, basting the meat from the inside and crisping up the skin. It’s like a spa treatment for your turkey!
Step 5: Prepare Filling
Now, let’s stuff that turkey cavity. Place the quartered onion, carrots, celery, lemon, and the extra herb sprigs inside the main cavity. Don’t pack it too tightly, as this can prevent even cooking. These aromatics will release steam and flavor as the turkey roasts, making the inside incredibly fragrant and delicious. It’s a simple step that makes a world of difference.
Step 6: Layer & Swirl (Truss and Prepare for Roasting)
Next, we’ll get the turkey ready for its time in the oven. If you want that classic, compact shape, you can truss the legs together with kitchen twine. Tuck the wing tips underneath the body of the turkey. This helps it cook more evenly and looks beautiful when it’s done. Place the prepared turkey, breast-side up, in the roasting pan on the rack. If you opted for the optional broth for basting, pour it into the bottom of the roasting pan now. This will create steam and help keep things moist. Tent the turkey loosely with aluminum foil. This foil lid is important for the first part of the cooking process; it helps the turkey cook through without the skin getting too dark too quickly.
Step 7: Bake
Pop that foil-tent-covered turkey into your preheated oven. We’re going to roast it for about 13 minutes per pound. So, for our 12-15 pound bird, that’s roughly 2.5 to 3.5 hours. Around the halfway point of cooking (about 1.5 hours in), carefully remove the foil tent. Now, this is where the basting comes in if you choose to do it. Using a baster or a spoon, scoop up some of the juices from the bottom of the pan and drizzle them over the turkey. Do this every 30 minutes or so until the turkey is done. This helps to keep it moist and develop that gorgeous golden color. Continue roasting until a meat thermometer inserted into the thickest part of the thigh (without touching the bone) registers 165°F (74°C). If you notice the skin browning too quickly at any point, you can loosely tent it with foil again.
Step 8: Cool & Glaze
Once your turkey reaches that perfect 165°F, carefully remove it from the oven. This is arguably the hardest part – waiting! Transfer the turkey to a clean cutting board and let it rest, tented loosely with foil, for at least 20-30 minutes. This resting period is crucial! It allows the juices to redistribute throughout the meat, ensuring every slice is incredibly moist and tender. If you want a glaze, this is the time to make it and brush it on the hot turkey while it rests. A simple mix of melted butter, a touch of maple syrup, and a pinch of salt works beautifully, or you can use your favorite cranberry glaze. The heat of the turkey will help it set.
Step 9: Slice & Serve
After resting, it’s time for the grand reveal! Carve your beautiful Thanksgiving turkey. Start by removing the legs and thighs, then slice the breast meat. Arrange the carved turkey on a platter, garnish with some fresh herbs if you like, and get ready for the compliments! Serve it immediately with all your favorite Thanksgiving sides.
What to Serve It With
This Thanksgiving turkey is truly the star, but what you serve it with can make the whole meal sing! For **Breakfast**, I love using any leftover carved turkey meat to make a quick and savory hash with roasted potatoes and a fried egg on top. It’s a fantastic way to start the day after the big feast. For **Brunch**, imagine elegant slices of turkey alongside fluffy mini-waffles, a dollop of cranberry sauce, and perhaps a mimosa or a spiced cider. It feels fancy but is so easy to assemble. As **Dessert**? This is a bit unconventional, but tiny, crispy turkey skin bits (cooked until golden and seasoned) can be surprisingly addictive, almost like savory bacon chips, and they pair wonderfully with a sharp cheese board. Or, think of it as a palate cleanser before something sweet! For **Cozy Snacks**, leftover turkey meat is incredible piled high on toasted sourdough with a smear of cranberry mayo and a sprinkle of stuffing – it’s like a mini Thanksgiving sandwich that’s perfect for nibbling on while watching football or just relaxing. My family tradition is to have extra turkey available on the counter the day after Thanksgiving for anyone who wants to assemble their own “ultimate turkey sandwich” – a true comfort food experience. I also love pairing it with a simple green salad with a sharp vinaigrette to cut through the richness, or with roasted Brussels Sprouts for that classic pairing.
Top Tips for Perfecting Your Thanksgiving Turkey
I’ve learned a few things over the years of making Thanksgiving turkey, and I’m happy to share them with you! For **Zucchini Prep** (just kidding, but that’s the kind of detail you get in some recipes!), let’s talk about turkey. When it comes to **Turkey Prep**, the absolute most important thing is getting it *really* dry. I cannot stress this enough. Use paper towels and pat it down everywhere, inside and out. Moisture is the enemy of crispy skin! For **Mixing Advice**, with the herb butter, don’t be afraid to get your hands in there. It’s the easiest way to ensure everything is well combined. And when you’re spreading it under the skin, be gentle but firm. You want to create that pocket without ripping the skin, which will give you the best texture. If you accidentally tear it a bit, don’t sweat it; just do your best to keep the butter contained. When it comes to **Swirl Customization** for the butter, really try to distribute it as evenly as possible over the breast meat. This ensures every bite of breast meat is equally infused with flavor. For **Ingredient Swaps**, if you don’t have fresh rosemary, thyme, or sage, you can use about 1/3 of the amount in dried herbs, but fresh really makes a difference here. And if you’re out of lemons, a quartered orange in the cavity is a nice, slightly sweeter alternative. For **Baking Tips**, don’t be afraid of your meat thermometer. It’s your best friend for ensuring the turkey is cooked through but not overcooked. Aim for that 165°F in the thigh. Also, know your oven; some run hotter than others, so keep an eye on it and adjust the foil tenting as needed. For **Glaze Variations**, if you’re not a fan of sweet glazes, a simple brush of melted butter and a sprinkle of sea salt right before serving can be equally delicious. A little Dijon mustard mixed into the butter before brushing on also adds a nice tang. I once tried a maple-Dijon glaze that was absolutely incredible – just mix equal parts maple syrup and Dijon, brush on during the last hour of cooking, and tent with foil if it’s browning too fast.
Storing and Reheating Tips
So, you’ve got leftover Thanksgiving turkey! Hooray! Let’s talk about how to keep it tasting delicious. At **Room Temperature**, it’s best to get your carved turkey into the refrigerator within two hours of it coming out of the oven. Don’t leave it sitting out for too long, especially if your house is warm. For **Refrigerator Storage**, slice or cube the turkey and store it in airtight containers or wrap it tightly in plastic wrap and then aluminum foil. It should stay good in the fridge for about 3-4 days. For **Freezer Instructions**, if you think you won’t get to it within a few days, freezing is a great option. Wrap portions tightly in plastic wrap, then in aluminum foil or place them in freezer bags. Properly stored, it can last in the freezer for up to 3 months. To thaw, transfer it to the refrigerator overnight – this is the safest and best way to maintain quality. For **Glaze Timing Advice**, if you know you’ll be storing leftovers, it’s often best to apply the glaze *after* reheating, or just before serving, as some glazes can become sticky or even burn during reheating. If you do glaze before storing, ensure it’s completely cooled before packaging.
Frequently Asked Questions
Final Thoughts
There you have it – my go-to recipe for a Thanksgiving turkey that’s truly something special. It’s the kind of dish that brings people together, sparks joy, and makes all the effort feel completely worthwhile. The combination of that fragrant herb butter, the aromatic cavity stuffing, and the patient roasting process just works magic. I hope this recipe brings as much warmth and deliciousness to your table as it has to mine over the years. It’s forgiving, incredibly flavorful, and honestly, makes you look like a culinary rockstar without all the fuss. If you love this recipe, you might also enjoy my roasted chicken recipe, which uses a similar herb butter technique, or my foolproof gravy recipe that perfectly complements any roasted bird. Give this Thanksgiving turkey a try, and I just know you’re going to love it! I can’t wait to hear how yours turns out! Please feel free to leave a comment below with your thoughts or any variations you tried, and don’t forget to share your masterpiece if you post a photo!
Thanksgiving turkey
Ingredients
Main Ingredients
- 14 pound whole turkey
- 0.25 cup salted butter (softened)
- 1 teaspoon poultry seasoning
- 1 teaspoon salt
- 0.5 teaspoon black pepper
- 1 large onion
- 3 medium carrots
- 3 ribs celery
- 1 bunch fresh herbs (see notes, optional)
- 2 cups chicken broth (or turkey broth)
Instructions
Preparation Steps
- Remove the thawed turkey from the fridge 45 to 60 minutes before roasting.
- Preheat the oven to 350°F.
- Peel each onion and cut into 1-inch wedges.
- In a small bowl, combine butter, poultry seasoning, salt, and pepper and mix well. Set aside.
- Remove the giblets and neck from inside the turkey cavity (not all turkeys have this) and set aside.
- Loosely fill the cavity of the turkey with half of the onion and a handful of herbs if using.
- Crisscross the legs and tie them together with kitchen string or tuck under the flap of skin at the tail if your turkey has one to hold them in place. Twist the tips of the wings under the turkey.
- Pat the skin of the turkey dry with paper towels and rub with the butter mixture.
- Add a rack to a large rimmed roasting pan (optional). Halve the carrots and celery (or keep whole if you aren't using a rack). Add them and the rest of the onion to the bottom of the pan along with the turkey neck and giblets. Add the broth to the pan.
- Place the turkey on the rack, breast side up.
- Place the roasting pan in the oven and immediately reduce the heat to 325°F. Roast the turkey uncovered for about 14 to 16 minutes per pound or until the turkey reaches 158 to 160°F in the thickest part of the thigh *see cooking times below. If the skin on the breast starts to brown too much, loosely tent a piece of foil overtop.
- Remove the turkey from the oven and transfer it to a rimmed baking sheet or a platter. Loosely tent it with aluminum foil and let it rest for 20 to 30 minutes before carving.
- Make gravy from the drippings while the turkey rests if desired.