Oh, divinity candy! Just saying the name brings back a flood of memories. For me, it’s the scent of my grandmother’s kitchen, a symphony of sugar and vanilla that always signaled something truly special was about to happen. This isn’t just candy; it’s a hug in confectionary form. You know, I’ve tried so many variations of this classic sweet treat over the years, but there’s something about this particular divinity candy recipe that just hits different. It’s got that perfect balance – impossibly light and fluffy, yet with a satisfying melt-in-your-mouth texture that’s utterly addictive. It’s not as complicated as it sounds, I promise! Think of it like a fancy marshmallow meets a cloud, but with a delightful chewy center. It’s the kind of thing that makes people ooh and aah, and then ask for the recipe immediately. Honestly, it’s what I turn to when I need to impress without a whole lot of fuss, or when that late-night sweet craving hits and baking a cake just feels like too much work. If you’ve ever had store-bought divinity and thought it was a bit too grainy or just… meh, get ready to be amazed. This homemade version is in a whole other league, and I can’t wait to share how I make it with you.
What is Divinity Candy?
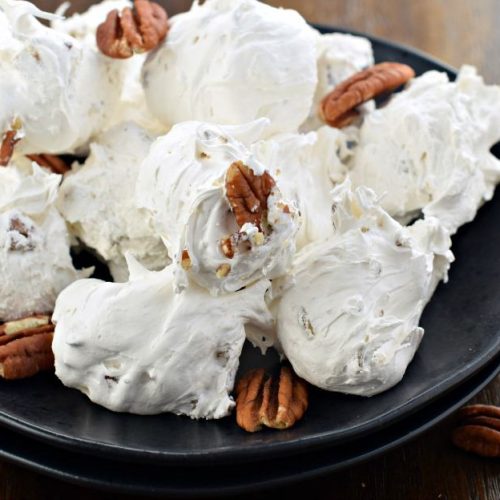
So, what exactly *is* divinity candy? At its heart, it’s a classic confection made primarily from sugar, corn syrup, and egg whites. It’s cooked to a specific temperature, then whipped with the fluffy egg whites to create that signature airy, nougat-like texture. The name itself, “divinity,” just conjures up images of something heavenly, and honestly, it lives up to it! It’s often compared to nougat or fudge, but it’s much lighter and airier than either. It’s not quite as dense as fudge, and it doesn’t have that chewy pull of traditional nougat. Instead, it’s wonderfully delicate. You’ll often find it studded with chopped nuts, like pecans or walnuts, and sometimes flavored with vanilla or a hint of peppermint. The magic really happens in the cooking and whipping process, where tiny sugar crystals form, giving it that characteristic slightly crystalline, melt-away quality. It’s one of those old-fashioned candies that really stands the test of time because it’s just so uniquely delicious and surprisingly simple to make once you get the hang of it.
Why you’ll love this recipe?
There are so many reasons why I absolutely adore this divinity candy recipe, and I’m pretty sure you’re going to fall head over heels for it too. First off, let’s talk about that incredible flavor and texture. It’s unbelievably light and fluffy, almost like biting into a sweet, cloud-like dream. The taste is pure, sweet bliss, with a delicate vanilla aroma that just makes you want more. It’s the perfect sweetness without being cloying, and the nuts add just the right amount of crunch and earthy flavor. Secondly, and this is a huge win for me, it’s surprisingly simple to make! I know when you hear “candy making,” it can sound intimidating, but this recipe is really straightforward. The ingredients are all pantry staples, and once you get past the initial sugar-cooking stage, it comes together beautifully. It’s also incredibly cost-effective – a little bit of sugar and a couple of eggs go a long way to creating a decadent treat that rivals any expensive confection. And the versatility! While I love it plain with vanilla and pecans, you can easily switch up the nuts or add a different extract like almond or even a hint of lemon. It’s perfect for holidays, teacher gifts, or just because you deserve a little bit of heaven. Honestly, what I love most about this divinity candy is the sheer joy it brings. The look on people’s faces when they try it for the first time, that look of pure delight? That’s priceless. It’s so much better than anything you can buy in a store, and knowing you made it yourself makes it taste even sweeter. It’s a little bit of magic, right there on your countertop.
How do I make Divinity Candy?
Quick Overview
Making this divinity candy is a three-stage process that’s easier than it sounds. First, we’ll cook a sugar syrup to the perfect stage. Then, while that’s cooking, we’ll whip up some egg whites until they’re stiff and glossy. Finally, we’ll drizzle the hot syrup into the whipped whites and beat it until it’s gloriously fluffy and forms beautiful peaks. It’s all about precision with the syrup temperature, but don’t worry, I’ll walk you through exactly what to look for. The result? A heavenly, melt-in-your-mouth confection that’s perfect for sharing (or not!).
Ingredients
For the main candy base: Candy: Candy: Candy: Candy: Candy: Candy: Candy: Candy: Candy: Candy: Candy: Candy: Candy
3 cups granulated sugar (make sure it’s fresh and free of clumps!)
1 cup light corn syrup (this is key for preventing crystallization and achieving that smooth texture)
½ cup water
2 large egg whites, at room temperature (this helps them whip up better!)
1 teaspoon vanilla extract (use a good quality one for the best flavor)
½ cup chopped pecans or walnuts (or a mix! Toasting them beforehand really brings out their nutty flavor)
Step-by-Step Instructions
Step 1: Preheat & Prep Pan
First things first, let’s get everything ready. You’ll need a 9×9 inch baking pan. Lightly grease it with butter or cooking spray, or even better, line it with parchment paper, leaving an overhang on the sides. This makes lifting the finished candy out so much easier. Set this aside. Also, make sure your egg whites are separated and at room temperature. Cold egg whites don’t whip up as well. In a separate, clean bowl (make sure it’s grease-free, otherwise those whites won’t whip!), whisk your egg whites until they are foamy. This is our starting point for the magic.
Step 2: Mix Dry Ingredients
This step is more about preparing your workspace for what’s next. You’ll have your sugar and water in the saucepan. We don’t mix anything else dry in at this stage, but it’s good to have your nuts ready to go in a small bowl nearby, and your vanilla extract measured out.
Step 3: Mix Wet Ingredients
In a heavy-bottomed saucepan, combine the granulated sugar, light corn syrup, and water. Stir gently until the sugar is dissolved. Place the saucepan over medium heat. Once the mixture comes to a boil, stop stirring. You can swirl the pan gently if needed, but avoid stirring, as it can cause sugar crystals to form. Clip a candy thermometer to the side of the pan, making sure the tip is submerged in the syrup but not touching the bottom of the pan. Cook the syrup until it reaches 250°F (121°C) on the candy thermometer. This is the firm-ball stage, and it’s crucial for the right texture.
Step 4: Combine
Once the syrup reaches 250°F, carefully remove the saucepan from the heat. Let it sit for just a minute to stop boiling vigorously. Now, with your electric mixer running on medium-high speed (using the whisk attachment is best), slowly and carefully drizzle the hot sugar syrup into the foamy egg whites. Pour it in a thin, steady stream down the side of the bowl, being careful not to hit the beaters directly. It’s going to look thin and watery at first, and that’s totally normal. Keep beating.
Step 5: Prepare Filling
While the syrup is cooking, it’s a good time to prepare your nuts if you haven’t already. If you like them toasted, just pop them in a dry skillet over medium heat for a few minutes until fragrant, watching them closely so they don’t burn. Chop them into small pieces and have them ready. Measure out your vanilla extract too. Having everything prepped and ready to go makes the process so much smoother, especially when you’re dealing with hot sugar!
Step 6: Layer & Swirl
This is where the divinity really starts to come to life! Continue beating the mixture on medium-high speed. As it beats, it will start to lose its gloss, become thicker, and hold its shape. This process can take about 10-15 minutes. You’re looking for it to become stiff and glossy, forming peaks that stand straight up when you lift the beaters. Stir in the vanilla extract and the chopped nuts. Once everything is incorporated and the mixture is thick and fluffy, spoon it quickly into your prepared pan. Work fast because divinity sets up quickly! You can use a spatula to spread it gently, but don’t overwork it. You can even try to make some pretty swirls on top with your spatula.
Step 7: Bake
Actually, there’s no baking involved for divinity candy! Once it’s in the pan and smoothed, you just let it set at room temperature. That’s one of the best parts – no oven needed!
Step 8: Cool & Glaze
Let the divinity candy sit undisturbed at room temperature for at least 4 hours, or preferably overnight, to set completely. It needs this time to firm up and develop that classic texture. Once it’s firm to the touch, you can lift it out of the pan using the parchment paper overhang. You can then cut it into squares or diamonds. Some people like to add a glaze, but I find this recipe is perfect without one. The beauty is in the simple, pure flavor and texture.
Step 9: Slice & Serve
Once the divinity has set, carefully lift it out of the pan. If you used parchment paper, this is a breeze. You can then use a sharp knife or a pizza cutter to slice it into your desired shapes – squares, rectangles, or diamonds are traditional. I like to make them bite-sized! Serve them at room temperature. They’re best enjoyed within a few days for optimal freshness and that delightful melt-in-your-mouth quality.
What to Serve It With
Divinity candy is truly a star on its own, but it can also be a delightful addition to various occasions. For a cozy morning breakfast, a few small pieces alongside a steaming mug of coffee or a cup of tea can feel like a luxurious start to the day. It’s that little sweet surprise that makes a weekday feel a bit more special. For a more elaborate brunch spread, divinity candy is fantastic as a small, elegant treat on a dessert platter. It adds a touch of old-fashioned charm and a beautiful white contrast to other pastries or fruits. It’s especially lovely when paired with a light fruit salad or a creamy yogurt parfait. As a dessert, divinity is a wonderful after-dinner indulgence. It’s light enough to not feel heavy after a meal, and its sweetness is incredibly satisfying. I often serve it with a small espresso or a glass of dessert wine. And for those truly cozy snack moments? This is the absolute perfect companion to a cup of hot chocolate or even a glass of cold milk. It’s a simple pleasure that’s incredibly comforting. My family tradition is to have a batch ready for movie nights – it’s so much cleaner to eat than popcorn and everyone always asks for seconds!
Top Tips for Perfecting Your Divinity Candy
I’ve made my fair share of divinity over the years, and I’ve learned a few tricks that I think will really help you nail it. First, about the egg whites: make absolutely sure your bowl and whisk are completely free of any grease. Even a tiny bit of fat can prevent them from whipping up properly. Room temperature egg whites are also a must for maximum volume. When you’re cooking the sugar syrup, the candy thermometer is your best friend. Don’t rush it, and don’t stir the syrup once it starts boiling – just swirl the pan gently if you need to. That 250°F mark is critical; too low and it won’t set, too high and it can become too hard. I learned this the hard way once! When you’re drizzling the hot syrup into the egg whites, pour it in a slow, steady stream down the side of the bowl. This prevents the syrup from cooking the egg whites too quickly and making them scramble. Be patient with the beating process. It takes time for the mixture to thicken and get that glossy, stiff-peak texture. Don’t stop too soon! It should look like marshmallow fluff but hold its shape beautifully. As for the nuts, toasting them beforehand truly elevates the flavor. It’s a small step that makes a big difference. And when it comes to adding them and the vanilla, work quickly. Divinity sets up fast once it starts to cool. If you find your mixture is too soft to work with, it might mean it wasn’t beaten quite long enough, or the syrup wasn’t quite hot enough. If it’s too stiff, you might have overcooked the syrup a bit. Don’t despair, though! You can often salvage it by gently rewarming it very slightly (think: over a double boiler, not direct heat) and beating again, or by stirring in a touch more vanilla or a very small amount of warmed corn syrup. I’ve also found that the humidity can play a role in candy making, so on really damp days, you might need to cook your syrup a degree or two higher. Experimenting with flavorings is fun, too! A drop of peppermint or almond extract can really change things up, but just be careful not to add too much, as strong flavors can sometimes affect the texture.
Storing and Reheating Tips
Proper storage is key to keeping your divinity candy delicious! At room temperature, divinity is best enjoyed within about 3 to 5 days. You want to keep it in an airtight container, making sure the pieces aren’t touching too much if you want to prevent them from sticking together. I usually place wax paper or parchment paper between layers if I’m stacking them. If your house is particularly warm or humid, it might not stay as firm, so then refrigerator storage is a better bet. In the refrigerator, divinity candy will keep well for up to two weeks. Again, an airtight container is your best friend here. Make sure it’s well-sealed to prevent it from absorbing any odors from other foods. When you take it out of the fridge, let it sit at room temperature for about 15-20 minutes before serving to let it soften up just a bit. For longer storage, divinity candy freezes beautifully! Wrap individual pieces tightly in plastic wrap, then place them in a freezer-safe bag or container. It can stay in the freezer for up to 2-3 months. To thaw, transfer the frozen pieces to the refrigerator overnight. Don’t try to thaw them at room temperature, as the condensation could make them sticky. As for glaze timing, if you decide to add a glaze (though this recipe doesn’t require one), it’s best to add it just before you plan to serve or store it at room temperature for immediate enjoyment. Glazes can get sticky or melt if stored for too long, especially in warmer conditions.
Frequently Asked Questions
Final Thoughts
There you have it – my absolute favorite divinity candy recipe! It’s a confection that truly lives up to its heavenly name. The incredible lightness, the melt-in-your-mouth texture, and that pure, sweet vanilla flavor with a hint of nutty crunch are simply irresistible. I know some people find candy making a bit daunting, but I promise, with a little patience and this recipe, you can create something truly spectacular. It’s a wonderful way to add a touch of homemade magic to any occasion, whether it’s a holiday gathering, a special gift, or just a treat for yourself. If you love this recipe, you might also enjoy my other old-fashioned favorites, like my fudgy brownies or my chewy ginger molasses cookies – they’re all about that comforting, homemade goodness. I truly hope you give this divinity candy a try. I can’t wait to hear how yours turns out, and what your favorite additions or memories are! Happy baking (and candy making)!
Divinity candy
Ingredients
Main Ingredients
- 2.5 cup granulated sugar
- 0.5 cup light corn syrup
- 0.5 cup water
- 2 large egg whites
- 1.5 teaspoon pure vanilla extract (or almond extract)
- 0.5 cup chopped pecans
Instructions
Preparation Steps
- In a large saucepan over medium-high heat, combine the sugar, corn syrup, and water. Cook and stir constantly until boiling. Clip a candy thermometer to the pan and without stirring, bring the temperature up to 260°F (hard ball stage) over medium heat. This will take approximately ten minutes.
- When the candy mixture is nearly at the hard ball stage, begin to beat the egg whites. In a large mixing bowl, attached to an electric freestanding mixer, beat the egg whites until stiff peaks form.
- Gradually, in a slow steady stream, pour the hot sugar mixture into the beaten egg whites, beating on high speed the entire time. This should take about 3 minutes. Scrape the sides of the bowl and add in your vanilla extract (or almond extract).
- Continue to beat on high speed for approximately 6-10 minutes, until the candy starts to lose its glossy finish. When the beaters are lifted, the mixture should mound on itself and not flatten. You can test it by dropping a spoonful onto a parchment paper-lined baking sheet; if it stays mounded, the mixture has been beaten sufficiently. If it begins to flatten, continue beating and check again after a minute or so.
- Once properly beaten, fold in the chopped pecans. Spoon (using a heaping tablespoon) the divinity onto parchment paper-lined baking sheets. Allow about an hour or two to set. Store in a tightly covered container at room temperature. Enjoy!