There are some recipes that just feel like a warm hug, aren’t there? The kind that transport you back to your grandmother’s kitchen, the air thick with the sweet scent of baking. For me, that’s precisely what these raspberry shortbread bars do. I remember the first time I made them, completely by accident, trying to use up some overripe raspberries and a surplus of butter. I was aiming for something simple, something that wouldn’t take hours, and what emerged from the oven was pure magic. These aren’t just any cookies; they’re a decadent, buttery shortbread base, layered with a vibrant, slightly tart raspberry filling, all topped off with a delicate crumb. They’re somewhere between a cookie and a cake, but better than either, if you ask me. Honestly, they’re a serious contender for my favorite baked good, and that’s saying something because I’m a pretty tough critic when it comes to sweets! If you’ve ever loved a classic shortbread or a fruity crumble, you’re going to be head-over-heels for these raspberry shortbread bars. They’re the perfect balance of sweet, tart, and buttery, and they’re surprisingly simple to whip up.
What are Raspberry Shortbread bars?
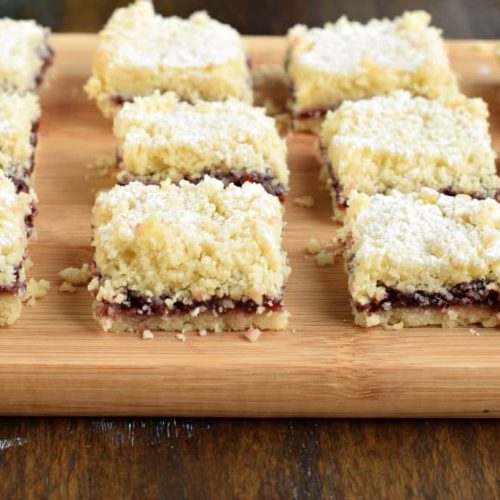
So, what exactly are these delightful little squares? Think of them as the ultimate upgrade to a simple shortbread cookie. We start with a rich, buttery shortbread dough that forms the base and the crumbly topping. In between, we have a luscious layer of raspberries, often cooked down slightly to concentrate their flavor and thicken them just enough so they don’t make the shortbread soggy. The “bars” part comes from baking it all in a rectangular pan and then slicing it into neat, portable squares. It’s essentially a shortbread crust, a fruity jam-like filling, and a streusel topping all rolled into one, baked to golden perfection. The name itself, “raspberry shortbread bars,” just hints at the delightful combination of textures and flavors. It’s humble, yet incredibly elegant. It’s the kind of treat that feels special enough for company but is so comforting and easy to make, you’ll find yourself baking it just for yourself on a Tuesday afternoon. It’s the sweet spot between a fuss-free weeknight bake and a show-stopping dessert.
Why you’ll love this recipe?
Honestly, there are so many reasons why I keep coming back to these raspberry shortbread bars, and I just know you will too. First and foremost, the FLAVOR is absolutely out of this world. That rich, buttery shortbread base is just melt-in-your-mouth delicious, and it pairs so perfectly with the bright, slightly tart burst of the raspberries. It’s not overly sweet, which I really appreciate, making it a wonderful treat any time of day. Then there’s the SIMPLICITY. I’m not kidding when I say this is a lifesaver on busy days. You can genuinely have these mixed and ready for the oven in under 20 minutes. The ingredients are all pantry staples, which brings me to the COST-EFFICIENCY. You don’t need any fancy or expensive ingredients to make these, which is always a huge plus in my book. And the VERSATILITY is just incredible! I’ll get to more on that later, but these bars are fantastic for breakfast, brunch, dessert, or just a midday pick-me-up with a cup of tea. What I love most about this recipe, though, is that it’s incredibly forgiving. Even if you’re not a seasoned baker, you can make these and have them turn out beautifully. It’s the kind of recipe that builds confidence in the kitchen. Plus, the smell that fills your house while these are baking? Pure bliss. It’s that comforting, homey aroma that just makes everything feel right in the world. They’re miles better than any store-bought treat you’ll find, and the fact that you made them yourself just adds to the sweetness.
How do I make Raspberry Shortbread Bars?
Quick Overview
The process for these raspberry shortbread bars is surprisingly straightforward. We’ll make a buttery shortbread dough, press half of it into the pan, top it with a quick raspberry filling, and then crumble the remaining dough over the top. It bakes up into a beautiful bar with a tender crust and a delightfully gooey center. The key is not to overwork the dough and to bake it until it’s golden brown. It’s a simple assembly that results in a sophisticated dessert. This method ensures a perfect balance of shortbread and fruit, creating a harmonious bite every time.
Ingredients
For the Main Batter (Shortbread Base & Topping):
You’ll need about 2 cups of all-purpose flour. Make sure it’s all-purpose; anything too heavy will make the shortbread tough. I always sift my flour, even though some people skip it – I find it makes for a more tender crumb. Then, we have 1 cup of unsalted butter, softened but not melted. This is crucial for that perfect shortbread texture. Using unsalted butter lets you control the saltiness, and I always use good quality butter for the best flavor. Next up, 3/4 cup of granulated sugar. You can adjust this slightly if you prefer things sweeter or less sweet, but this is a good starting point. For binding and a bit of richness, we’ll use one large egg. And finally, a teaspoon of vanilla extract to amp up that lovely buttery flavor. A pinch of salt, maybe 1/4 teaspoon, is essential to balance the sweetness.
For the Filling:
This is where the stars of the show come in! You’ll need about 2 cups of fresh or frozen raspberries. If you’re using frozen, don’t thaw them completely; just give them a quick rinse and use them as is. A quarter cup of granulated sugar is usually enough to sweeten them up, but you can add more or less depending on your raspberries’ tartness. To help thicken the filling and give it a lovely glossy finish, we’ll use 1 tablespoon of cornstarch. You can also use tapioca starch if you have it. A squeeze of fresh lemon juice, about a teaspoon, really brightens up the raspberry flavor and cuts through the richness of the shortbread. If you don’t have fresh raspberries, good quality raspberry jam (about 1 cup) can be a decent substitute, though fresh always wins in my book.
For the Glaze (Optional but Highly Recommended!):
This is what takes them from delicious to utterly irresistible. We’re talking about a simple powdered sugar glaze. About 1 cup of powdered sugar, sifted to avoid lumps. Then, 1 to 2 tablespoons of milk (any kind will do – I’ve even used almond milk in a pinch, and it worked wonderfully!). You want to start with a tablespoon and add more until you get a drizzling consistency. If you want a little extra zing, add another 1/2 teaspoon of vanilla extract or even a tiny splash of lemon juice. Sometimes, I’ll add a drop of pink food coloring if I want them to look extra festive, but it’s totally optional.
Step-by-Step Instructions
Step 1: Preheat & Prep Pan
First things first, get your oven preheating to 350°F (175°C). This is a pretty standard temperature for most baked goods, and it works perfectly for these bars. Now, grab an 8×8 inch baking pan. I prefer a metal pan for even baking, but glass works too, you might just need to reduce the baking time slightly. Grease your pan really well with butter or cooking spray, and then line it with parchment paper, leaving an overhang on two sides. This overhang is your best friend for easily lifting the bars out of the pan later. Trust me, you’ll thank yourself for this step!
Step 2: Mix Dry Ingredients
In a medium bowl, whisk together your all-purpose flour, granulated sugar, and salt. Give it a good whisk so everything is nicely combined. This ensures that the sugar and salt are evenly distributed throughout the shortbread dough, preventing any salty or overly sweet spots. I like to give it a good vigorous whisk for about 30 seconds – it’s a small step but it really makes a difference in the final texture.
Step 3: Mix Wet Ingredients
In a separate large bowl, cream together your softened unsalted butter and the granulated sugar until it’s light and fluffy. This usually takes about 3-5 minutes with an electric mixer. You want it to be pale yellow and airy. Then, beat in the egg and the vanilla extract until just combined. Make sure you scrape down the sides of the bowl occasionally to ensure everything is incorporated. The butter needs to be soft enough to cream properly but not so soft that it’s melted and greasy.
Step 4: Combine
Now, gradually add the dry ingredients to the wet ingredients. Mix on low speed (or by hand with a spatula) until just combined. The dough will be crumbly and soft, almost like wet sand. It’s important *not* to overmix here! Overmixing develops the gluten in the flour, which can lead to tough shortbread. We want tender, crumbly goodness, so stop as soon as you don’t see any dry flour streaks. It should hold together when you pinch it.
Step 5: Prepare Filling
While the dough is chilling (or if you’re making it all at once), let’s get the raspberry filling ready. In a small saucepan, combine the raspberries (fresh or frozen), sugar, cornstarch, and lemon juice. Cook over medium heat, stirring constantly, until the mixture thickens and the raspberries start to break down. This usually takes about 5-8 minutes. You’re looking for a jam-like consistency. It will thicken more as it cools. If using frozen raspberries, they’ll release more liquid, so you might need to cook it a minute or two longer. Let it cool slightly while you assemble the base.
Step 6: Layer & Swirl
Take about two-thirds of your shortbread dough and press it evenly into the bottom of your prepared baking pan. Use your fingers or the bottom of a glass to get a nice, even layer. Don’t worry if it’s not perfectly smooth. Now, spoon the slightly cooled raspberry filling over the pressed shortbread base, spreading it out to cover the entire surface, leaving a small border around the edges. Take the remaining one-third of the dough and crumble it over the raspberry layer. You can use your fingers to create small crumbles, or you can even grate it over the top if you want a more even topping. I love the rustic, craggy look of hand-crumbled dough.
Step 7: Bake
Pop the pan into your preheated oven. Bake for 30-40 minutes, or until the edges are golden brown and the topping is lightly golden. The center might still look a little soft, but it will set up as it cools. Keep an eye on it in the last 10 minutes – ovens can vary! If the edges are browning too quickly, you can always loosely tent the pan with foil. The smell that will waft from your oven at this point is simply divine, a beautiful mix of buttery shortbread and sweet raspberries.
Step 8: Cool & Glaze
Once baked, remove the pan from the oven and let it cool completely in the pan on a wire rack. This is *so* important. If you try to cut them while they’re warm, they’ll just fall apart. Patience, my friends! Once completely cooled, prepare the glaze. In a small bowl, whisk together the sifted powdered sugar, vanilla, and 1 tablespoon of milk. Add more milk, a teaspoon at a time, until you reach your desired drizzling consistency. Drizzle the glaze over the cooled bars. Let the glaze set for about 15-20 minutes before slicing. This part is optional but adds a lovely finishing touch.
Step 9: Slice & Serve
Once the glaze has set, use the parchment paper overhangs to lift the entire block out of the pan. Place it on a cutting board and use a sharp knife to slice it into bars. I usually cut mine into 9 or 12 squares. Clean your knife between cuts for the cleanest slices. These are best served at room temperature, but I’ve also enjoyed them slightly warm. They’re just perfect!
What to Serve It With
These raspberry shortbread bars are incredibly versatile and can be enjoyed in so many ways! For a lovely BREAKFAST treat, they’re simply divine with a strong cup of coffee. I like to serve them with a few extra fresh raspberries on the side for a pop of color and freshness. The buttery shortbread is so satisfying to start the day with. For BRUNCH, they really shine. Arrange them on a tiered stand with other pastries and fruit for an elegant presentation. A mimosa or a sparkling rosé pairs beautifully. They feel just a little bit fancy, don’t you think? As a DESSERT, they are a winner. Serve them warm with a scoop of vanilla bean ice cream or a dollop of freshly whipped cream. The contrast of warm bar, cold ice cream, and tart raspberries is pure bliss. They also look stunning on a dessert platter with other small treats. And for those COZY SNACKS, which is honestly my favorite time to enjoy them, just a bar with a cup of tea is perfection. They are so comforting and satisfying. My kids love them after school with a glass of milk – they disappear in minutes!
Top Tips for Perfecting Your Raspberry Shortbread Bars
Over the years, I’ve picked up a few tricks that make these bars even better. For the ZUCCHINI PREP (oops, I mean raspberry!), if you’re using fresh raspberries, give them a gentle rinse and pat them dry. If they’re very ripe, you might get a slightly looser filling, which isn’t a bad thing! If using frozen, don’t thaw them completely – a quick rinse is all they need before going into the pan with the other filling ingredients. This helps prevent a watery filling. When it comes to MIXING ADVICE, I cannot stress enough the importance of not overmixing the shortbread dough. Seriously, stop as soon as you don’t see dry flour. Overmixing is the enemy of tender shortbread, leading to a tough, dry texture. You want that crumbly, melt-in-your-mouth quality. For SWIRL CUSTOMIZATION, while these are bars, not a true swirl, you can play with the raspberry filling. If you want more distinct pockets of raspberry, dollop the filling on top of the base layer and gently swirl it with a toothpick. Don’t overdo the swirling, though, or you’ll muddy the flavors and textures. For INGREDIENT SWAPS, if you’re out of raspberries, any berry will work! Blueberries, blackberries, or even a mix of berries create a fantastic filling. You can also swap the lemon juice for a bit of orange juice for a different citrus note. For BAKING TIPS, keep an eye on your oven. Mine tends to run a little hot, so I often pull these out a few minutes earlier than the recipe suggests. You’re looking for that beautiful golden-brown edge and a slightly set center. If the topping starts to brown too quickly, you can loosely tent the pan with foil. For GLAZE VARIATIONS, if you don’t want a sweet glaze, you can skip it entirely. Or, for a more rustic look, simply dust the cooled bars with powdered sugar. A lemon glaze is also divine, just swap the milk for lemon juice in the glaze recipe. Experimentation is key!
Storing and Reheating Tips
These raspberry shortbread bars are delicious eaten fresh, but they also store beautifully, which makes them perfect for making ahead. At ROOM TEMPERATURE, they’ll stay fresh in an airtight container for up to 3 days. Just make sure they’ve completely cooled before sealing them up, or condensation can make them a bit soggy. I usually place a piece of parchment paper between layers if I’m stacking them. For REFRIGERATOR STORAGE, if you’ve glazed them and want them to last a bit longer, or if your kitchen is particularly warm, pop them in the fridge. They’ll keep well for about 5 days. They’re quite good cold, but I actually prefer them at room temperature, so I usually take them out of the fridge about 30 minutes before serving. FREEZER INSTRUCTIONS are also a go! If you want to freeze these, it’s best to do it *before* glazing. Wrap the cooled, unglazed bars tightly in plastic wrap, then in a layer of aluminum foil, or place them in a freezer-safe container. They’ll keep for up to 2-3 months. Thaw them overnight in the refrigerator, then bring them to room temperature before glazing and serving. My advice on GLAZE TIMING is this: if you’re planning to store them for more than a day or two, or if you’re freezing them, skip the glaze until just before you plan to serve them. Glaze makes them a little more susceptible to sogginess over time, so it’s best applied fresh.
Frequently Asked Questions
Final Thoughts
I really hope you give these raspberry shortbread bars a try. They’re more than just a recipe to me; they’re a little piece of happiness that I love to share. The way the buttery shortbread melts in your mouth, perfectly complemented by the bright, slightly tart raspberries, is just sublime. They’re so simple to make, yet they taste like they came from a fancy bakery. They are proof that you don’t need complicated techniques or rare ingredients to create something truly special. If you’re looking for a treat that’s a little bit rustic, a little bit elegant, and a whole lot delicious, these bars are it. They’re the kind of dessert that makes people ask, “Who made this?” and feel a genuine sense of accomplishment when you say, “I did!” For those of you who loved these bars, you might also enjoy my Lemon Blueberry Scones or my Classic Chocolate Chip Cookies – they have that same comforting, homemade feel. Thank you for letting me share this little treasure with you. I can’t wait to hear how yours turn out, so please leave a comment below and tell me all about it! Happy baking!
Raspberry Shortbread Bars
Ingredients
Main Ingredients
- 1 cup unsalted butter softened
- 0.5 cup granulated sugar
- 1 teaspoon vanilla extract
- 1 cup raspberry preserves
- 2.5 cup all-purpose flour
- 0.25 cup powdered sugar for garnish
Instructions
Preparation Steps
- Preheat oven to 350 degrees F. Line a 13x9 baking dish with parchment paper. Set aside.
- In a large mixing bowl, combine butter, granulated sugar, and vanilla extract. Blend together until fully combined.
- Add in flour and mix until butter is incorporated. Mixture will be crumbly. You should be able to pinch the cookie dough and it sticks together.
- Pour half the crumbs into the bottom of your baking dish. Press firmly with the palm or your hand or bottom of a measuring cup until firmly pressed into the dish.
- Spread raspberry preserves, gently, over the bottom layer of cookie.
- Sprinkle remaining crumbs on top of raspberry preserves. Do not press!
- Bake for 31-33 minutes until lightly browned. Remove from oven and cool completely.
- For best results in cutting, refrigerate after cooling for up to an hour. Cut into slices and sprinkle generously with powdered sugar.
- Store in air tight container in refrigerator or at room temperature.