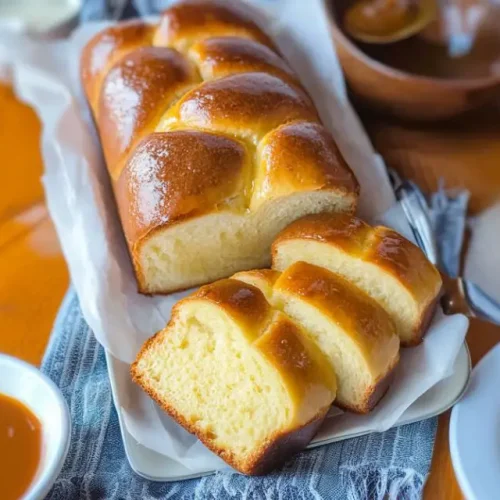
Oh, this brioche loaf. It’s one of those recipes that just feels like a warm hug. I remember the first time I tried making it; I was aiming for something special for a family gathering, and honestly, I was a bit intimidated. Brioche always seemed so fancy, so beyond my reach. But this recipe? It changed everything. It’s got that incredible, buttery richness that just melts in your mouth, but the process is so wonderfully straightforward. It’s not about being a master baker, it’s about patience and a little bit of love. If you’ve ever dreamed of a perfectly golden, impossibly soft brioche loaf that smells like heaven as it bakes, you are in the right place. This is better than any bakery version I’ve ever had, and the joy of pulling it out of the oven yourself? Priceless.
What is Brioche Loaf?
So, what exactly is this magical thing we call a brioche loaf? Think of it as the Rolls-Royce of yeasted breads. It’s a rich bread, meaning it’s packed with butter and eggs, which gives it that signature tender crumb and a slightly sweet, custardy flavor. Unlike a standard white bread, brioche has a higher fat content, which makes it incredibly soft and adds a beautiful golden hue. The name “brioche” itself is French, and while there are variations, at its heart, it’s about that luxurious dough that’s almost cake-like. It’s not just bread; it’s an experience. It’s the kind of thing you can dress up or down, but no matter how you serve it, it feels undeniably special.
Why you’ll love this recipe?
There are so many reasons why this brioche loaf has become a staple in my kitchen, and I just know you’re going to fall in love with it too. First off, let’s talk about that flavor. It’s this perfect balance of rich, buttery goodness with a subtle sweetness that’s just divine. It’s not overly sweet, mind you, but just enough to make you want to keep sneaking a slice. Then there’s the texture – oh, the texture! It’s unbelievably soft and airy, with a delicate crumb that’s tender to the touch. My kids go absolutely bonkers for it, and honestly, who can blame them? Beyond the taste and texture, I love how surprisingly simple it is to make. I know yeast can seem a little daunting to some, but this recipe breaks it down in a way that makes it totally manageable. You don’t need any fancy equipment, just a little bit of patience and a willingness to let the dough do its thing. And let’s not forget how budget-friendly it is compared to buying a loaf from a good bakery! You get this gourmet-level bread for a fraction of the cost. Plus, it’s so versatile. Whether you’re having it for a special breakfast, a decadent dessert, or even just a cozy snack, it always hits the spot. What I love most about this particular brioche loaf recipe is that it’s so forgiving. I’ve even messed up a step or two (don’t tell anyone!) and it still turned out beautifully. It’s a real lifesaver when you want something impressive without all the fuss.
How do I make Brioche Loaf?
Quick Overview
The beauty of this brioche loaf lies in its elegant simplicity. You’ll essentially create a rich dough, let it rise to its full, glorious potential, shape it, let it rise again, and then bake it until it’s a perfect golden brown. The key is allowing ample time for the dough to develop its flavor and texture through its rises. Don’t rush this part – it’s where the magic happens! The result is a loaf that’s incredibly soft, buttery, and simply irresistible.
Ingredients
For the Main Dough:
All-purpose flour: Around 3.5 cups, plus more for dusting. I always opt for a good quality all-purpose flour; it makes a noticeable difference in the final texture.
Active dry yeast: 2 and 1/4 teaspoons. Make sure your yeast is fresh! I always check the expiration date. If it’s been in the pantry for ages, it’s worth getting a new packet.
Granulated sugar: 1/4 cup. This feeds the yeast and adds a touch of sweetness.
Salt: 1 teaspoon. Essential for flavor and controlling the yeast.
Unsalted butter, softened: 1/2 cup (1 stick). This is where the richness comes from! Make sure it’s truly softened, not melted. It should yield to gentle pressure from your finger.
Large eggs: 3, at room temperature. Room temperature eggs incorporate much better into the dough.
Whole milk, lukewarm: 1/2 cup. Lukewarm is key – too hot will kill the yeast, too cold won’t activate it properly. Think bathwater temperature.
For the Optional Egg Wash:
1 large egg, beaten with 1 tablespoon of water. This is what gives the loaf that gorgeous, glossy sheen. Totally worth the extra minute!
Step-by-Step Instructions
Step 1: Activate the Yeast
In a small bowl, combine the lukewarm milk with the granulated sugar and the active dry yeast. Give it a gentle stir. Let it sit for about 5-10 minutes. You’re looking for it to get foamy and bubbly on top. If it doesn’t foam, your yeast might be dead, and you’ll need to start again with new yeast. Trust me, this foamy step is crucial!
Step 2: Mix Dry Ingredients
In a large mixing bowl (or the bowl of your stand mixer fitted with the dough hook), whisk together the flour and salt. Make sure they are well combined. This ensures the salt is evenly distributed and doesn’t interfere too much with the yeast at this stage.
Step 3: Combine Wet Ingredients
In a separate medium bowl, whisk the 3 large eggs until they are well beaten. Then, gradually whisk in the softened butter until it’s mostly incorporated. It might look a bit clumpy at first, and that’s okay. Add the activated yeast mixture to the egg and butter mixture. Whisk until everything is combined.
Step 4: Combine Dough Elements
Pour the wet ingredients into the bowl with the dry ingredients. Mix on low speed (or with a sturdy spoon if mixing by hand) until a shaggy dough forms. It will look a bit messy and sticky, and that’s perfectly normal at this stage. Don’t be tempted to add too much extra flour!
Step 5: Knead the Dough
Now comes the kneading! If you’re using a stand mixer, increase the speed to medium-low and let it knead for about 8-10 minutes. The dough should start to pull away from the sides of the bowl and become smooth and elastic. If you’re kneading by hand on a lightly floured surface, it will take about 10-15 minutes of consistent pushing, folding, and turning. The dough will be very soft and slightly sticky – that’s the hallmark of a good brioche! You want to achieve that windowpane effect: gently stretch a small piece of dough; if you can stretch it thin enough to see light through it without it tearing, it’s ready.
Step 6: First Rise (Bulk Fermentation)
Lightly grease a clean bowl with a little oil or butter. Place the kneaded dough in the bowl, turning it once to coat the entire surface. Cover the bowl tightly with plastic wrap or a damp kitchen towel. Let it rise in a warm place for 1.5 to 2 hours, or until it has doubled in size. I usually pop mine in a slightly warmed (then turned off) oven. The warmth helps it rise beautifully.
Step 7: Shape the Loaf
Gently punch down the risen dough to release the air. Turn it out onto a lightly floured surface. You can shape it into a traditional loaf by forming it into a log and placing it in a greased 9×5 inch loaf pan. Or, for a more decorative look, you can divide the dough into equal portions (usually 3 or 4), roll them into ropes, and braid them before placing them in the pan. Ensure the seams are tucked underneath.
Step 8: Second Rise (Proofing)
Cover the shaped loaf loosely with plastic wrap or a clean kitchen towel and let it rise again in a warm place for another 45-60 minutes, or until it has nearly doubled in size and looks puffy. Don’t let it over-proof, or it might collapse in the oven.
Step 9: Bake the Brioche
Preheat your oven to 375°F (190°C). If you’re using an egg wash, gently brush it over the top of the risen loaf. Bake for 30-40 minutes, or until the top is a deep golden brown and the internal temperature reaches around 190-200°F (88-93°C) on an instant-read thermometer. If the top starts browning too quickly, you can loosely tent it with aluminum foil.
Step 10: Cool and Enjoy!
Once baked, immediately remove the brioche loaf from the pan and place it on a wire rack to cool completely. This step is crucial to prevent a soggy bottom. Resist the urge to slice into it while it’s still warm – it’s hard, I know! Allowing it to cool completely lets the crumb set properly, ensuring you get those perfect, soft slices.
What to Serve It With
This brioche loaf is so incredibly versatile, it’s practically a culinary chameleon! Seriously, it makes everything feel a little bit more special.
For Breakfast: This is where it truly shines! Serve it toasted with a generous smear of good quality butter. A dollop of your favorite jam or preserves is divine, especially a raspberry or apricot. Or, try it with a drizzle of honey. It’s also amazing alongside a cup of freshly brewed coffee or a glass of warm milk. For a bit more indulgence, a slice alongside some scrambled eggs and crispy bacon makes for a truly memorable weekend brunch.
For Brunch: Elevate your brunch spread with French Toast made from thick slices of this brioche. It soaks up the custard beautifully and bakes up incredibly golden and tender. Or, use it for mini sandwiches with cream cheese and smoked salmon – the richness of the bread balances the savory salmon perfectly. A light dusting of powdered sugar can make it look extra elegant for guests.
As Dessert: This is my secret weapon for a quick, elegant dessert. Warm up a slice and serve it with a scoop of vanilla bean ice cream. A simple berry compote spooned over the top is also heavenly. For something a bit more refined, you can make a bread pudding using leftover brioche – it’s ridiculously decadent and always a hit.
For Cozy Snacks: Honestly, sometimes I just grab a slice on its own. It’s satisfying enough with its rich flavor and soft texture. For a more substantial snack, a thin layer of Nutella or even a smear of Peanut Butter works wonders. It’s the perfect thing to have with a cup of tea in the afternoon when you need a little pick-me-up.
Top Tips for Perfecting Your Brioche Loaf
I’ve been making this brioche loaf for years, and along the way, I’ve picked up a few tricks that I think really make a difference. These little tweaks have helped me avoid common pitfalls and consistently get a beautiful, delicious result.
Yeast Activation is Key: Don’t skip the foamy stage! If your yeast doesn’t get bubbly, your bread won’t rise properly. I learned this the hard way many times. Always check the expiry date on your yeast and use lukewarm liquid – not hot, not cold. It’s the foundation of a good rise.
Don’t Overwork the Dough (But Do Knead Enough!): This is a delicate balance. You need to knead enough to develop the gluten for that lovely elastic texture, but overworking it can make the bread tough. For a stand mixer, 8-10 minutes is usually perfect. For hand-kneading, aim for smooth and elastic, about 10-15 minutes. The windowpane test is your best friend here – stretch a small piece; if it’s thin enough to see through without tearing, you’re golden.
Softened, Not Melted Butter: This is so important for the texture. When you add the softened butter during the kneading stage, it gradually gets incorporated, creating those lovely layers of richness. If the butter is melted, it can make the dough greasy and heavy, rather than light and airy.
Patience with the Rises: The two rises are non-negotiable. The first rise (bulk fermentation) develops flavor, and the second rise (proofing) gives the loaf its final structure and airy quality. Don’t be tempted to rush them, especially in a cold kitchen. Find a warm spot – near a sunny window, on top of the fridge, or in a slightly warmed (then turned-off) oven. It’s worth the wait, I promise!
Grease Your Pan Well: Brioche dough is rich, and it can stick. Make sure your loaf pan is thoroughly greased with butter or baking spray. This ensures your beautiful loaf slides out cleanly after baking, preventing any heartbreaking tears.
Egg Wash for That Golden Glow: While completely optional, the egg wash (egg beaten with a tablespoon of water or milk) really takes the visual appeal to the next level. Brush it on gently just before baking for a glossy, bakery-quality finish. Don’t brush it on too early, or it might bake too hard.
Listen to Your Oven: Every oven is a little different. The baking time is a guideline. Use a thermometer if you have one to check the internal temperature (190-200°F or 88-93°C). If the top is browning too quickly before the inside is cooked, just loosely tent it with foil. I’ve learned to keep a close eye on mine, especially in the last 10-15 minutes of baking.
Cooling is Crucial: Don’t cut into it immediately! The steam trapped inside needs to escape, and the crumb needs to set. Letting it cool completely on a wire rack is essential for the best texture. It’s the hardest part, but so worth it for those perfect, clean slices.
Storing and Reheating Tips
This brioche loaf is best enjoyed fresh, but it’s surprisingly forgiving when it comes to storage. I’ve tested a few methods, and these are the ones that work best to keep it delicious for as long as possible.
Room Temperature Storage: Once completely cooled, you can store your brioche loaf at room temperature for about 2-3 days. The best way to do this is to wrap it tightly in plastic wrap, then place it in an airtight container or a bread bag. This helps prevent it from drying out. If you’re only storing it for a day, just wrapping it well is usually enough.
Refrigerator Storage: If you need to store it for longer than 3 days, or if you live in a very warm climate, the refrigerator is your best bet. Wrap it very securely in plastic wrap, then place it in an airtight container. It should keep well in the fridge for up to a week. Just be aware that refrigeration can sometimes slightly alter the texture, making it a bit firmer.
Freezer Instructions: For longer storage, freezing is ideal. Once the loaf is completely cooled, wrap it tightly in a double layer of plastic wrap, ensuring there are no air pockets. Then, wrap it again in aluminum foil or place it in a freezer-safe bag. It will keep beautifully in the freezer for up to 2-3 months. Thaw it overnight at room temperature, still wrapped, or unwrap and gently reheat in a low oven.
Reheating Tips: To refresh a slice that’s a day or two old, I love to toast it! A few minutes in the toaster or under the broiler gives it that wonderful crispy exterior and soft interior again. If you’re reheating a whole loaf or larger pieces, especially from the fridge or freezer, a quick stint in a moderate oven (around 300°F or 150°C) for 5-10 minutes can work wonders to bring back its softness. For frozen loaves, thaw completely before reheating.
Glaze Timing Advice: If you’ve added a glaze, it’s usually best to add it just before serving. For room temperature storage, it’s often best to store the loaf *without* the glaze and add it fresh. If you do glaze it and store at room temperature, the glaze might become sticky or absorb moisture. For refrigerator or freezer storage, definitely store the loaf plain and glaze it after thawing and reheating, right before you’re ready to enjoy it.
Frequently Asked Questions
Final Thoughts
There you have it – my tried-and-true recipe for a brioche loaf that’s truly something special. It’s more than just a recipe; it’s an invitation to slow down, enjoy the process, and create something truly delicious for yourself and your loved ones. The aroma that fills your kitchen as it bakes is just incredible, and that first bite? Pure bliss. It’s that perfect combination of rich, buttery flavor and an unbelievably tender crumb that makes it stand out. If you’re someone who loves a good bake but wants a recipe that feels achievable and incredibly rewarding, this is it. I really hope you give this brioche loaf a try. It’s a labor of love, but honestly, the results are so worth every moment. Once you’ve mastered this, you might also enjoy exploring other enriched doughs, like challah or cinnamon rolls. Happy baking, and I can’t wait to hear how your beautiful brioche loaf turns out!
Classic Brioche Loaf
Ingredients
Dough Ingredients
- 4.5 cups all-purpose flour
- 0.25 cup granulated sugar
- 1.5 teaspoons salt
- 2.25 teaspoons instant yeast
- 4 large eggs at room temperature
- 0.5 cup unsalted butter softened
Egg Wash
- 1 large egg beaten
- 1 tablespoon water
Instructions
Preparation Steps
- In the bowl of a stand mixer fitted with the dough hook, combine the flour, sugar, salt, and yeast. Mix on low speed for about 30 seconds until just combined.
- In a separate bowl, whisk together the 4 large eggs. With the mixer on low speed, gradually add the whisked eggs to the dry ingredients. Mix until a shaggy dough forms.
- Increase the mixer speed to medium-low and knead for about 8-10 minutes, or until the dough is smooth and elastic. It will be a bit sticky.
- With the mixer running on low speed, gradually add the softened butter, one tablespoon at a time, allowing each piece to incorporate before adding the next. Continue to mix until all the butter is incorporated and the dough is smooth and pulls away from the sides of the bowl.
- Transfer the dough to a lightly oiled bowl, cover with plastic wrap, and let it rise in a warm place for 1-1.5 hours, or until doubled in size.
- Punch down the dough and turn it out onto a lightly floured surface. Shape the dough into a loaf and place it in a greased 9x5 inch loaf pan. Cover loosely with plastic wrap and let it rise again for about 45-60 minutes, or until it has almost doubled in size.
- Preheat your oven to 375°F (190°C). In a small bowl, whisk together the beaten egg and water for the egg wash.
- Gently brush the top of the risen dough with the egg wash.
- Bake for 30-35 minutes, or until the crust is golden brown and the internal temperature of the loaf reaches 190°F (88°C). If the top starts to brown too quickly, loosely tent it with foil.
- Let the brioche cool in the pan for 10 minutes before removing it to a wire rack to cool completely.