There are some recipes that just feel like coming home, aren’t there? This one is absolutely one of those for me. It’s not fancy, it’s not complicated, but oh my goodness, the smell that fills my kitchen when I bake these homemade brownies is pure magic. My earliest memories of baking involve my grandma, her apron perpetually dusted with flour, and the glorious scent of chocolate wafting from her oven. This recipe is my adaptation of hers, tweaked over the years to be just perfect. When I’m craving something deeply chocolatey, a little fudgy, and with that perfect crackly top, this is my go-to. Honestly, these homemade brownies are so good, they make a bad day instantly better, and a good day even more celebratory. They’re the kind of treat that makes people ask, “What’s your secret?” and I always just smile because some secrets are too good not to share, especially with friends.
What are some of the best home made brownies?
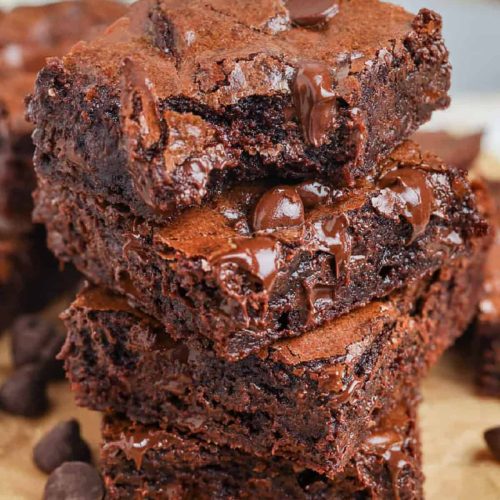
So, what exactly are these homemade brownies we’re talking about? Think of them as the ultimate comfort food in bar form. They’re dense, incredibly moist, and packed with rich chocolate flavor. Unlike some lighter, cakey brownies, these are on the fudgier side, with a delightful chewiness that makes each bite feel like a little indulgence. The name “homemade brownies” really says it all, doesn’t it? It’s the antithesis of anything from a box. This recipe is all about letting real ingredients shine, creating something truly special from scratch. It’s that perfect balance of sweet, rich, and utterly satisfying. They’re not overly complicated, which is a huge plus in my book, and the result is always a pan of pure happiness. They’re the kind of treat that reminds you of simpler times and the joy of making something delicious with your own two hands.
Why you’ll love this recipe?
Okay, let me tell you why this particular homemade brownies recipe has earned a permanent spot in my recipe binder, and I suspect it will in yours too. First and foremost, the flavor. It’s an intense, deep chocolate that isn’t too sweet. It’s just right. The texture is a dream – fudgy in the middle with those irresistible slightly crisp edges and that beautiful crackly top that just screams “eat me!” What I truly adore is how surprisingly simple they are to whip up. Seriously, on a busy weeknight when a chocolate craving hits hard, I can have these in the oven in under 15 minutes. And the ingredients? All pantry staples! No fancy, hard-to-find items here, which makes them incredibly cost-efficient. Plus, they’re so versatile. Whether you’re looking for an afternoon pick-me-up, a dessert for a dinner party, or even a sweet treat for the kids’ lunchboxes, these homemade brownies fit the bill perfectly. I’ve tried other brownie recipes, and some are too cakey, some are too bland, but this one? This one hits every single note. It’s the perfect balance, and I think that’s why it’s become my absolute favorite.
How do I make homemade brownies?
Quick Overview
Making these homemade brownies is a straightforward process that guarantees fantastic results. You’ll start by melting your chocolate and butter, then whisking in sugar and eggs to create a glossy base. Next, you’ll gently fold in your dry ingredients, being careful not to overmix. A quick spread into a prepared pan, a bake until just done, and then a patient cool-down before slicing. It’s really that simple. The key is in the gentle handling of the batter and knowing when they’re perfectly baked. Trust me, the aroma alone will have you counting down the minutes!
Ingredients
For the Main Batter:
1 cup (2 sticks) unsalted butter, melted – good quality butter makes a difference here, I find!
1 ¾ cups granulated sugar – for that classic sweetness and crackly top.
3 large eggs, at room temperature – this helps them emulsify nicely.
1 teaspoon vanilla extract – don’t skimp on this, it enhances the chocolate flavor.
1 cup all-purpose flour – just enough to give structure.
⅔ cup unsweetened cocoa powder – I prefer Dutch-processed for a richer, darker color and flavor.
½ teaspoon baking powder – just a tiny bit for lift.
½ teaspoon salt – essential for balancing the sweetness.
For the Filling:
½ cup semi-sweet chocolate chips – for extra gooey pockets of chocolate.
For the Glaze:
1 cup powdered sugar, sifted – to avoid lumps.
2-3 tablespoons milk or heavy cream – for a smooth, pourable consistency.
½ teaspoon vanilla extract – for a hint of warmth.
Step-by-Step Instructions
Step 1: Preheat & Prep Pan
First things first, preheat your oven to 350°F (175°C). Now, grab an 8×8 inch baking pan. I like to line mine with parchment paper, leaving a little overhang on the sides. This makes lifting the baked brownies out a breeze and cleanup so much easier. Lightly grease the pan before lining it, just to be sure nothing sticks. This simple step ensures your beautiful homemade brownies come out in one perfect piece.
Step 2: Mix Dry Ingredients
In a medium bowl, whisk together the flour, cocoa powder, baking powder, and salt. Whisking them together thoroughly before adding them to the wet ingredients ensures everything is evenly distributed, which means no pockets of flour or bitter cocoa. This is a small step, but it’s one of those little things that makes a big difference in the final texture of your homemade brownies.
Step 3: Mix Wet Ingredients
In a large bowl, pour in your melted butter. Add the granulated sugar and whisk them together until well combined. It will look like coarse sand, and that’s perfectly fine. Then, add your eggs one at a time, whisking well after each addition. Finally, stir in the vanilla extract. You want this mixture to be glossy and smooth. If your butter has cooled a bit too much, it’s not the end of the world, but a slightly warm mixture helps everything incorporate beautifully.
Step 4: Combine
Now, it’s time to bring it all together. Gradually add the dry ingredients to the wet ingredients. Use a spatula or wooden spoon to gently fold them together until *just* combined. It’s super important not to overmix here. A few streaks of flour are okay; they’ll disappear as it bakes. Overmixing develops the gluten in the flour, which can lead to tougher homemade brownies, and nobody wants that! We’re going for fudgy and tender.
Step 5: Prepare Filling
While your batter is almost ready, take your semi-sweet chocolate chips. These are optional but highly recommended for those extra gooey chocolate pockets. I like to have them ready to go right before they hit the pan.
Step 6: Layer & Swirl
Pour about two-thirds of the brownie batter into your prepared pan and spread it out evenly. Sprinkle the chocolate chips evenly over the top of this layer. Then, dollop the remaining one-third of the batter over the chocolate chips. Use your spatula to gently spread this top layer, trying to cover most of the chips. You can even drag a knife or skewer through the batter in a swirling motion for a beautiful marbled effect. This makes them look extra special!
Step 7: Bake
Pop the pan into your preheated oven. Bake for 25-30 minutes. The edges should look set, and a toothpick inserted into the center should come out with moist crumbs attached, not wet batter. If it comes out perfectly clean, they might be slightly overbaked for my fudgy preference, but still delicious! Ovens vary, so keep an eye on them, especially during the last few minutes. This is key to achieving that perfect fudgy texture in your homemade brownies.
Step 8: Cool & Glaze
This is perhaps the hardest part – waiting! Let the brownies cool in the pan on a wire rack for at least 1 hour, preferably 2. This allows them to set up properly. While they’re cooling, whisk together the sifted powdered sugar, vanilla extract, and 2 tablespoons of milk or cream. Add more liquid, a teaspoon at a time, until you reach a smooth, pourable consistency. Drizzle this glaze over the cooled brownies, spreading it gently with your spatula. Let the glaze set for about 15-20 minutes before slicing. For a thinner glaze, use a little more liquid; for a thicker one, use less.
Step 9: Slice & Serve
Once the glaze has set, use the parchment paper overhang to lift the whole slab out of the pan onto a cutting board. Now for the moment of truth! Use a sharp knife to slice them into squares. For cleaner cuts, you can wipe the knife with a damp cloth between slices. Serve them at room temperature for the best fudgy texture. Enjoy every single bite of your amazing homemade brownies!
What to Serve It With
These homemade brownies are practically a meal in themselves, but they also play wonderfully with others! For a casual morning treat or a slightly decadent breakfast (because why not?), a strong cup of coffee or a steaming mug of hot chocolate is the perfect pairing. I sometimes sprinkle a few extra chocolate chips on top before baking for a truly indulgent start to the day. For brunch, I love to present them as part of a dessert platter. They look stunning alongside fresh berries like raspberries or strawberries, which add a lovely tartness to cut through the richness. A dollop of lightly sweetened whipped cream or a scoop of vanilla bean ice cream also takes them to another level. And as a proper dessert? They are sublime on their own, perhaps with a tiny dusting of cocoa powder or a few shavings of dark chocolate. On cozy snack nights, I often serve them slightly warmed, with a tall glass of cold milk – it’s a classic for a reason! My kids always beg for them after school, and a single brownie with a glass of milk is their absolute favorite treat.
Top Tips for Perfecting Your Homemade Brownies
After making batches of these homemade brownies more times than I can count, I’ve picked up a few tricks that I think are worth sharing. First, about the chocolate: I always use good quality unsweetened cocoa powder, and Dutch-processed really does give a deeper, smoother flavor. It’s worth the slight extra cost, I promise! When you’re mixing the wet and dry ingredients, it’s really crucial to *not* overmix. I mean it! Stop as soon as you don’t see any dry flour streaks. Overmixing is the enemy of tender, fudgy brownies. I learned that lesson the hard way early on, and they came out a bit tough. For that beautiful swirl on top, don’t go overboard; just a few gentle passes with a knife or skewer will do. You want pockets of flavor and texture, not a muddy mess. If you’re not a fan of the glaze, or just want something different, try a dusting of powdered sugar, a sprinkle of flaky sea salt on top just before baking for a sweet-and-salty kick, or even a light drizzle of melted White Chocolate for contrast. When it comes to baking, trust your oven and use the toothpick test. A few moist crumbs are perfect; if it comes out clean, you’ve probably gone a minute or two too long for that ultimate fudgy texture. And patience during the cooling phase is key! They need to set properly, otherwise, they’ll fall apart when you try to cut them. Trust me on this one; it’s tough but it’s worth it!
Storing and Reheating Tips
These homemade brownies are so good, you might actually have leftovers (though I wouldn’t bet on it!). If you do, storing them properly is key to maintaining that delicious texture. At room temperature, they’re best kept in an airtight container and will stay wonderfully moist for about 2-3 days. If you live in a warm climate or just want them to last a bit longer, the refrigerator is your friend. Pop them in an airtight container, and they should be good for up to a week. They’ll be firmer when cold, so I often let them sit out on the counter for about 15-20 minutes before serving if they’ve been refrigerated. For longer storage, freezing is fantastic. Wrap individual brownies tightly in plastic wrap, then place them in a freezer-safe bag or container. They can last for up to 2-3 months this way. To reheat, you can gently warm them in the microwave for about 10-15 seconds per brownie, or if you have a larger batch, a low oven for a few minutes can work too. I usually add the glaze after they’ve cooled completely if I plan to store them for more than a day at room temperature, as moisture can sometimes make the glaze a bit sticky over time. For refrigerated or frozen, the glaze usually holds up beautifully.
Frequently Asked Questions
Final Thoughts
So there you have it – my absolute favorite recipe for homemade brownies. I truly believe this recipe captures the heart of what a perfect brownie should be: deeply chocolatey, wonderfully fudgy, and delightfully easy to make. It’s the kind of recipe that brings a smile to everyone’s face, from the baker to the last person to snag a corner piece. If you love rich, decadent chocolate treats, then you absolutely have to give these a try. They’re perfect for a quiet afternoon with a book, a special occasion, or just because you deserve a little something sweet. If you enjoy this recipe, you might also love my recipe for chewy chocolate chip cookies or my fudgy dark chocolate cake. I can’t wait to hear how yours turn out! Please leave a comment below and let me know what you think, or share any variations you’ve tried. Happy baking!
Homemade Fudgy Brownies
Ingredients
Main Ingredients
- 0.5 cup unsalted butter melted
- 1 cup granulated sugar
- 0.5 cup brown sugar packed
- 2 large eggs
- 1 teaspoon vanilla extract
- 0.33 cup unsweetened cocoa powder
- 0.5 cup all-purpose flour
- 0.25 teaspoon salt
- 0.5 cup chocolate chips optional
Instructions
Preparation Steps
- Preheat oven to 350°F (175°C). Grease and flour an 8x8 inch baking pan.
- In a large bowl, whisk together melted butter, granulated sugar, and brown sugar until well combined.
- Beat in the eggs one at a time, then stir in the vanilla extract.
- In a separate bowl, whisk together cocoa powder, flour, and salt.
- Gradually add the dry ingredients to the wet ingredients, mixing until just combined. Do not overmix.
- If using, stir in the chocolate chips.
- Pour the batter into the prepared baking pan and spread evenly.
- Bake for 25-30 minutes, or until a toothpick inserted into the center comes out with moist crumbs attached (not wet batter).
- Let cool completely in the pan before cutting into squares.