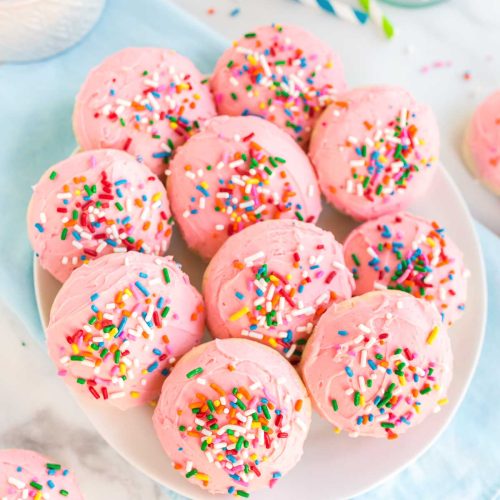
There are certain smells that just transport you back in time, aren’t there? For me, it’s the scent of warm butter and vanilla, mingling with just a hint of almond extract. That’s the smell of my grandma’s kitchen on a Saturday morning, and it’s the exact aroma that fills my house whenever I whip up a batch of these Sugar Cookies. Forget those cardboard-tasting ones you find in the store or the ones that spread into greasy puddles on your baking sheet. This recipe? This is the real deal. It’s the kind of sugar cookie that’s soft in the middle, slightly crisp on the edges, and just sweet enough to make you close your eyes and sigh with happiness. Honestly, it’s my go-to for holidays, birthdays, or just those random Tuesday nights when a little bit of sweet comfort is desperately needed. If you’ve ever felt disappointed by a sugar cookie recipe that promised the world and delivered mediocrity, then trust me, you are in for a treat. These are the sugar cookies that have become a legend in my family, and I’m so excited to share them with you!
What are Magic Sugar Cookies?
So, what exactly makes these sugar cookies so special? Think of them as the ultimate classic sugar cookie, but perfected. They’re not overly fussy, and you won’t need any fancy equipment or ingredients you can’t find at your local grocery store. They’re essentially a wonderfully simple butter cookie, infused with just the right amount of sweetness and a subtle hint of almond that elevates them beyond the ordinary. The magic lies in the texture – they hold their shape beautifully if you want to cut them into fun shapes, but they also have this delightful chewiness that makes them utterly irresistible when they’re just baked. It’s that perfect balance that often eludes other recipes. They’re not thin and brittle, nor are they cakey and soft like a drop cookie. They hit that sweet spot, and that’s why they’re my absolute favorite. These are the sugar cookies you’ll remember from childhood, the ones that taste like pure joy.
Why you’ll love this recipe?
Oh, where do I even begin with why you’ll love these sugar cookies? Let’s start with the flavor, because that’s usually the first thing people notice. They’re perfectly sweet, with that comforting buttery richness that just melts in your mouth. And that hint of almond extract? It’s my secret weapon, adding a subtle complexity that makes everyone ask, “What’s in these?” Beyond the taste, they are surprisingly simple to make. I’ve made this recipe more times than I can count, often with little helpers underfoot, and it always turns out beautifully. You don’t need to be a seasoned baker to master these; they’re incredibly forgiving. Plus, they’re so budget-friendly! The ingredients are all pantry staples, which is a lifesaver when you need a sweet treat without a big grocery bill. And the versatility? Amazing! They’re perfect for rolling out and cutting into festive shapes for holidays, or you can simply drop them on the baking sheet for a more rustic, everyday cookie. They’re also wonderful for decorating with royal icing if you’re feeling artistic, but honestly, they’re so delicious on their own, you don’t even need the fancy icing. What I love most about this recipe is the pure, unadulterated comfort it brings. It’s a hug in cookie form, and that’s something pretty special. They also hold up really well, which means they’re fantastic for bake sales or when you need to pack a lunchbox treat that won’t crumble into dust by noon.
How do I make my go-to sugar cookies?
This recipe is broken down into easy steps to ensure you get perfect sugar cookies every single time. We’ll cream the butter and sugar, add our wet ingredients, then gently incorporate the dry. The chilling step is crucial for the best texture and shape, and then it’s just a matter of baking and enjoying. It really is that straightforward!
Ingredients
For the Main Batter:
2 ½ cups all-purpose flour, plus more for dusting – I always use King Arthur’s unbleached all-purpose flour; it seems to give the best texture.
1 teaspoon baking powder – Make sure it’s fresh! Old baking powder can make your cookies flat.
½ teaspoon salt – Just a little to balance the sweetness.
1 cup (2 sticks) unsalted butter, softened – Really important that it’s softened, not melted. Take it out of the fridge about an hour before you start.
1 ½ cups granulated sugar – For that perfect sweetness and crispness.
2 large eggs – Room temperature is best for emulsifying properly.
1 teaspoon pure vanilla extract – Don’t skimp on the quality here; pure vanilla makes a huge difference.
½ teaspoon almond extract – This is my secret touch! It adds a lovely warmth.
For the Filling:
(This section is actually for a different type of cookie I might share later! For these classic sugar cookies, there’s no separate filling needed. The magic is all in the dough itself!) If you’re looking for a cookie with a filling, I’ll be sharing my amazing thumbprint cookies soon!
For the Glaze:
2 cups powdered sugar – Sifted, if you want a super smooth glaze.
2-3 tablespoons milk (or water) – Start with 2 tablespoons and add more until you get the right consistency.
½ teaspoon vanilla extract (optional) – For a little extra flavor.
Step-by-Step Instructions
Step 1: Preheat & Prep Pan
Before you do anything else, preheat your oven to 350°F (175°C). This is the perfect temperature for getting nicely golden edges without burning. Line your baking sheets with parchment paper. This is a lifesaver for easy cleanup and prevents the cookies from sticking, ensuring they lift off perfectly after baking.
Step 2: Mix Dry Ingredients
In a medium bowl, whisk together the 2 ½ cups of all-purpose flour, 1 teaspoon of baking powder, and ½ teaspoon of salt. Whisking them together ensures that the leavening agent and salt are evenly distributed throughout the flour, which means your cookies will rise evenly and have a balanced flavor. You’re looking for a light, airy mixture. Don’t overthink this step; a good whisking is all you need!
Step 3: Mix Wet Ingredients
In a large bowl, using an electric mixer (or a stand mixer with the paddle attachment), cream together the 1 cup (2 sticks) of softened unsalted butter and 1 ½ cups of granulated sugar. Beat them together for about 3-5 minutes until the mixture is light, fluffy, and pale yellow. This creaming process is crucial for incorporating air, which contributes to the cookie’s texture. Next, beat in the 2 large eggs, one at a time, making sure each egg is fully incorporated before adding the next. Stir in the 1 teaspoon of pure vanilla extract and ½ teaspoon of almond extract. The scent at this point is already divine!
Step 4: Combine
Gradually add the dry ingredients to the wet ingredients, mixing on low speed until just combined. Be careful not to overmix! Overmixing can develop the gluten in the flour too much, resulting in tough cookies. You want to mix until you no longer see streaks of dry flour. The dough will be soft and slightly sticky, which is exactly what you’re looking for at this stage.
Step 5: Prepare Filling
As I mentioned, these classic sugar cookies don’t have a separate filling. The beauty is in the simple, delicious dough itself!
Step 6: Chill the Dough
This is arguably the most important step for perfect sugar cookies, especially if you plan to cut them out. Divide the dough in half, flatten each half into a disc, wrap it tightly in plastic wrap, and refrigerate for at least 2 hours, or preferably overnight. Chilling the dough makes it firm enough to roll out easily without sticking excessively, and it prevents the cookies from spreading too much in the oven. If you’re short on time, you can freeze the discs for about 30-45 minutes. Just make sure it’s firm but not frozen solid.
Step 7: Roll and Cut
Once chilled, take one disc of dough out at a time. Lightly flour your work surface and your rolling pin. Roll the dough out to about ¼-inch thickness. This thickness is key for that perfect balance of soft interior and slightly crisp edge. If the dough gets too soft to work with, pop it back in the fridge for a few minutes. Use your favorite cookie cutters to cut out shapes. Re-roll scraps gently, trying not to overwork the dough.
Step 8: Bake
Place the cut-out cookies onto your prepared baking sheets, leaving about 1-2 inches between them. Bake for 8-12 minutes, depending on the size and thickness of your cookies. You’re looking for the edges to be lightly golden brown, and the centers to look set, not wet. They will continue to cook slightly on the hot baking sheet, so it’s better to underbake slightly than overbake. I usually check mine around 8 minutes. For thicker cookies, you might need a minute or two longer.
Step 9: Cool & Glaze
Let the cookies cool on the baking sheets for 5 minutes before carefully transferring them to a wire rack to cool completely. This is super important! If you try to move them too soon, they can break. While they’re cooling, prepare your glaze. In a small bowl, whisk together the 2 cups of sifted powdered sugar with 2 tablespoons of milk and ½ teaspoon of vanilla extract. Add more milk, ½ teaspoon at a time, until you reach your desired drizzling consistency. You want it thick enough to stick but thin enough to pour or spread easily. Once the cookies are completely cool, you can dip them, drizzle them, or spread the glaze on top. Let the glaze set completely before stacking or serving.
What to Serve It With
These sugar cookies are pretty fantastic on their own, but they also play well with others! Here are some ideas for how I love to serve them:
For Breakfast: While not a traditional breakfast food, a single cookie with a good cup of strong black coffee is pure bliss. It’s like a little sweet treat to start your day without being too heavy. I sometimes think of it as my “special occasion” breakfast cookie!
For Brunch: These are always a hit on a brunch spread. Arrange them on a platter with fresh berries and maybe some mini muffins. They add a sweet touch without being overpowering. They look especially pretty when decorated with a simple white glaze and some sprinkles.
As Dessert: Of course! They’re wonderful after dinner, especially with a scoop of vanilla bean ice cream. The warm cookie and cold ice cream is a classic combo for a reason. They’re also perfect for an afternoon tea spread or a “fancy” get-together with friends.
For Cozy Snacks: This is where they really shine for me. A warm cookie, a glass of cold milk – it’s the ultimate comfort food. My kids devour them like this after school. They’re also fantastic for a movie night snack, especially when paired with a cozy blanket and a good film. My family tradition is to bake a big batch around the holidays, and we always have a “cookie decorating station” where everyone gets to personalize their own. It’s messy, but oh-so-much fun!
Top Tips for Perfecting Your Sugar Cookies
I’ve definitely made my share of cookie mistakes over the years, so I’ve picked up a few tricks that I think will help you achieve sugar cookie perfection. These little nuggets of wisdom come from real-life baking experience!
Dough Handling: The absolute key to not having your sugar cookies spread into thin, sad puddles is chilling the dough. Seriously, don’t skip this! If you’re rolling it out and it starts to get soft and sticky, just pop it back in the fridge for 10-15 minutes. It makes all the difference in maintaining those crisp edges and defined shapes. When re-rolling scraps, try to do it quickly and get them back in the fridge so they don’t get too warm.
Mixing Advice: When you’re combining the wet and dry ingredients, I always tell people to stop mixing as soon as they don’t see any dry flour. A few tiny streaks of flour are okay; they’ll get incorporated as you knead it together on the counter or handle the dough to roll it out. Overmixing is the enemy of tender cookies, so err on the side of under-mixing.
Cutting Techniques: Use sharp cookie cutters for clean edges. If your dough is properly chilled, it should cut cleanly. If you find the cutters are dragging or sticking, give your dough a quick chill and lightly flour the cutter. For thicker cookies that are soft in the middle, aiming for about ¼-inch thickness is the sweet spot.
Ingredient Swaps: While this recipe is tested and true with the ingredients listed, I have experimented! For a dairy-free option, I’ve had success using a good quality vegan butter stick (stick margarine, not tub) and plant-based milk for the glaze. The texture is very similar, and the flavor is still delightful. For a richer flavor, some people like to use a combination of butter and shortening, but I find good old unsalted butter gives the best taste. If you’re not a fan of almond extract, you can simply double the vanilla extract, but I truly think the almond adds something special.
Baking Tips: Always bake in the center rack of your oven for the most even heat distribution. If your oven tends to run hot, you might need to reduce the temperature by about 10-15 degrees Fahrenheit or shorten the baking time. Keep an eye on them! They go from perfectly golden to slightly overdone very quickly. When in doubt, slightly underbaked is better for a softer cookie. If you want crispier edges, you can bake them for another minute or two, but watch them closely.
Glaze Variations: The glaze is super simple, but you can get creative! For a pastel color, add a tiny drop of food coloring. For a lemon sugar cookie, add a teaspoon of lemon zest to the dough and a tablespoon of lemon juice to the glaze. You can also make a simple powdered sugar dusting using a sieve for a more delicate finish, or skip the glaze altogether and just enjoy the cookie plain – they’re still incredible!
Storing and Reheating Tips
One of the best things about these sugar cookies is how well they keep! They’re perfect for making ahead, which is a lifesaver when you’re prepping for parties or holidays.
Room Temperature: Once completely cooled and any glaze has set, store the cookies in an airtight container. They will stay fresh and delicious at room temperature for about 5-7 days. I usually layer them between sheets of parchment paper to prevent the glaze from sticking if they’re decorated.
Refrigerator Storage: If you live in a very humid climate or want them to last a bit longer, you can store them in the refrigerator. Again, airtight container is key. They should keep well for up to 2 weeks this way, though they might lose a tiny bit of their crispness. I find they’re best brought back to room temperature before eating.
Freezer Instructions: These cookies freeze beautifully! You can freeze them either before baking (roll and cut them, then freeze on a baking sheet until firm, then transfer to a freezer bag) or after baking and cooling. Unfrosted cookies freeze best for longer storage, but frosted ones are fine too if the frosting is completely set. Store them in an airtight container or freezer bag for up to 3 months. To thaw, let them come to room temperature overnight in their container.
Glaze Timing Advice: If you plan to freeze your cookies, it’s best to do so without the glaze. You can add the glaze after the cookies have thawed and come to room temperature. If you are storing them at room temperature for a few days and want to glaze them, do it on the day you plan to serve them or within a day or two of storing them for the best texture. Glazed cookies will also keep well for about 5-7 days in an airtight container.
Frequently Asked Questions
Final Thoughts
There you have it – my absolute favorite sugar cookie recipe! I truly believe this recipe strikes the perfect balance: simple enough for a weeknight bake, but special enough for any celebration. It’s the recipe I turn to when I want something reliably delicious, something that smells incredible as it bakes, and something that brings smiles to everyone who tries it. The texture is just divine – that satisfying slight crispness at the edges with a wonderfully tender center. If you loved learning about these classic sugar cookies, you might also enjoy my recipe for soft gingerbread cookies or my no-bake peanut butter cookies, which are also family favorites. I can’t wait to hear how your sugar cookies turn out! Please leave a comment below and let me know what you think, or share your own tips and variations. Happy baking!
Soft Sugar Cookies
Ingredients
Cookie Dough
- 1 cup unsalted butter softened
- 1.5 cup granulated sugar
- 1 large egg
- 1 teaspoon vanilla extract
- 3 cup all-purpose flour
- 1 teaspoon baking soda
- 0.5 teaspoon salt
Instructions
Preparation Steps
- In a large bowl, cream together the softened butter and granulated sugar until light and fluffy.
- Beat in the egg and vanilla extract until well combined.
- In a separate medium bowl, whisk together the flour, baking soda, and salt.
- Gradually add the dry ingredients to the wet ingredients, mixing until just combined. Do not overmix.
- Cover the dough and chill in the refrigerator for at least 30 minutes.
- Preheat oven to 375°F (190°C). Line baking sheets with parchment paper.
- Roll dough into 1-inch balls and place them 2 inches apart on the prepared baking sheets.
- Bake for 10-12 minutes, or until the edges are lightly golden brown.
- Let the cookies cool on the baking sheets for a few minutes before transferring them to a wire rack to cool completely.